Sunday, September 30, 2018

#113: What You Don’t See In Photos Of Our Living Room

Our week of living Furniture Free is over and it went… wellllll… differently than we expected. So today we’re talking about what we liked, what we didn’t, what we screwed up, and what lasting impacts it may have on how we use our home. We also confess an annoying side effect of a feature in our home that’s pretty, but less than ideal. Plus, Sherry takes her love of all things woo-woo to another level and John breaks down an issue he has with a certain smart home technology.

You can download this episode from Apple PodcastsGoogle PodcastsStitcherTuneIn Radio, and Spotify – or listen to it below! Then use this page to check out any links, notes, or photos we referenced. Note: If you’re reading in a feed reader, you may have to click through to the post to see the player.

What’s New

  • Yup, that’s me rocking my bootleg standing desk (thanks random box!) as part of the Furniture Free Living experiment we talked about in last week’s episode.
  • I’m still undecided about if I’ll embrace the standing desk thing long term, but if I did I’d probably upgrade to this all-white, convertible standing desk.
  • I also asked Sherry if she’d like an under-desk walking treadmill, but it wouldn’t fit under her current desk and she said she prefers to walk around outside and work on her phone (she has ordered things we need for the duplex, returned emails, and even taken work calls while walking around the neighborhood).
  • We mentioned watching a few YouTube videos to better understand the Furniture Free movement, and this house tour by Katy Bowman is probably the most comprehensive. She was the one featured in the Good Housekeeping article we linked to last week and a lot of you have suggested her as a good resource for Furniture Free / Natural Movement enthusiasts.

  • Also for reference, this is the bonus room we talked about introducing some more active elements into. For instance, we have an area behind the couches that would fit a treadmill just fine if we relocated a few baskets full of dress up clothes.

  • Also, be sure to tell us on social media if you’re joining us for Aquatober or Walktober!

Updates

  • Thanks to your suggestions (interventions?) I’m happily loyalty card free on my keychain now. I’m relying entirely on entering my phone number, using Apple Wallet, or scanning things that I’ve loaded into the Key Ring app. I’m also trying an app called Pass2u to import some of my loyalty cards in cases where the retailer’s app doesn’t appear to support it.
  • And I want to add – since people are more invested in this mission than I expected – that the solo key that’s not wrangled in my leather key organizer above is over on that ring by our car fob because it’s for the beach house – so when we get there I can easily detach the whole leather thing and walk around with only my car key and that one key.
  • I’ve also ordered this “slim wallet” to see if it’ll help me pare down my wallet too. Thanks for the suggestion, Chris!

Can We Just Talk About Smart Locks?

  • The door shown above is the main place we’ve considered adding a smart lock since it’s the door we use most often (it leads into the garage). We love how the existing lockset coordinates so nicely with the rest of the polished nickel hardware throughout the kitchen, which is why we picked it out. And you can below that it’s even visible from waaaay back in our living room.

  • Now, imagine that door had one of these big, black chunks of smart lock technology slapped on it? Not to mention that we haven’t found one in polished nickel (they’re mostly satin nickel – occasionally polished chrome). Here are the links to the ones below: 1 / 2 / 3

  • They also all come in black or bronze, which helps the black plastic cover blend in – and they look best on a dark door that further hides that big black box. Meanwhile our door (and our whole kitchen, for that matter) is so light that we fear it would really stand out.

  • But here is the August brand smart lock that I’ve been researching. It does require that you purchase a hub with it that plugs in somewhere else (that’s how it gets away with being less of a giant box on the door) and you can buy a keypad too if you don’t want to rely on peope having their phone with them. And the “silver” color probably isn’t a perfect match to polished nickel, but again – at least it’s not very big. Well, it still kind of looks like a Nest thermostat stuck to the door, so I wouldn’t call it tiny…

  • And lastly, these are the Kwikset locksets we have on our front and back doors which have the SmartKey system where you can rekey your own locks so you don’t have to hire a locksmith to get all of your locks to match. We’ve had them for five years and would highly recommend them.

Front Porch With Fake Plant Evergreens

Listener Question

  • This is the covered porch area that Ang was asking about (ignore the deck – this photo is from before we tore it off). Those windows behind the outdoor sofa lead into our living room.
  • You’re probably used to seeing our kitchen and living room look something like this…

  • But last week I snapped this photo (without a long exposure to help brighten up dark shots) and it really demonstrates how much darker this side of our house can feel in the afternoon when the sun is on the front/western side of our house. Just note how bright the dining room is there on the right side! There’s not a light on in there, it’s just the sun shining in. And you can see how the kitchen isn’t super bright, but the living room is even darker thanks to that overhang.

  • The funny thing is that splash of light that you see hitting the fireplace is sunlight bouncing off of the bright white doors to our shed (see, aren’t sheds the best!?). But long story short, the lighting can get very weird in our house around this hour.
  • You can also see in this photo how that covered porch really does become a dark spot in the afternoon since it blocks so much sun. Again, we like having the porch, but it definitely impacts how the inside of the house feels sometimes.

We’re Digging

  • That’s us playing the kids’ favorite new game: Tenzi (and yes, we’re using coasters to stack our dice)

  • Our favorite variation is some combination of Tenzi Tower (where you have to stack your dice as your go) and Stealzi (where you can swipe your opponents dice).
  • We also bought this “77 Ways to Play Tenzi” that suggests dozens of other variations. They also sell a Party Pack version with 6 sets of dice.

  • And to see Sherry’s jade face roller in action (and my response video at the end) just click play below (or on YouTube or in our Instagram Highlights).

If you’re looking for something we’ve dug in a past episode, but don’t remember which show notes to click into, here’s a master list of everything we’ve been digging from all of our past episodes. You can also see all the books we’ve recommended on our Book Club page.

And lastly, a big thank you to Revel Woods for sponsoring this episode. Visit RevelWoods.com/YHL to find the right hardwood floor for your home, and don’t forget to enter the code YHL10 at checkout to get $10 off your first sample box!


Thanks for listening, guys!

*This post contains affiliate links*

The post #113: What You Don’t See In Photos Of Our Living Room appeared first on Young House Love.


#113: What You Don’t See In Photos Of Our Living Room published first on www.younghouselove.com

Friday, September 28, 2018

IKEA TV stand + the LACK range extension that IKEA didn’t produce

I have a LACK TV unit, but I have also a lot of devices that cannot fit into it. And IKEA does not provide other LACK products that can suit with the TV unit (as the BESTÃ… can.) This is my version of the IKEA TV stand and LACK range extension.

IKEA items used:
IKEA Lack TV stand

IKEA LACK TV stand | Photo: IKEA.com

Other materials and tools:
Instructions for IKEA TV stand and LACK extension

Assemble the LACK side tables.

Cut as many wood boards as you need to fit your electronic devices. These wood boards will become the lower tier shelves on the LACK side table.

IKEA TV stand + the LACK range extension that IKEA didn't produce

Set a suitable height to fit the height of your device and fix the shelf support brackets into the leg of the LACK side table. Place the cut wood boards on top of the shelf support brackets.

IKEA TV stand + the LACK range extension that IKEA didn't produce

To finish the top, I used self-adhesive floor planks with a wood grain.

IKEA TV stand + the LACK range extension that IKEA didn't produce

The LACK side table can fit 2 or 3 additional shelves, which is the perfect height for my devices.

Cost:

The cost is the best part of this IKEA TV stand hack! 5 euro for each LACK side table, 1 or 2 euro for each wood board!

IKEA TV stand + the LACK range extension that IKEA didn't produce

Now my IKEA TV stand and media storage look seamless with this simple and easy range extension.

~ by Alex


You may also like these IKEA TV Stand hacks

TV stand twice the lengthLove the LACK TV unit but it falls a little short? Here’s how to double its length and make yourself a sleek TV console. See the hack.

ikea lack tv stand vintage styleLove the LACK TV unit but not the style? How about turning it a little more vintage? Here’s how to give a totally different spin to your LACK TV stand.

IKEA LACK TV unit with wood

Love the LACK TV unit but find it a tad sterile? Warm it up with wood and some new legs. You’ll never guess what they were originally. Take a look at the tutorial.


The post IKEA TV stand + the LACK range extension that IKEA didn’t produce appeared first on IKEA Hackers.


IKEA TV stand + the LACK range extension that IKEA didn’t produce published first on www.ikeahackers.net

Thursday, September 27, 2018

Create a cheap and huge gerbil cage from the IKEA DETOLF glass cabinet

We made a gerbil cage out of the IKEA DETOLF glass display cabinet. For $60 we got a huge cage (less if you get an old DETOLF off Craigslist or eBay) with a separator in the middle.

IKEA item:
IKEA DETOLF cabinet

DETOLF | IKEA.com

Other materials to make the Gerbil Cage:

Instructions to transform the IKEA DETOLF cabinet into a gerbil cage

1. Take out the door of the cabinet.

2. Remove the metal frame out of the cabinet. Most importantly, MAKE SURE THAT YOU SUPPORT THE SIDES. DO NOT LET IT FALL APART!!!

3. Take the metal frame and saw off the crossbars and bottom, so only the top bar stays intact.

4. Remove the top and the bottom of the cabinet.

5. Insert glue in the slot of one side.

6. Then put the cabinet together and let it stand on the side with the glue. So there is pressure from its weight on the glue. Let the glue dry (24 hours) and then put clear/white silicone.

7. Redo step 5-6 to the other side of the cage and let it stand on the other side to dry now. (using its weight to pressurize the glue)

8. Put the metal rails (frame) in on the top of your cage

9. Use Silicone to fill the cracks and cover up the glue.


Related: IKEA DETOLF cage for dwarf hamsters


Optional — make more cages out of the cabinet

Use the glue to attach the U-profile to ½ or 1/3 or 2/3 of the way down the cage.

Let the glue dry.

Create a cheap and huge gerbil cage from the IKEA DETOLF glass cabinet


Related: IKEA DETOLF vivarium for reptiles


Slide in one of the glass sheets.

Here you can see the gerbil cage put together. We left the rails (iron frame) on the top only. This can be easy to attach items too.

Create a cheap and huge gerbil cage from the IKEA DETOLF glass cabinet

How we made the cover for the IKEA DETOLF Cabinet

1. Cut the wood sideways into the size of each cage to create a top.

2. Use the metal “L”s to attach each piece of wood to another.

Create a cheap and huge gerbil cage from the IKEA DETOLF glass cabinet


Related: IKEA DETOLF as a green house


3. Place the wire mesh on top of the 1st layer of wood.

4. Repeat the above 3 steps.

5. Lastly, nail the 2 layers of wood and the wire mesh together using nails.

Create a cheap and huge gerbil cage from the IKEA DETOLF glass cabinet

See the full tutorial of the gerbil cage.

~ by Kirsten Hopstaken

The post Create a cheap and huge gerbil cage from the IKEA DETOLF glass cabinet appeared first on IKEA Hackers.


Create a cheap and huge gerbil cage from the IKEA DETOLF glass cabinet published first on www.ikeahackers.net

Wednesday, September 26, 2018

How To Make Inexpensive Curtains Look A Lot More Polished & Our New Master Bed!

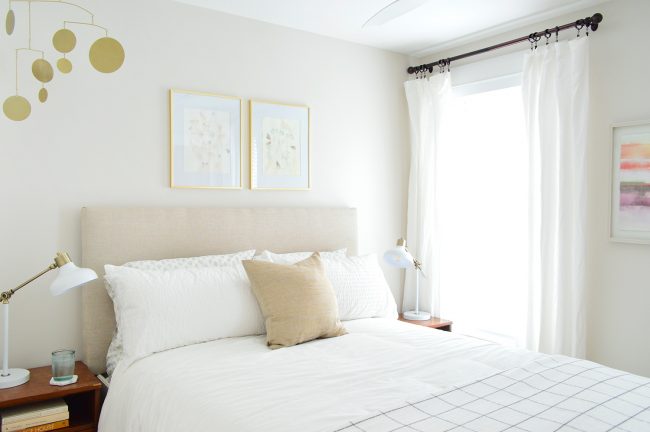
You haven’t seen our master bedroom in a while (except for small peeks on Instagram) because we owe you a certain curtain-related confession. But first, I get so many questions about our new bed – and why we upgraded from our old Ikea one – that I thought it was time to formally introduce you to this beauty that we got nearly a year ago. Yes, as in last November.

sherry putting pillow on master bed edgecomb gray walls

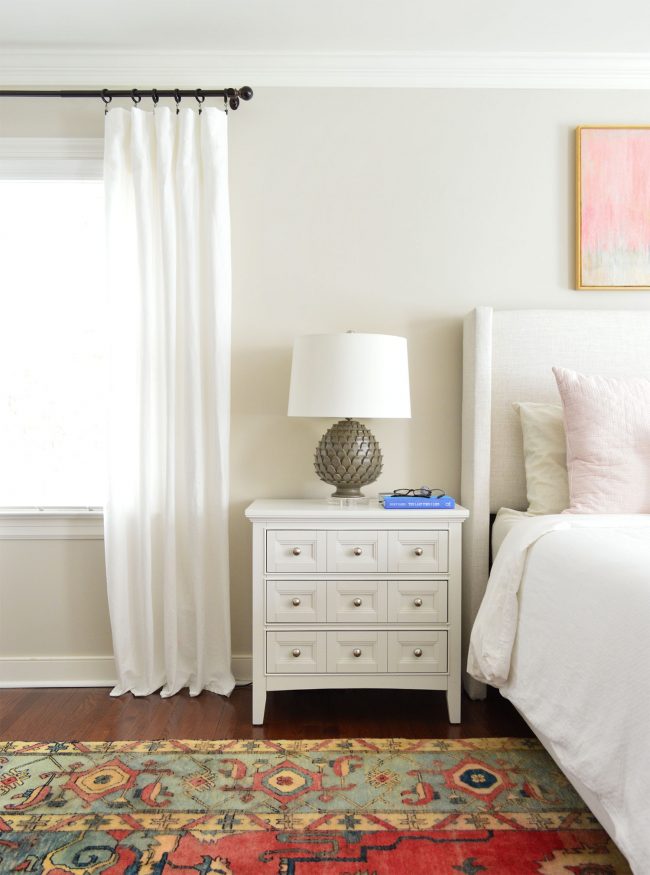
 bed / nightstand / bench / similar art / similar rug / duvet / chandelier / faux plant

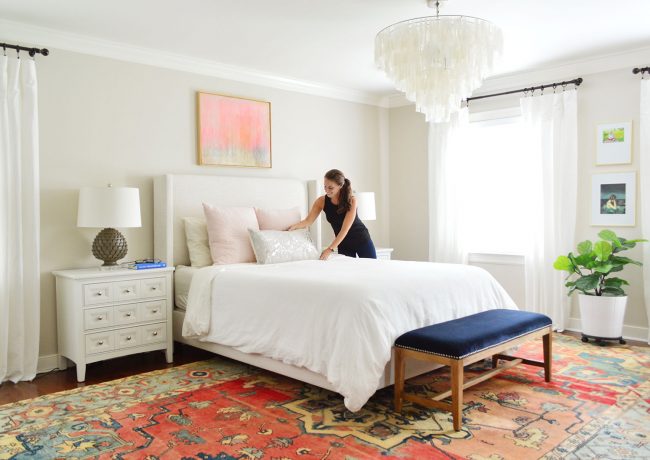
Why a new bed? Well, at first glance, our new bed isn’t wildly different from what was there before (which you last saw last May when we blogged about getting the new consignment store rug). Both headboards are a light wheat-colored linen, and they work well in the peaceful low-contrast bedroom we’ve been working towards lately. But the key difference is that this a legit bed – as in, headboard and side/footboards – all upholstered in the same fabric. Previously it was one of those metal frame situations plus a headboard we made ourselves.

previous master bedroom with bedskirt and tan headboard

And actually, at one point we did have that same headboard attached to a different bed entirely: the Ikea Edland canopy bed that we chopped the posts off of years ago (who remembers Ed the Bed?). But we swapped beds with our guest room at some point when we were over the floating-up-on-legs look for our bedroom (a regular bed frame + bedskirt gave us a more grounded and substantial look). We also found ourselves yearning for a proper boxspring situation for our mattress, which just sat directly on old Ed’s slats.

previous master bedroom with ikea platform bed

Our free took-twenty-minutes bed swap was definitely a step in the right direction, but we knew an upholstered bed would look more finished than the bedskirt + metal frame scenario. We actually don’t mind a bedskirt (2 of 3 beds in the beach house have them), but it always bugged me that it would never be the exact same white color as the duvet in here – and since it’s a much bigger room than the beach house bedrooms, you view it from a lot further away and notice that fact a lot more.

previous master bedroom with bedskirt and headboard and tan curtains

So long story long (have you met me?! no story is short), after five years of bed swapping and adding a skirt and reupholstering the headboard, we just went for it and ordered a fully upholstered bed. Not without twenty hours of research and hemming and hawing though (again, have you met me?!).

master bedroom with light upholstered bed and white ikea curtains

similar lamps / nightstand / bench / similar art / chandelier / curtain rod

The best thing about buying a new bed for our master bedroom was that it meant we could steal the headboard from our room and reunite it with Ed the Bed and bring them both to the empty beach house last fall, and put them in the middle bedroom. So essentially instead of buying a new bed for the beach house – we got to buy the bed we always wanted FOR OUR MASTER BEDROOM INSTEAD, and use ol’ faithful Ed + our homemade headboard at the beach house, where they totally fit the bill.

beach house guest bedroom with headboard in it

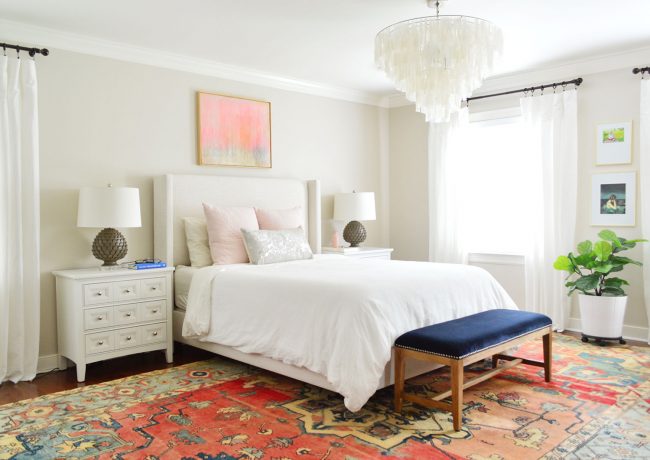
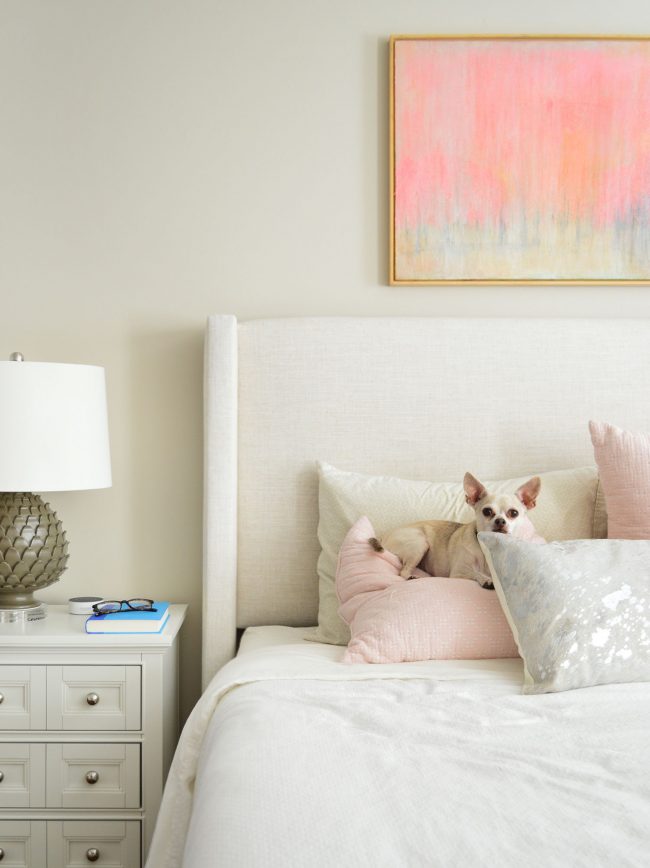
similar mobile / gold frames / similar headboard / lamps / pink art / square blanket

So even though he’s seen a few incarnations and lived in three different houses, Ed’s been with us for nearly 8 years (and the headboard has lived on for more than 6). Pretty soon they’ll be welcomed into the 10-year club! (If you haven’t read that post about the items in our home we’ve had for ten years and still love, it’s one of my favorites.) 

But back to our new (*cough… year old… cough*) bed. This post is probably making her feel very unloved so far, since we haven’t even blogged about the upgrade, but that’s far from the truth.

master bedroom with light upholstered bed and white ikea curtains

I LOVE THIS BED SO MUCH I AM TEMPTED TO BUY IT AGAIN FOR THE BEACH HOUSE MASTER BEDROOM (and just use that headboard/frame combo in the duplex somewhere). It’s such a nice feeling to have an actual bed after a series of metal frames and headboards attached to the wall or the bed in various ways. It kind of feels like adulting, but not quite as annoying as cleaning the house or buying band-aids every week (am I the only household that goes through approximately 1,000 every three days?! Are the kids eating them?!).

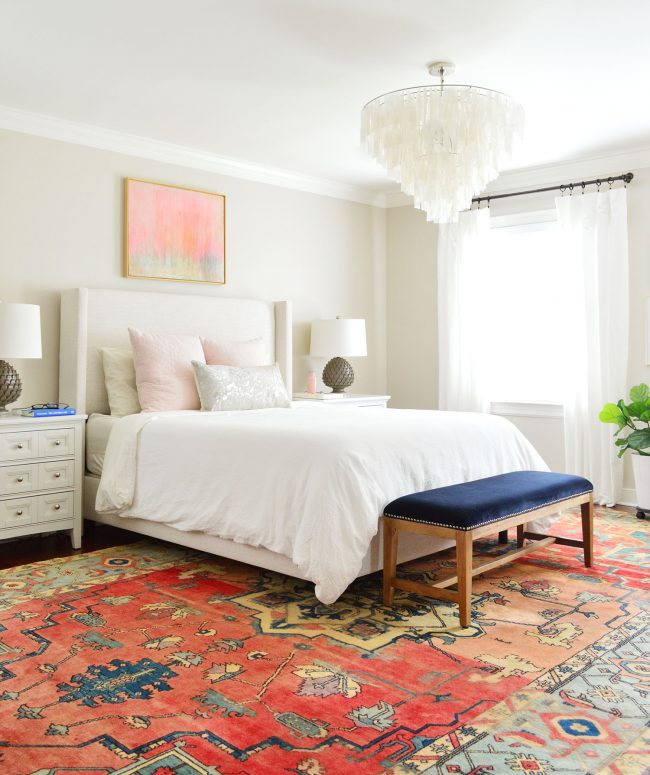
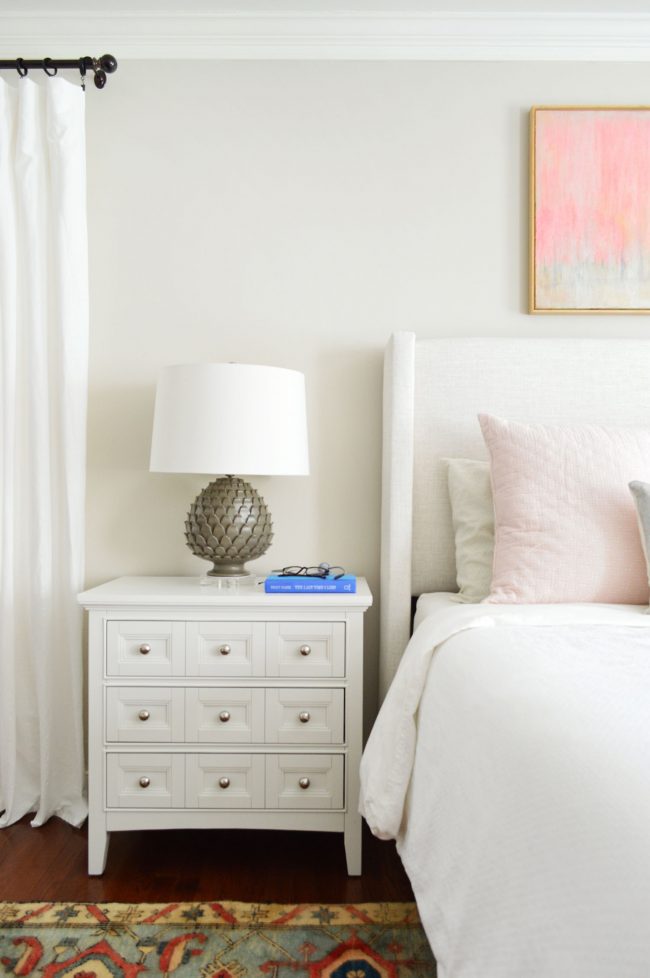
Anyway, my bed BFF is called the Sanford Linen Upholstered Panel Bed and we got it from Wayfair last November. It comes in all of the standard sizes (twin up to california king) and in two colors (the “Talc” color is what we got – and there’s a “Kelly Green” that’s definitely more of a statement). At the moment it’s 30% off, putting a queen bed at $628, and one of the reasons I went for it is because a ton of clean-lined and classic upholstered beds that look like this this are in the $1,000-$2,000 range (like this one and this one), so I love that this is a great neutral color and a timeless shape that looks more expensive than it is.

sanford linen upholstered panel bed from wayfair

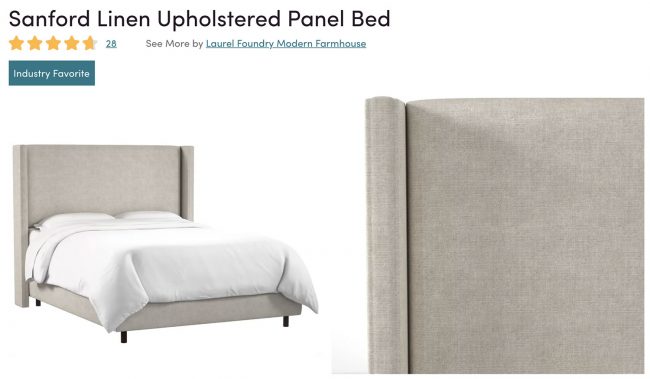
It doesn’t look NEARLY as dark or gray as it does in the listing photos (which was a pleasant surprise for us – because it really does mean it would work anywhere). I’d call it a warm linen color, that’s just barely on the warmer side of the gray-beige line, but it could completely live in a room with gray or tan walls, which I love. Given our history of moving beds around, the more places a bed can work, the better. And it has a really nice linen-looking texture that makes it a bit more interesting in person than you can probably tell in the website photos:

detail on upholstered bed with linen texture

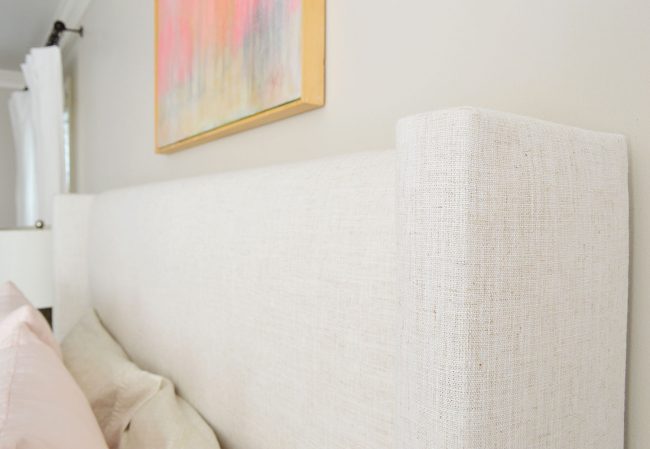
We also liked that it has these small vertical panels flanking each side of the headboard. The “wings” give it an extra little detail and coziness that our flat DIYed headboard didn’t have (although you could definitely make this version yourself – just upholster the side pieces and attach them in the back with some sort of flat metal bracket).

side view of upholstered headboard to show wings

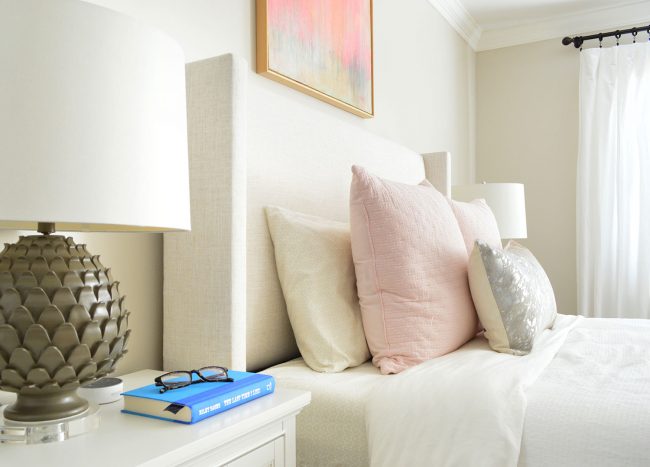
This bed still requires a boxspring, which we like (feels more like a real adult bed that way, and it’s better for our mattress, we hear) and I’ll warn you that if your mattress isn’t as thick as ours (ours is 12″) there might be a small gap between the top of the mattress and bottom of the headboard… so you might want to add a mattress pad or just place your pillows along the back of the bed in a way that you can’t see that area (sleeping pillows + a few decorative ones could totally cover it).

nightstand in master bedroom with edgecomb gray walls

similar lamp / nightstand / similar artcurtain rod / duvet

I actually realized that there’s a reason for that space, which is: so you can change the sheets more easily. If the headboard squished up against the top of the mattress much tighter, you wouldn’t really be able to change the fitted sheets without a ton of effort – so I actually appreciate that detail.

Also a few people have asked “wait, are the black feet of your bed ugly?” and I didn’t even know what they meant and had to run upstairs and look at them in person, but I guess in the online photos where it’s cut out and placed on a white background they’re really clunky and obvious, but the bed’s feet are set in a bit from the upholstered frame, so they’re basically in the bed’s shadow if that makes sense. I literally never notice them or “register” that there are those little black feet in real life because the upholstered part is pulled forward, so that’s really all you see.

two windows in master bedroom with white curtains

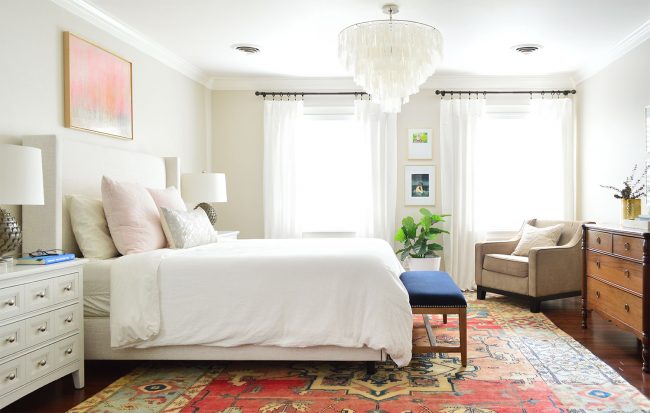
Ok, now that I’ve told you everything you could possibly wonder about our bed…. let’s turn our attention to curtains. BECAUSE CURTAINS ARE HARD. Our old curtains in here had been some wheat-colored cheapies I grabbed at HomeGoods years ago, but after we installed white curtains throughout the entire beach house, I developed what can only be described as an animalistic craving for white curtains in here again.

white ikea lenda curtains hung in master bedroom

similar dresser / gold frames / bench / similar rug / similar chair

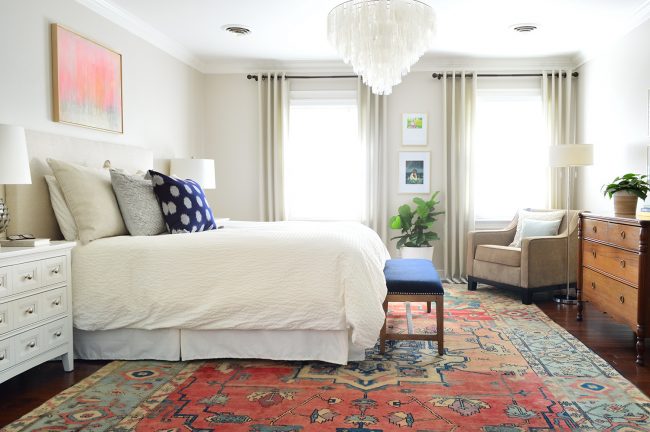
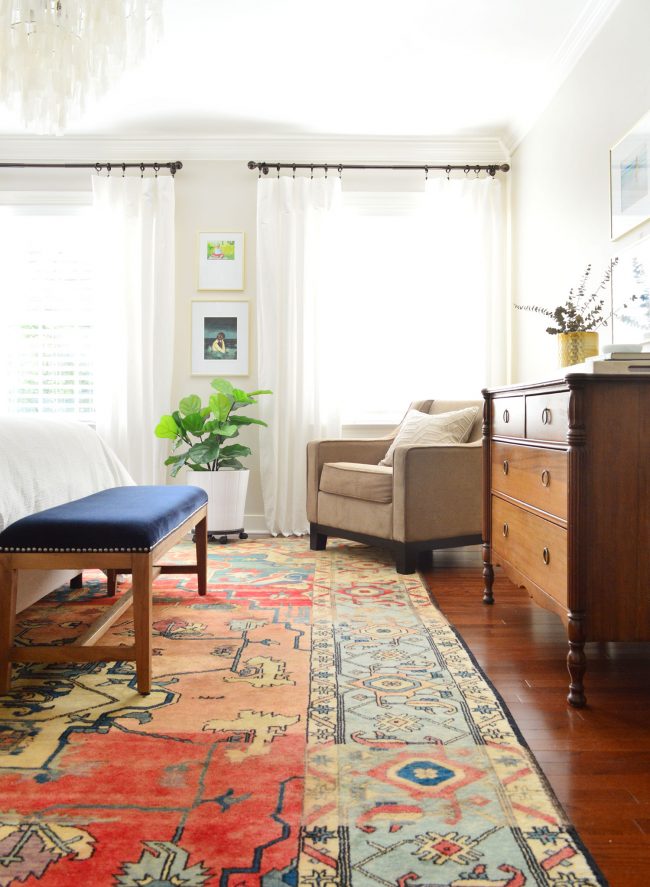
So much of the room had been beige-ish, that I just thought crisp white curtains would freshen things up and not make the whole space feel like we had a sepia filter on it. So I craigslisted the tan curtains, and on a trip to Ikea sometime last winter we loaded up on three sets of our favorite affordable white curtains (Ikea’s Lenda curtains) for the bedroom. But the reason you haven’t seen an “our bedroom got two updates!” post about this room is because is has taken me nearly a year to finish fixing the curtains (thereby completing this update) so they no longer look like this:

messy unironed curtains in master bedroom

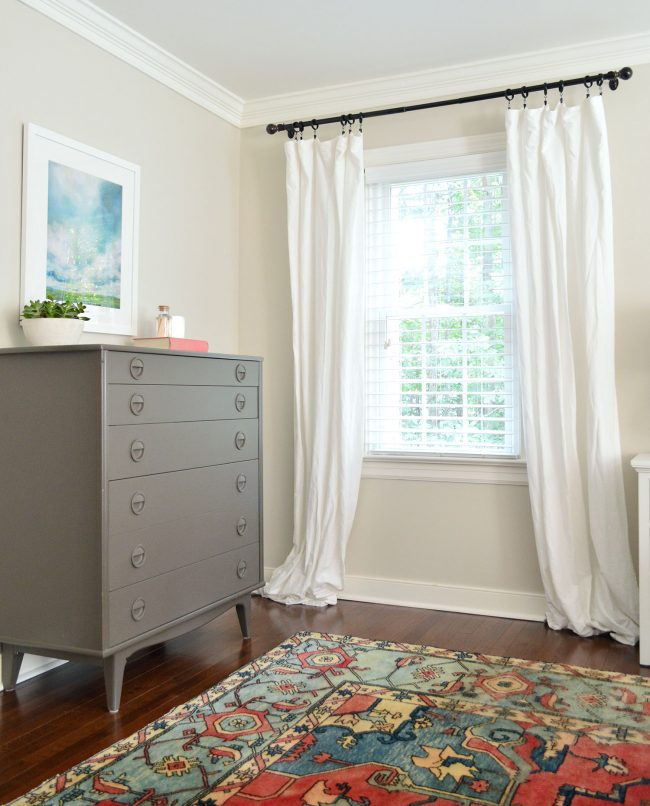
Yup, we lived with them like this for nearly 12 months, and I gotta say, I’m not even ashamed of it. Life is busy, (see: adulting) and curtains can be high maintenance, so they might just end up at the bottom of the list. And this sloppiness underscores the dilemma of Ikea curtains. We LOVE them for their nice heavy white fabric and their affordable price: just $25 for two 98″ tall curtains (which means they’re long enough to go from floor-to-ceiling in a standard eight foot room). And if you have extra tall rooms you can also get two of their 108″ length for $35.

And now for a curtain-related side rant: don’t buy too-short curtains at Target! I don’t even know why anyone makes 86″ curtains because it’s SO MEAN and they’re never tall enough to make a room look as good as it could with 95″ (or taller) curtains!

Unlike Ikea’s cheaper Vivan curtains, the Lenda ones have a decent weight to them – in fact they look extremely similar to curtains sold by West Elm and Pottery Barn but they’re a heckova lot more budget-friendly. But let me tell you… Ikea’s photos of these curtains are so not-selling that when people ask where we get our white curtains and we link to them, 100% of people say “that’s the wrong link” – because they’re actually sold with big tabs on the top and they have these country-looking tiebacks, and they essentially look nothing like this:

crisp ironed lenda ikea curtains against beige walls

They look like this:
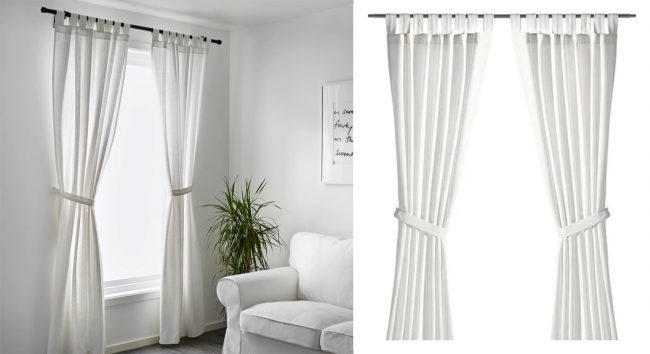
I know.

This doesn’t look like the same set of curtains. But it is.

And these are the exact same Lenda curtain panels too. We’ve probably had them in our office for the longest amount of time (four years or so) and they look great. We got two sets for each side of that large window so they’d look extra full – and our entire curtain cost was $50.

four ikea lenda panels across bay window in home office

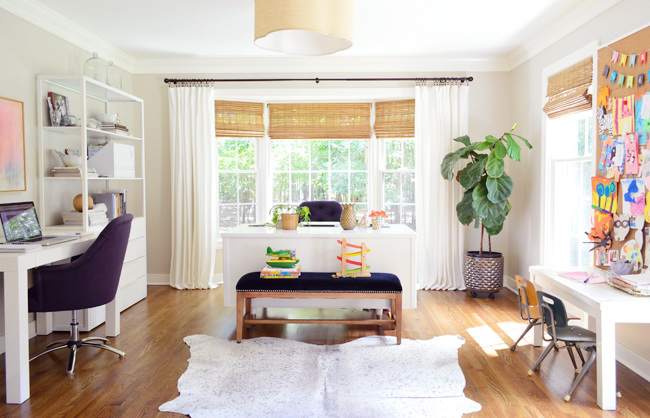
woven blinds (pecan color) / desk chair / desk / bench / rug / similar faux plant

But… if you’re someone who just wants curtains that you can throw up on a rod and have them look awesome, these aren’t them. Getting them to look presentable can take a significant amount of effort in our experience, but after it’s all said and done, they can look pretty darn decent. Plus they’re washable (which is a great thing in a house with kids and a dog – or a rental house like our beach houses) and they’re not so expensive that they’re precious – so you can relax and not freak out if kids twirl around in them or hides back there, which is a daily occurrence in our house.

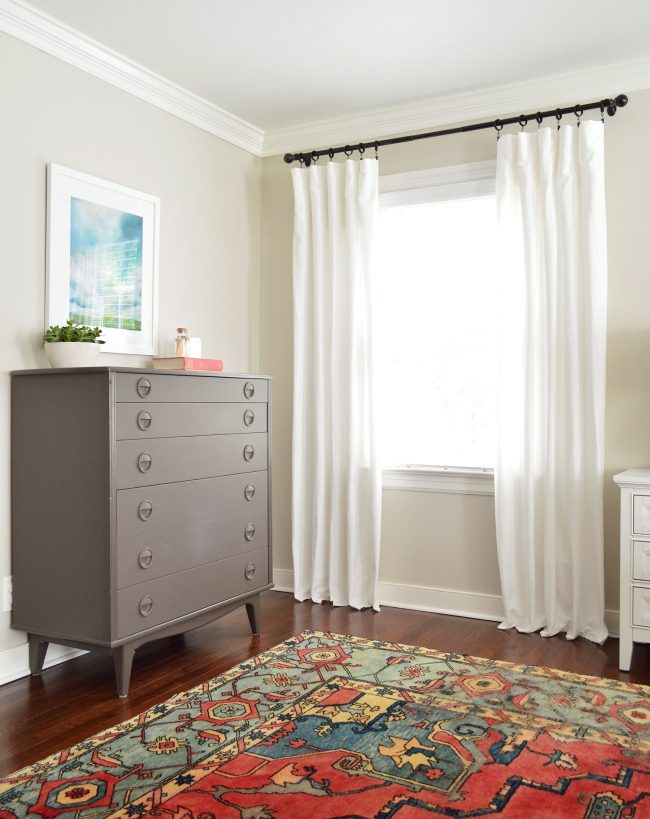
So what are the things we do to turn these formerly-tab-topped curtains into what you see in the photo above? I thought you’d never ask. Here’s my process:

Step 1: Wash them on hot and dry them on high to pre-shrink them (they’ll shrink a ton – maybe 5″, but in a standard height room that’s just fine – and you NEED to preshrink curtains before you hang them. Otherwise if they get dirty later and you launder them, they’ll look like bad highwaters when you hand them back up.

Step 2: Use a sharp pair of scissors to cut off the tabs right above the sewed line where they’re attached along the top edge.

Step 3: Fold the top edge over once to hide where you cut the tabs, making sure the fold goes toward the back of the curtain (facing the window). Once it’s all clipped that fold looks just like a sewed top seam and has a nice finished look.

back side of curtain with curtain rod ring clips

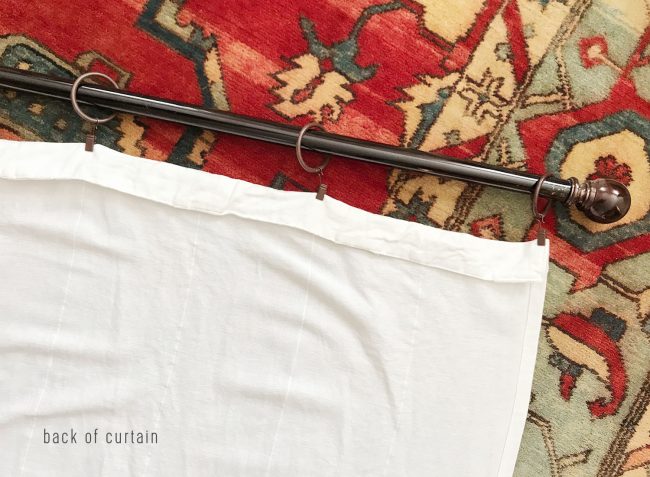
Step 4: Clip your rings on along the fold. We use 6 ring clips per panel: one on each end and then one on every other vertical seam, which you can see above. Your spacing my be different if you’re using different curtains, but ours are about 10″ apart.

Step 5: Slide two pre-washed & clipped panels onto your curtain rod, and hold it up to determine the best height to install it. Remember to go high and wide around your window, but not so high that the curtains don’t touch the floor, and not so wide that they look flat (volume from the curtains draping is really pretty). We typically go around 8″ beyond the window trim on the sides, and like to hang the rod a few inches below the ceiling, but use the length of your panels to determine the best height.

This was a far as I made it with these new curtains for basically a year, so if yours look something like the messy picture below – don’t worry. We’ve all been there. Well, at least I have. Many times. And I’ve lived to tell the tale. In fact it wasn’t until last week that we finally carried out the final two steps.

messy curtains hung but not ironed

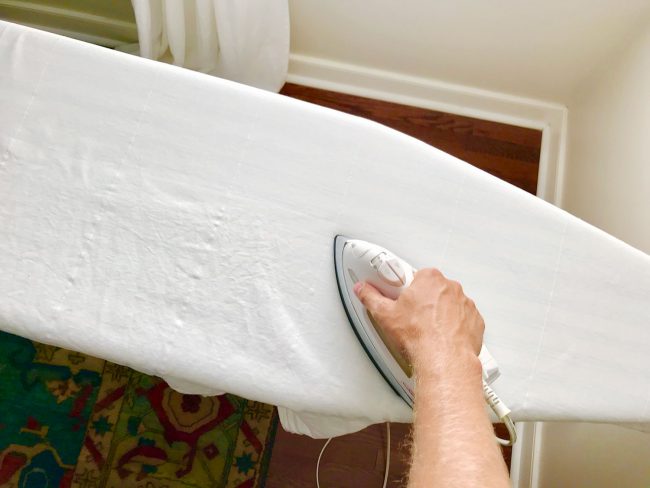
Step 6: Iron or steam your curtains. We steamed the curtains at the beach house while they hung in place – but we found that we got the best result with two people doing that (one to hold the curtain taut, the other to steam – this is our steamer, btw). So to get the smoothest result at home with just one person on curtain duty, we took them down and ironed them. I knocked out four of them before bed one night last week, and John did the other two the following evening (which explains why the hairy arm in this picture is his and not mine).

ironing ikea lenda curtains on ironing board

Step 7: Once the curtains are pre-shrunk and fully relaxed, it’s safe to hem them if you need to. Sometimes you get lucky and they shrink enough so that you can hang them high without needing any hemming – but a little is usually necessary for us. I like to use no-sew hem tape, but I tried a new cheater-way to hem these and it worked, so I’m sharing it. NO HEM TAPE OR SEWING REQUIRED!!!

I just unclipped them one clip at a time while standing on a chair and folded them over until I liked the way they hit the floor below (just the slightest little break – like they’re kissing the floor) and reclipped them to hold them that way. The fold of fabric is in the back of the curtain, facing the window, so you don’t see it from the front – it actually just looks like a nice thick top hem when the light shines through.

clipping curtain panels to curtain rod using ring clips

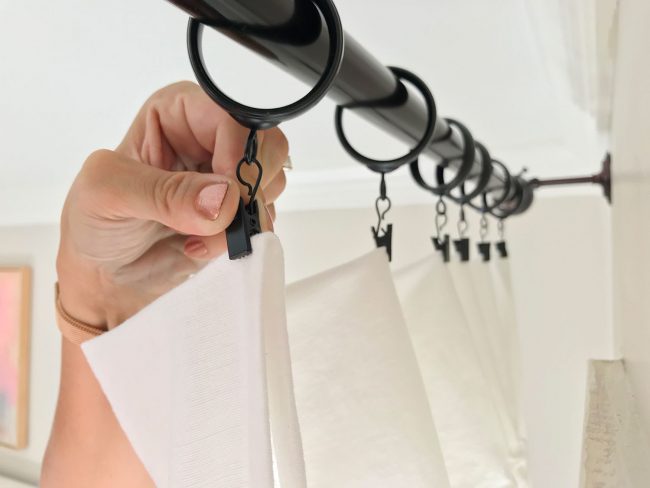
You can’t really tell that I took a short cut, and it means if they ever shrink in a future washing (or we decide we want more or less fabric touching the floor) we can just adjust them just by unclipping them and changing the fold. Genius? Probably not. Lazy? Most definitely!

Are they the most luxe high-end curtains out there? Nope. Do we think they look nice, hold up well, and add softness & height to a room? Yup. Did we do the entire bedroom for $75? Yup. And that’s less than the cost of one of these stock white 95″ curtain panels (and we got 6 panels!). Getting custom curtains can also be significantly more expensive – and it can make them feel extra precious. They’re also not usually washable which is a huge selling point for me when it comes to these.

white ikea lenda curtain panels next to nightstand

Maybe someday we’ll feel fancy enough to splurge on custom curtains. Using them in some of our showhouse projects means we’ve experienced the difference firsthand (really, they look amazing and perfectly graze the floor and don’t even need to be steamed – they arrive totally ready to hang). So this isn’t an anti-custom curtain rant or anything – we just know lots of people who can’t swallow that custom curtain price tag right now, and might want something that feels easier to live with/wash for this season of life. So hopefully this elbow-grease-but-affordable method can help you get SOME sort of window treatments in your house. And you know I won’t judge you if it takes a year to get them finished.

vintage dresser in master bedroom with white curtains

Also, dogs don’t have to adult. I wanna be Burger.

chihuahua sitting on master bed

Believe it or not, this isn’t the first time we’ve had white Lenda curtains in this room (but they got stolen for the office at one point). So here’s that story, and more curtain projects/tips from over the years:

Psst- Wanna know the paint colors in this room, or any other room in our house? Click here for a whole-house rundown. And if you want to get our free email newsletter (it’s like a bonus post that comes right to your inbox each week) click here to get on the list

*This post contains affiliate links*

The post How To Make Inexpensive Curtains Look A Lot More Polished & Our New Master Bed! appeared first on Young House Love.


How To Make Inexpensive Curtains Look A Lot More Polished & Our New Master Bed! published first on www.younghouselove.com

Charleston for the Weekend! Plus, Paint Colors!

You know how I said I was trying to get out more? Like trying to take regular breathers from the house and the rest of life to see the people I love and do stuff I maybe want to do?

I did it again! My dear old friend Chandler (you might remember blog posts about her apartment from forever ago!) and I planned this little weekend jaunt down to Charleston, SC back in April, and I have to say it was nice and motivating to have something like this to look forward to throughout the summer! Then it totally crept up and we were on our way. Crazy how that happens.

Charleston is SUCH a beautiful city. I visited with my family briefly about a year ago, so when Chandler suggested we go there I was super excited to go back. The city is just so amazingly historically intact—it’s a total fantasyland if you’re interested in old buildings and history.

The real impetus for the trip was to catch a live show of one of our favorite podcasts, My Favorite Murder! Where my murderinos at?! If you’re not familiar, I’ll try to explain it like the hosts, Karen and Georgia, do: it’s a true crime/comedy podcast, which is a complicated combo to negotiate yet they make it work. Each week, they individually pick a murder from history and then recap it for the other one, and that’s basically the whole thing. It never gets old. And there’s an endless supply of murder because people are monsters! Karen and Georgia’s voices have kept me company for literal hours and hours while I’ve plugged away on projects on the house and whatnot, so being in a room with them performing live was so weird and crazy—both the same and different than I expected. It was a lot of fun.

In any case, the podcast is super crazy popular and has a rad population of fans, so if it sounds interesting to you I’d HIGHLY, HIGHLY recommend starting from the beginning so that you, too, can develop a close, personal, one-sided bond with these women as their goofy idea for a podcast becomes, like, an international sensation before your very ears. Otherwise you might just be very annoyed by it all.

OH ALSO REAL QUICK: because people simply cannot get enough murder and comedy in combination, getting tickets to one of these shows was one of the most stressful things I’ve ever been tasked with doing. I had to join a fan club to get pre-sale access to the tickets and even those sold out in about 6 seconds flat. Eek! Sometime before that, I figured out that my friend Lauren who runs the Historic Charleston Foundation is also a murderino, as is her friend Gray, so we all went together with the 4 tickets I was able to snag. So the show was on Friday, and then every Monday they post mini-episodes where they basically read off listener emails of their own murder-related or otherwise creepy/weird/macabre stories. And on this Monday’s episode, THEY READ LAUREN’S EMAIL! Which, by the way, was a really fascinating insight into how the Historic Charleston Foundation conducts research on the properties they own, plus some surprising finds from inside some very old walls. It’s Minisode #89, if you’re interested!

So that was cool.

Otherwise, we pretty much just walked around, ate, and tried to take in as much of Charleston’s absurd beauty as we could before heading home.

I MEAN, JUST LOOK AT THIS PLACE! It’s insane. I think due to a combination of early and comprehensive historic protections and a fairly mild climate, Charleston kind of reminds me of what a place like Kingston might look and feel like if it hadn’t fallen victim to terrible urban-renewal policies and the unmitigated trend of replacing windows, doors, and exterior cladding with plastics and metals. It’s really something.

So many original windows! So many working shutters! SIIIIGHHHHH.

Marble floors like this are all over the city.

I’m crying.

I love this house and this arborvitae situation.

We ate very well during our short trip, including brunch at this restaurant called 5Church on the morning we left! Such a great space. The food was awesome too.

There are several historic house museums right in downtown Charleston, including The Nathaniel Russel House and the Aiken-Rhett House which I toured last time, and the Calhoun Mansion which I toured this time! LOOK AT THAT VESTIBULE TILE! The Calhoun Mansion doesn’t allow photography but the other two (managed by the Historic Charleston Foundation) do.

ANYWAY. Knowing more or less what I was getting into, I tried to come to Charleston a little more prepared this time around than last by remembering to bring my Nix Mini sensor! I know I’ve mentioned this thing on Instagram but I can’t remember if we’ve discussed it here…it’s a little ping-pong-ball-sized device that can scan and match paint colors on the go! Out in the wild! It pairs with an app on your phone, which allows you to choose between a bunch of different paint brands and save and organize colors you’ve scanned into collections. It’s a little addictive! Because Charleston picks paint colors really, really well, I thought I’d scan great colors here and there as we walked and put together a palette for the city! Is that fun? Not fun? I thought it was fun. Maybe we’ll do it again someday. Maybe we’ll never do it again ever. Either way, if you’re looking to inject your color scheme with some southern style, here ya go! Do with it what you will!


Charleston for the Weekend! Plus, Paint Colors! published first on manhattan-nest.com