Thursday, January 31, 2019

IKEA and Tom Dixon to launch hackable DELAKTIG bed

A year after IKEA and Tom Dixon launched the IKEA DELAKTIG sofa, they are back again to build on the winning concept.

IKEA x Tom Dixon's announces the IKEA DELAKTIG bed

The first DELAKTIG was conceived as a platform from which you add other components such as backrests, coffee tables, lamps to turn it into a sofa, sectional,  daybed or whatever catches your fancy. It was designed to suit smaller homes and a modular way of living.

“We spend more time in contact with our beds than with any other piece of furniture. So why not make it do more?” ~ Tom Dixon

Now, they’ve taken the same idea into the bedroom and it looks set to be a success too.

IKEA x Tom Dixon's announces the IKEA DELAKTIG bed

“I’m fascinated by the bed as a kind of primary unit that everybody needs. It’s essential; we spend more time in contact with our beds than with any other piece of furniture. So why not make it do more?” said Dixon in a press release.

IKEA DELAKTIG bed – modular and lightweight

The hackable double bed is made out of the same ultra lightweight 50% recycled aluminium frame as its predecessor.

IKEA x Tom Dixon's announces the IKEA DELAKTIG bed

Once you’ve set up the IKEA DELAKTIG bed, it can then be personalized and transformed with a series of headboards and accessories specially designed for it.

At the moment, they are offering 2 headboards which seems like an effort to please two ends of the taste spectrum. On one end, an earthy rattan headboard and on the other, a dramatic black wooden headboard.

IKEA x Tom Dixon's announces the IKEA DELAKTIG bed

IKEA x Tom Dixon's announces the IKEA DELAKTIG bed

The headboards are easily snapped-on or snapped-off, should you want to switch it out.

IKEA x Tom Dixon's announces the IKEA DELAKTIG bed

Besides the headboards, they’ve made side tables that slide into the bed’s aluminum frame. You can also add on reading lamps.

IKEA x Tom Dixon's announces the IKEA DELAKTIG bedIKEA x Tom Dixon's announces the IKEA DELAKTIG bed

New covers for IKEA DELAKTIG sofa

The new IKEA DELAKTIG bed isn’t the only one getting the spotlight.

The launch will also include a new series of covers for the existing IKEA DELAKTIG sofa, including dusty pink, soft beige, and stone gray.

That’s the ensure the seating nook in your bedroom can match the moods of your headboards.

IKEA x Tom Dixon's announces the IKEA DELAKTIG bed

Strangely, though the IKEA DELAKTIG was meant to be hackable, I’ve yet to see anyone (who isn’t commissioned to) actually make something for it. Perhaps there are some hacks out there which I missed? If so, please do point me to them.

I hope this bed will inspire some IKEA hackers to create for it. It would be interesting to see what comes out of it.

IKEA x Tom Dixon's announces the IKEA DELAKTIG bed

The IKEA DELAKTIG bed is set for launch next month. As it is a customizable piece of furniture, prices will vary depending on the headboard, mattress and accessories you choose to accompany the frame. Do expect to pay $429 and upwards.

Would you buy the IKEA DELAKTIG bed?

Let us know in the comments below.

The post IKEA and Tom Dixon to launch hackable DELAKTIG bed appeared first on IKEA Hackers.


IKEA and Tom Dixon to launch hackable DELAKTIG bed published first on www.ikeahackers.net

Wednesday, January 30, 2019

The Only Grout We Ever Use (And How To Pick The Right Grout Color)

I’m Sorry, Bluestone Cottage. I’m Still Here.

Hackers Help: How to reinforce PAX back panels?

Hello,

Just about to order 100cm wide PAX wardrobes.

The PAX back panels seem a bit flimsy and I am guessing that they will bulge if anything is pushed against them from the inside of the wardrobe.

How to reinforce PAX back panels

PAX | IKEA.com

Does anyone have a suggestion for backing them up? I was thinking of fixing some ply battens across the back. Say 10cm wide 9mm thick, spaced 50cm vertically. Any views from anyone?

~ by Malcolm

***

Hi Malcolm

Yes, you are right. The PAX back panels are a bit flimsy and will bulge if you lean something against it, from inside.

I’ve not had a need to reinforce the back panels of my PAX wardrobe, so I’ve not given this a go.
But, I think your idea of ply battens should work.

Anyone else with a brilliant idea?

Jules


Other Hackers Help questions on the IKEA PAX

#1 Can I turn regular PAX units into a corner wardrobe?

I am thinking of purchasing a PAX wardrobe to fit on a little corner on my entry room. I really like the new design of PAX for the corner wardrobe, the problem is that the corner unit is very similar to a regular unit but almost 3 times the price!

See the answers.

#2 How to make sliding closet doors for PAX?

I need a hack for PAX wardrobe system, I cannot afford IKEA’s sliding closet doors and I was wondering if there are any hacks that can turn a regular wardrobe door to a sliding door?

See the answers.

#3 IKEA kitchen doors on PAX frame?

According to your experience, is it possible to use KUNGSBACKA IKEA kitchen doors on PAX units?

We have two PAX units in the entryway and would like to change their doors and use KUNGSBACKA ones. Our kitchen is KUNGSBACKA and we love it a lot!

See the answers.

#4 How to shorten PAX wardrobes?

I moved into a new house with a huge open closet room with no storage. I designed my entire walk-in gorgeous closet using the PAX system, but now have realized my ceiling is too low. The ceiling is 78 1/4” tall. Can the PAX system be cut down? Would you cut the bottom or the top?

See the answers.


The post Hackers Help: How to reinforce PAX back panels? appeared first on IKEA Hackers.


Hackers Help: How to reinforce PAX back panels? published first on www.ikeahackers.net

Tuesday, January 29, 2019

Hydroponic garden: Easy system to get you started

I was looking for a cheap, beautiful, and readily available plant pot so that anyone could start their own hydroponic garden.

And I found the IKEA MUSKOT to be perfect for it.

MUSKOT plant pot | IKEA.com

What’s great about this hydroponic system is that anyone in the world can download the 3D files and start growing their own hydroponic food the same day.

For around $85, you can start growing food in your apartment.

IKEA items used:
  • MUSKOT Plant Pot
Other materials and tools for hydroponic system:

Instructions for starting a hydroponic garden:

1. Go to Thingiverse and download the following files:

  • Lid
  • Top reservoir
  • Module x 3
  • Vaselid.

2. Print them if you have a 3D printer or send them to a 3D printer like this one.

3. Purchase the IKEA MUSKOT 7 ½ inch plant pot.

4. Get nine 2 inch net cups, ½ inch vinyl tubing, hydroponic nutrients, ph control kit, and smart plug.

5. Set up your hydroponic garden like in the video. The modules are interlocking, so it can be expanded and contracted in size super easily.

The only part that’s probably a bit time consuming (besides growing the plants) is the printing. It takes about 10-12 hours per module.

I’m looking to adapt the lid to the larger MUSKOT plant pot next.

You can see my hydroponic garden in progress on my Instagram.

~ by Alex


You may also like these other hydroponic gardens

#1 ELIOOO IKEA Hydroponic kit

IKEA hydroponic system

Ever wondered if you could grow vegetables in your apartment? It may not be as far-fetched as it seems. Antonio has a created a hydroponic set up using the Trofast and Antonius. See more of the ELIOOO IKEA Hydroponic System.

#2 Aquaponic farm for fish and salad

IKEA hydroponic farm

Malthus is an in-home aquaponics unit designed for the next generation kitchen or living room. It grows one meal a day: a portion of fish and a side salad. Read more.


Read more about starting your own hydroponic garden


The post Hydroponic garden: Easy system to get you started appeared first on IKEA Hackers.


Hydroponic garden: Easy system to get you started published first on www.ikeahackers.net

Monday, January 28, 2019

Big but minimalist bathroom mirror with lights

I wanted a minimalist bathroom mirror with lights without a cabinet. So, I found the HOVET mirror to be a perfect candidate for an IKEA hack.

Big but minimalist bathroom mirror with lights

On top of that I only need to drill two holes into the wall to attach the lights to the frame of the mirror.

Process of making a bathroom mirror with lights:

First, I taped off the size of the mirror on the wall to get a better feel for the proportions and where to put it.

Initially, I planned to hang the mirror in the middle of the wall. But later, I hung it in the middle of the drywall (more to the right), so that when standing in front of the washbasin the mirror looks more harmonious.

The second step was about finding a good placement of the lights and to determine if I would use three or four of them.

Big but minimalist bathroom mirror with lights

I also used some duct tape for some quick placement and quickly came to the conclusion to use four lights. The two lights on the outermost left and right should line up with the frame of the mirror.

Installing the bathroom mirror with lights

Next, I calculated the correct distance between each light. Then, I used the pre-drilled holes in the MAGLEHUT LED lights and a pencil to mark the positions for the needed holes.

To drill the holes I used a drill which was a tiny bit thicker than the threaded screws to have some play in the rotation of the lights. (This saved me from quite some trouble in the later step. 🙂 )

The rest was a simple assembly. The wing nuts made the installation a bit easier as I could hold them with one hand and with the other hand, use a screwdriver to tighten everything.

Lastly, I hot glued a piece of scrap wood underneath the transformer. This was just in case there would be some condensation collecting at the bottom of the frame.

I have also used a connection and an extension cable, so that I could make a proper connection on the floor in the bath before hanging the mirror onto the wall.

Big but minimalist bathroom mirror with lights

Material used for bathroom mirror with lights hack:
  • HOVET (mirror 80€) x 1
  • MAGLEHULT (LED lights 15€ each) x 4
  • TRÅDFRI (transofmer for up to 10 LEDs 25€) x 1
  • FÖRNIMMA (connection cable 5€) x 1
  • FÖRNIMMA (extension cable 5€) x 1
  • Picture hooks (M8, 80mm long) x 2
  • Threaded screws (M4, 40mm long) x 8
  • Wing nuts x 8 (M4 nuts are ok too, but wing nuts are easier to handle 😉
  • 1 x scrap piece of wood
Tip:

I have only used either galvanized or stainless screws and material. This is to avoid any rust stains, due to the sometimes higher humidity present in bathrooms.

Verdict:

The whole process went very well. And this setup of this bathroom mirror with lights is also future proof, which is a big plus. I like the clean look and setup very much and would not do anything different 😛

Note:

Although in my setup, splash water cannot reach any of this, please note that you will be installing this at your own risk, because I am not an electrician 😉

Take a look at the other hacks I made:

~ by Ralf B, Cologne Germany 🙂

The post Big but minimalist bathroom mirror with lights appeared first on IKEA Hackers.


Big but minimalist bathroom mirror with lights published first on www.ikeahackers.net

Friday, January 25, 2019

Rustic kitchen island: This is how I hacked HEMNES

Here’s my IKEA hack of a rustic kitchen island made from an IKEA HEMNES dresser.

I recently moved to a condo and I had a HEMNES dresser. Either, I was going to have to get rid of or think outside the box to keep it.

Rustic kitchen island - before

And, I was tired of my round dining table with chairs. For a change, I wanted something that was chic yet functional.

I also wanted something that would be a space saver. That was when I took a second look at the HEMNES dresser, observed a few kitchen island ideas on different websites and got to work.

Materials for rustic kitchen island:
  • 1 HEMNES 8-drawer dresser
  • 1 Maple butcher block countertop
  • I used a combination of chalk and flat paint to get my desired color of olive green.
  • I also applied a sealing wax finish to the dresser after several days, to help protect the paint.
  • To protect the floor, I used furniture felt pads on the HEMNES feet

Rustic Kitchen Island Project How-To:

1. Assemble HEMNES dresser per IKEA instructions or if it’s already assembled, leave the top portion of the dresser. I find that this provides more stability to the kitchen island.

2. Paint the dresser to the desired color. I would wait 1-2 days until the color really settles.

I ended up having to get a different green, due to the first go round was not the desired color of olive green I was looking for (see pictures).

Rustic Kitchen Island IKEA hack

The first color was a chalk paint and the second was regular flat paint. After a couple of days, when I was satisfied with the color, I applied the sealing wax. You may need 1-2 coats, depending on your preference.

I also decided to paint the knobs a gold dust color, to match the mirror.

3. I purchased the maple butcher block countertop on sale at a builders’ supply location.

The measurements were taken by comparing to another pub table of what the correct overhang should be.

Rustic Kitchen Island IKEA hack

The measurements of the countertop are 26” width and length 72”. This would also depend on how much overhang you want.

4. Once the countertop is placed, make sure to use either baby oil or the specialty rubbing oil to seal and protect your butcher block. The oil will also slightly darken the countertop.

5. I stuck felted pads on the bottom of the dresser legs to protect the floor when moving the kitchen island. You can also place rolling wheels; whatever your preference.

Rustic Kitchen Island IKEA hack

The costs for my rustic kitchen island project:

This rustic kitchen island was a fun and simple project. I did have to ask my sweet boyfriend to help me place the butcher block top on 😀👍🏼 The rest was all me!

The total cost of the project was about $300.

I bought the HEMNES dresser from another person for $50. The maple butcher block was the most expensive at $200 and paint/supplies costs $50.

~ Michelle H.


You may also like these HEMNES kitchen island hacks

#1 Kitchen island with seating area

kitchen island with seating

Lori made a kitchen island with seating for 3 to 4. The IKEA product she settled on was the IKEA KARLBY walnut countertop and HEMNES chest of 8-drawers to create her unique kitchen island. See the kitchen island with seating.

#2 Compact kitchen island with stainless steel top and drawers

kitchen island with drawers

After digging around on Etsy for what seemed like a million years, CommandoGirl still couldn’t find one that provided enough storage and was also small enough to fit into the limited space in her kitchen. So, enter the Hemnes dresser. And out came her small kitchen island with drawers.

#3 Country kitchen island

country kitchen island

Kitchen islands are expensive! And they are not very cute. Joanne took an old HEMNES 3-drawer chest (the bigger one) and re-purposed it into a charming country kitchen island.


The post Rustic kitchen island: This is how I hacked HEMNES appeared first on IKEA Hackers.


Rustic kitchen island: This is how I hacked HEMNES published first on www.ikeahackers.net

Thursday, January 24, 2019

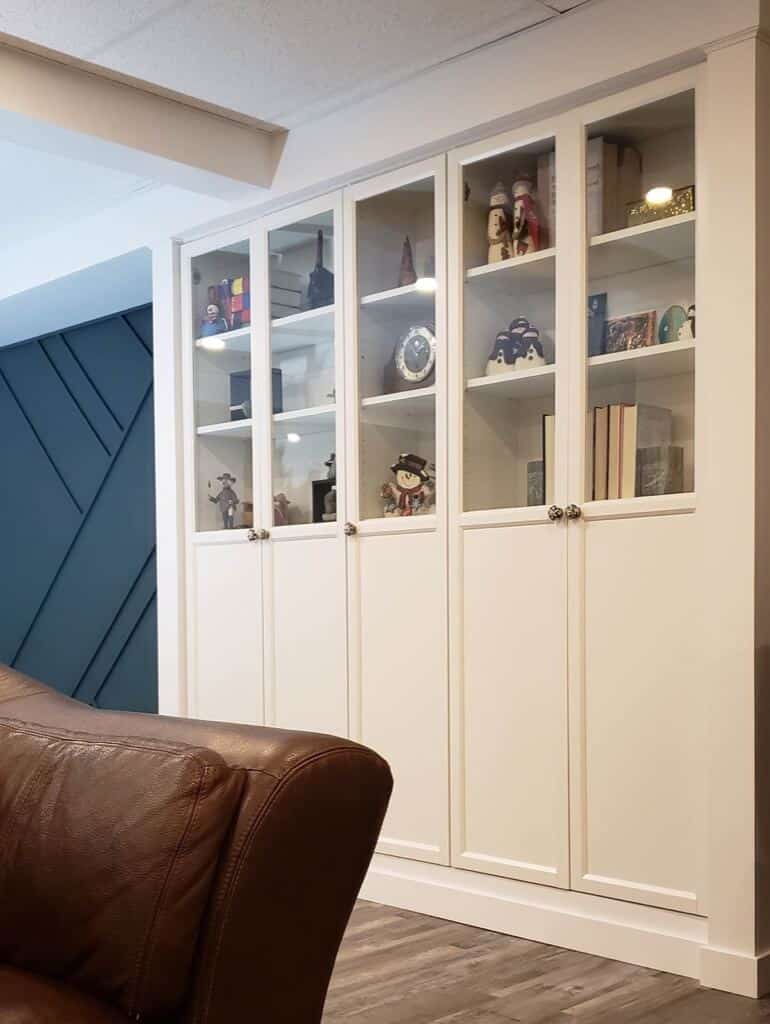
No doubt about it. BILLY is made for built-in bookshelves

The goal behind the IKEA hack was to create a useful division in the basement.

We had a really long wall that needed something to separate the games area from the media area.

What better way than to introduce more storage and some built-in bookshelves.

DIY built-in BILLY bookshelves

Items used for BILLY built-in bookshelves
  • BILLY bookcases + half glass doors
Other materials:
Tools:

Steps I took to build the BILLY built-in bookshelves

1. I started out by framing out the two walls that flanked either side of the bookshelves using 2×4’s. I wanted these to act like walls framing in the built-in BILLY bookshelves, thus I needed the walls deep enough to recess the BILLY’s in about 1 ½ inches from the finished front.

DIY built-in BILLY bookshelves

2. After the framing was complete, I assembled the IKEA BILLY bookshelves for a rough fit. It is absolutely essential that everything fits snug. At this stage, you can still easily make changes.

DIY built-in BILLY bookshelves

3. Next is to secure the BILLY bookshelves to each other. Use screws of the right length, so it won’t poke through the other side of the BILLY unit.

DIY built-in BILLY bookshelves

Once all of the BILLY bookshelves are joined, go ahead and secure them to the framed walls with 2 1/2″ screws.

4. It is time to start closing in the framed walls. I used MDF for this project because I wanted them to look like trimmed out walls and not just a drywall wall. Remember to check for plumb-ness.

DIY built-in BILLY bookshelves

Then, fill any of the joints and nail holes with drywall putty. Let it dry, and then give everything a good sanding.

5. Prime all of the MDF and then paint.

DIY built-in BILLY bookshelves

6. Now is time to install the finishing trim. For my project, I went with an inside quarter round along the top. This covers the joint between the drywall bulkhead and MDF, as well as the small gap above the built-in bookshelves.

DIY built-in BILLY bookshelves

For the bottom, I used the same baseboards as the rest of the basement (standard 1×4″ MDF baseboards). Again, this helps provide continuity to the entire space, tying the built-in BILLY’s with the rest of the renovation.

Fill the gaps and nail holes with drywall mud, give it a light sand, and then finish off the new trim with a final coat of paint.

7. The last step is to install the BILLY doors and hardware. We replaced the regular BILLY knobs with white and grey ceramic pumpkin knobs.

DIY built-in BILLY bookshelves

I made a YouTube video instruction to go along with this build. It can really help explain some of the more finicky steps about how I settled on specific measurements.

Total cost was around $500.00 CAD.

The best part of the hack is it completely changes the look of basic BILLY bookcases into a custom built-in and functional piece of furniture.

The hardest part of the build is the planning. Taking the extra time to really understand the dimensions and how it would all fit together is highly encouraged.

It led to some rather specific measurements to get the intended look. In particular having the final inside quarter round fit perfectly under the bulkhead when finishing the top of the built-in.

DIY built-in BILLY bookshelves

See the full tutorial of the IKEA BILLY built-in bookshelves.

~ Jeff from The Homestud

See Jeff’s other hack, which is one of 2018’s top 10 hacks — KALLAX corner home office furniture.

The post No doubt about it. BILLY is made for built-in bookshelves appeared first on IKEA Hackers.


No doubt about it. BILLY is made for built-in bookshelves published first on www.ikeahackers.net

Wednesday, January 23, 2019

Pupdate!

14 Valentine’s Day Gift Ideas for IKEA lovers

You love each other. You love IKEA. In my books, that seems a good enough reason to get each other IKEA themed Valentine’s Day gifts. Right?

I found some really cute (and funny) Valentine’s Day gift ideas on Etsy, bound to make your significant other’s heart flutter or melt, or both.

Some of these gifts can be customised, which will rake up brownie points for you. Have fun shopping over at the IH Shop.

valentines day gift ideas ikea

Click the image for the full gift guide

The post 14 Valentine’s Day Gift Ideas for IKEA lovers appeared first on IKEA Hackers.


14 Valentine’s Day Gift Ideas for IKEA lovers published first on www.ikeahackers.net

How To Install A Removable Wallpaper Mural

Hackers Help: Help me turn this built-in bed into reality

Please please please,
Do you have any idea how to set up this built-in bed with IKEA furniture?

Help me turn this bedroom into reality

Source unknown

I’m willing to do it if you could only give me help on which furniture would fit to build up this kind of bed.

I’ll be happy to share the step by step plan once I get the furniture name.

~ by Stefan

***

Hi Stefan

The built-in bed is a pretty ambitious project and I’m glad you’re up to the challenge. 

There are many ways to skin the cat and quite a few IKEA products may fit the bill. You choice will depend on your budget, skillset and what you’re comfortable working with.

#1 KURA and TARVA built-in bed combo

First off, I think the KURA reversible beds and TARVA beds are the obvious choice. Both are made of solid pine, which would make them play nicely together.

The easiest would be to have two KURA beds on top and slot in the TARVA queen beds at the bottom. But the KURA is quite low (45 5/8 “) so there is hardly enough headroom for the beds beneath, like so: 

Help me turn this bedroom into reality

If you wish to go with this, you’ll need to elevate the KURA beds

You’ll also need to close up the exposed legs for the built-in look.

#2 MYDAL and TARVA

So, on second thought, I would suggest building a wood structure (like how GeekDad did for the TROMSÖ bed) and use the 2 bunks of one MYDAL bunk bed.

Separate the bunk beds into 2 single beds. Position the top bunks high enough for comfortable headroom below. The TARVA queen beds should slot in well here too. Again, add trim, moulding, paint to beautify it.

elevated bunk beds

#3 KRITTER + MALM

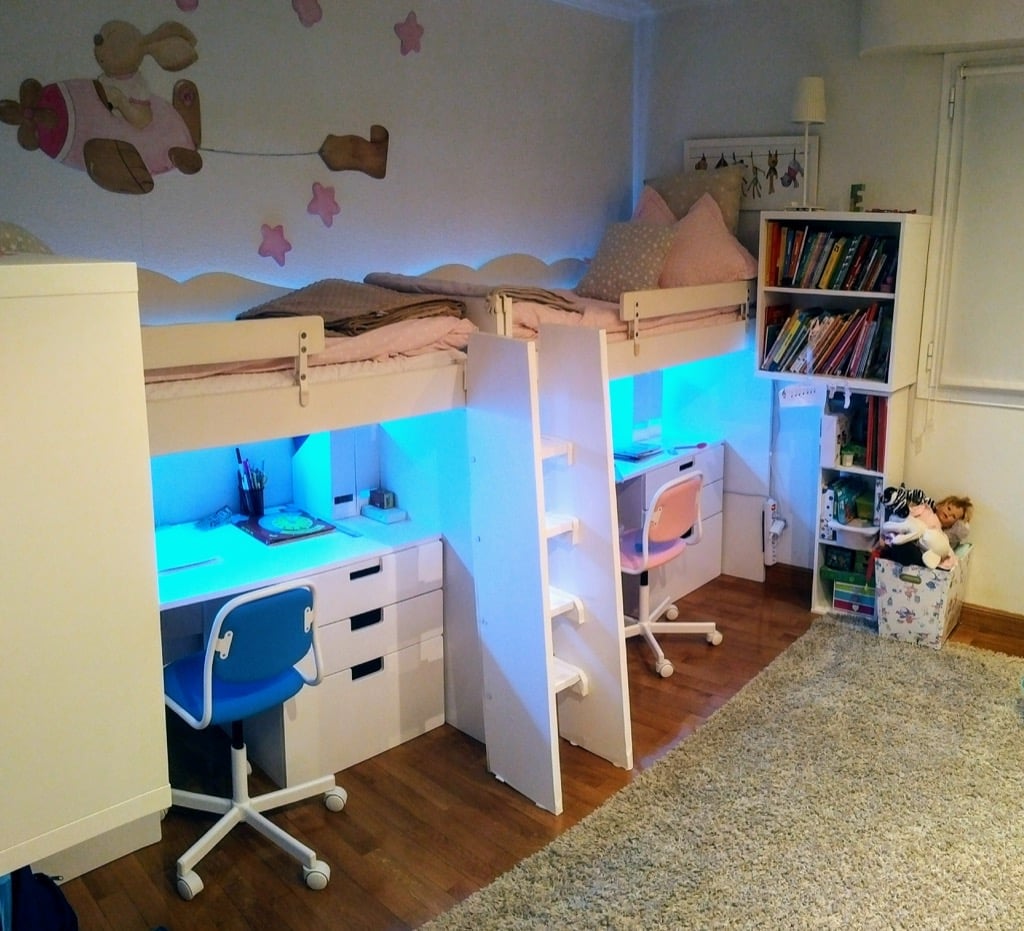
The same can be achieved with KRITTER junior beds. Aitor replaced the KRITTER’s head and foot boards with new “legs” made of wood boards to raise them. Aitor reinforced the bed using lateral stiffeners. This way the beds were strong enough. But the addition of some lateral buffers from wall-to-wall made the beds more stable.

Kritter loft bed

Another way to raise them up is to prop the beds with another piece of furniture like the KALLAX or STUVA. This could also serve as the landing of the staircase. Do secure the beds well to the furniture.

KRITTER loft bed

The KRITTER would go well with the MALM queen beds. This combo would probably look most like your all-white built-in bed inspiration photo.

#4 Stairs

As for the stairs, it would be better to build it from scratch as part of your structure in #2. That would look a lot more cohesive.

But if you rather not, you could use the most popular stair hack — the TROFAST staggered storage. The end step could be a STUVA wardrobe to raise it into a set of full-height bunk bed stairs.

trofast bunk bed stairsOr make it a lot more sturdy and built-in, like this.

So that’s my recommendations for you. I would suggest getting all the measurements of your room and dimensions of the IKEA products of your choice. If you do live near an IKEA, do take a look at the pieces and study them.

Then, start planning it out on paper. Be as detailed as possible as that will help you arrive at what works best for you.

For more help, join our IKEAhackers Facebook Community, where we share our hacks and get help from one another.

Good luck on your hack and we hope to see the finished results soon!

What other suggestions and advice on hacking this built-in bed? Please drop a line in the comments below. 

Happy hacking,

Jules

The post Hackers Help: Help me turn this built-in bed into reality appeared first on IKEA Hackers.


Hackers Help: Help me turn this built-in bed into reality published first on www.ikeahackers.net