Wednesday, October 31, 2018

New Video House Tour!

It surprised us to realize it has been nearly two years since our last video house tour. And we were even more surprised to realize how much our house has changed in that time!

In my head, we hadn’t really done much here in Richmond since we’ve been focused on the beach house and the duplex renovations, but when we re-watched those 2016 videos it felt like AGES ago – we hadn’t turned our son’s nursery into a big boy bedroom, our daughter’s room was mid-makeover, and Sherry had yet to go on her minimizing spree. There were also some pretty noticeable changes in our master bedroom and our living room, so it reminded us that we haven’t ignored this house as much as we thought we had!

The biggest change, maybe of our entire 5+ years of living here is definitely going on outside right now though…

We’ll share more info about painting our brick exterior once it’s complete in a giant detailed post with all the what, how, and how-much-it-costs details, but for the time being you can follow along on Instagram Stories or – better yet – turn your attention to the inside and take these tours around our ENTIRE first and second floors (we spared you a look into our third story which is just an unfinished attic).

Let’s start downstairs. Sherry and I relied on our go-to videotaping technique once again: I walked with the camera while Sherry narrated (we’re playing to our strengths here, folks). But I have to disclaim that the video was a little shakier than I realized, so I put a stabilizing filter on it afterward. It smoothed things out, but it caused it to look a tad glitchy in a couple of spots. But it still gives you a really accurate depiction of what it’s like to walk through our house – except our dining table is already full of junk for the duplex again (we recorded this a few weeks ago).

*If you can’t see the video above, you may have to click through to the post (they don’t always show up in a reader like Feedly/Bloglovin’) or you can watch it here on YouTube

The upstairs tour is a little longer because there are more rooms to see – and more rooms that are unfinished! And I should note that we shot this before Sherry’s closet video tour (hence the mirror not being hung in this one) and before we added the treadmill to the bonus room.

*If you can’t see the video above, you may have to click through to the post (they don’t always show up in a reader like Feedly/Bloglovin’) or you can watch it here on YouTube

For anyone who watched those videos and thought: “I wonder where they got that table/chair/lamp?” or “I wonder what that wall color is?” – we created this source page with all of that info for you. It has every room on each floor broken down for you.

And now that you’ve watched both of those you should totally take a time jump back to 2013 when we shared our FIRST video of this house when it was in its before state. And if nothing else, just click play to see our old brick of an iPhone at the beginning. Sheesh!

*One more time for the people in the back… if you can’t see the video above, you may have to click through to the post (they don’t always show up in a reader like Feedly/Bloglovin’) or you can watch it here on YouTube

We hope you enjoyed the tours! And we can’t wait to share more details about the exterior painting. I had to write this post because Sherry has had trouble forming words all week with all of the excitement around here, and is currently outside formatting a plan for how we’ll be replacing the portico that  WE TORE OFF OF OUR HOUSE. So yeah. It’s been a pretty exciting past few days.

P.S. Remember you can find all of our house’s paint colors and a full source list of where we got our furnisings/accessories/window shades/lights/etc here

The post New Video House Tour! appeared first on Young House Love.


New Video House Tour! published first on www.younghouselove.com

Hackers Help: How to make sliding closet doors for PAX?

I need a hack for PAX wardrobe system, I cannot afford IKEA’s sliding closet doors and I was wondering if there are any hacks that can turn a regular wardrobe door to a sliding door? ~ by Sara *** Hi Sara The price of the PAX sliding closet doors can be steep, especially if you […]

The post Hackers Help: How to make sliding closet doors for PAX? appeared first on IKEA Hackers.


Hackers Help: How to make sliding closet doors for PAX? published first on www.ikeahackers.net

Tuesday, October 30, 2018

So scary! Frightfully clever and easy Halloween ideas

So I turn to IKEA because they always have such fabulous ideas. Looking at their archives, I found these easy-to-recreate Halloween ideas that make a big impact with minimal effort.

The post So scary! Frightfully clever and easy Halloween ideas appeared first on IKEA Hackers.


So scary! Frightfully clever and easy Halloween ideas published first on www.ikeahackers.net

Monday, October 29, 2018

Recipe Time! Green Tomato Crisp!

The other day, as part of my Fall-To-Do-List-I’m-Determined-To-Really-Do-This-Year, I began shutting down the garden for the season. It’s one of those tasks that’s so thoroughly…fall. Cutting back spent perennials, pruning back shrubs, bagging leaves, splitting bulbs…taming all that stuff and taking care of this kind of ordinary business just feels so GOOD. I usually feel like a spectacular failure around this time of year because, inevitably, there’s always way too much renovation work to button up before winter, so tasks like these just fall by the wayside—so it feels like a huge mark of progress to be able to take the afternoon and just…putter around in the vegetables and set myself up for some highly successful spring planting in a few months. Little by little things are starting to feel rather civilized around here, as though the vision of living here that I’ve held onto in my mind is finally starting to align with reality. It doesn’t happen all at once, but it’s moments like this—out there in the crisp autumn air, peacefully yanking the languishing tomato plants from my modest backyard produce farm and wrangling them into a neat row of yard bags—that feel like glimpses into what life might look like someday. It ain’t bad.

Another major development has occurred: after 2+ years of hot plates and a small toaster oven, I have a working stove again! My kitchen itself is still a long ways from completion—almost everything in it is still “temporary,” except for said working stove—but it’s workable. And I am WORKING IT. Over the past week I’ve rediscovered the magic of roasted vegetables (didn’t realize how much I missed those!) and have baked like 7 different things. I don’t think of myself as some kind of great cook but I do enjoy it, and so restoring this basic functionality feels like a big deal.

SO! We’ve all heard of fried green tomatoes, yes? It’s, like, a thing in the South. I also vaguely remember my friend, originally from Tennessee, saying something one time about his mama’s Green Tomato Pie, a “this could come in handy someday” detail I catalogued somewhere in the back of my brain, only to have it reemerge as I looked down at all the green tomatoes still clinging to the plants I was about to rip out of the ground. So instead of just throwing it all in the yard waste bags, I collected all the remaining green tomatoes first and asked my friend for mama’s recipe.

He didn’t know the recipe. GREAT JOB, FRIEND. So I turned to google, looked at a few recipes, and decided I’d just make something up instead. Firstly, I didn’t want to make a pie crust. Secondly, the more traditional recipes I was finding struck me as extremely sweet with way too much sugar for my bland Yankee tastebuds. So instead of a pie I made it a crisp, and instead of the sticky-sweet filling I scaled way back on the sugar, plus I added some things, and then it occurred to me “wait, did I just develop a recipe? DOES THE INTERNET NEED TO KNOW?” so I’m going OFF BRAND to tell you all about it. This is when I take my dramatic turn as a food blogger. I have found my passion. Fuck houses; I’d rather eat.

So anyway. This is a dessert you can make with all those green tomatoes at the end of the season, and I don’t think it’s horrible for you as far as desserts go, and I really like it. The green tomatoes bake much like an apple, and the restrained use of sugar allows the tart green tomato flavor to come through without hitting you over the head with it. It’s a little weird but so far a limited selection of friends have confirmed that it is, in fact, pretty delicious so here we go.

INGREDIENTS:

Filling:

3-4 Cups thinly sliced green tomatoes
4 Tbsp flour (I used an all-purpose Gluten Free flour)
¼ Cup sugar
1 tsp ground cinnamon
2 Tbsp apple cider vinegar (I like Bragg’s, but any kind should do)
1 tsp vanilla extract
Pinch of salt

Crisp Topping:

½ Cup ground unsalted raw almonds
½ Cup ground unsalted raw cashews
¾ Cup oats (I used Bob’s Red Mill Gluten Free Old Fashioned Rolled Oats)
2 Tbsp brown sugar
6 Tbsp unsalted butter, melted
Pinch of salt

Step 1: Preheat oven to 350. Wash your damn hands.

Step 2: In a large bowl, sprinkle flour over the green tomatoes and toss to combine. Throw in the rest of the filling ingredients and mix until all tomatoes are nicely coated. I used my hands. Transfer the filling to your baking dish in an even-ish layer (I used a 1 ½-Quart round baking dish, but you do you).

Step 3. Grind your almonds and cashews. I used a coffee grinder, but whatever works (blender, food processor, mortar and pestle, rolling pin, laser eyes). Mostly you want a kind of coarse powder, like the texture of coffee grounds, but it’s good if there are still some larger chunks, like around the size of a…pencil eraser? Do what feels good. Choose your own adventure. Grind enough nuts to measure 1 cup and then transfer to a bowl.

Step 4. Melt the butter. I use the microwave. Mix the melted butter and the brown sugar, and then add the oats.

Step 5. Combine your buttery sugary oats with the ground nuts and mix until well-combined.

Step 6. Top your filling with the crisp topping in an even layer over the whole thing. It should be enough to provide good coverage! Sprinkle a pinch of coarse salt over it all—Maldon if you can; it’s the best! If you’re feeling fancy, distribute a few ½ T slices of butter on top before it goes in the oven.

Step 7. Bake at 350 for one hour, remove and let cool a little. You should see some of the filling bubbling up around the edges and the crisp topping starting to brown.

Step 8. Serve warm with ice cream! Or eat it however you want to! You’re a strong independent lady and you don’t need me to tell you how to enjoy dessert!


Recipe Time! Green Tomato Crisp! published first on manhattan-nest.com

2 easy ways to hang up the IKEA PS 2017 lamp

These are 2 different ways to hang up the IKEA PS 2017 Lamp. The original method was is to hang it like a lantern, but since I needed it to be used in a different space, I came up with 2 ways to hang it. I wanted some extra light in my laundry room to […]

The post 2 easy ways to hang up the IKEA PS 2017 lamp appeared first on IKEA Hackers.


2 easy ways to hang up the IKEA PS 2017 lamp published first on www.ikeahackers.net

Sunday, October 28, 2018

#117: The Downside To Decorating One Room At A Time

We recently passed the one year anniversary of moving furniture to our beach house, so this week we’re looking back on how we kept our sanity while decorating an entire house all at once. It made us realize that there are some flaws in our usual method of taking things slow and going one room at a time – so if you’re struggling with your own home, we have some ideas. We’re also recapping our trip to Chicago for the Domino Magazine Awards. Plus, I defend my take on navy cabinets and smart locks while Sherry buys something exceptionally ugly for our house.

You can download this episode from Apple PodcastsGoogle PodcastsStitcherTuneIn Radio, and Spotify – or listen to it below! Then use this page to check out any links, notes, or photos we referenced. Note: If you’re reading in a feed reader, you may have to click through to the post to see the player.

What’s New

  •  We realized MOST of our “photos” from the night are actually Boomerangs (you know, those short GIF-like videos like the one below) so your best recap of the event may be by checking out this Instagram post where Sherry posted a bunch of them that you can scroll through.

Updates

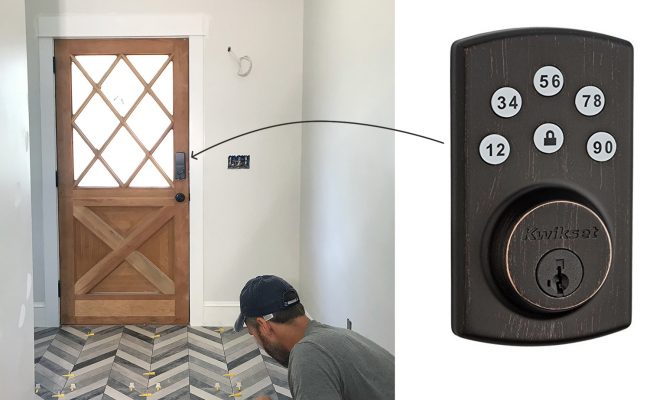
  • That’s the photo of tiling the duplex mudroom that had everyone wondering if we’d gotten a smart lock (which I ranted about back in Episode #113) but it’s actually just this keypad lock which doesn’t have any smart/wi-fi/Bluetooth features. Don’t be fooled by the “SmartKey” descriptor in the listing – that just means you can rekey the lock yourself to match any other existing Kwikset keys you have.
  • It’s slightly larger than your typical door hardware, but we appreciate that it matches the rest of the doorknob in color (we went with oil-rubbed bronze, but if you buy the nickel or brass versions, the entire thing is that finish).
  • If you’d like the details on that gray tile we used above, here you go.

  • Also, in the top left of the photo above, you can see the cabinet color that I egregiously called “navy” back in Episode #111 (for source info on all the other tile in the photo above, click here).
  • But maybe what I meant was that it’s closer to “the new navy” as Apartment Therapy recently speculated after spotting a growing peacock blue trend.

(source)

  • Our cabinets probably aren’t green enough to be dubbed a true peacock blue (Sherry’s description of a grayed out muted teal might be closer), but we’ve used peacock blue a lot in the past (like in our last home’s guest room and dining room)
  • And lastly, if you missed the original discussion of solving our stinky house problem with a crawl space dehumidifier, you can catch it back in Episode #103.

Decorating A Whole House

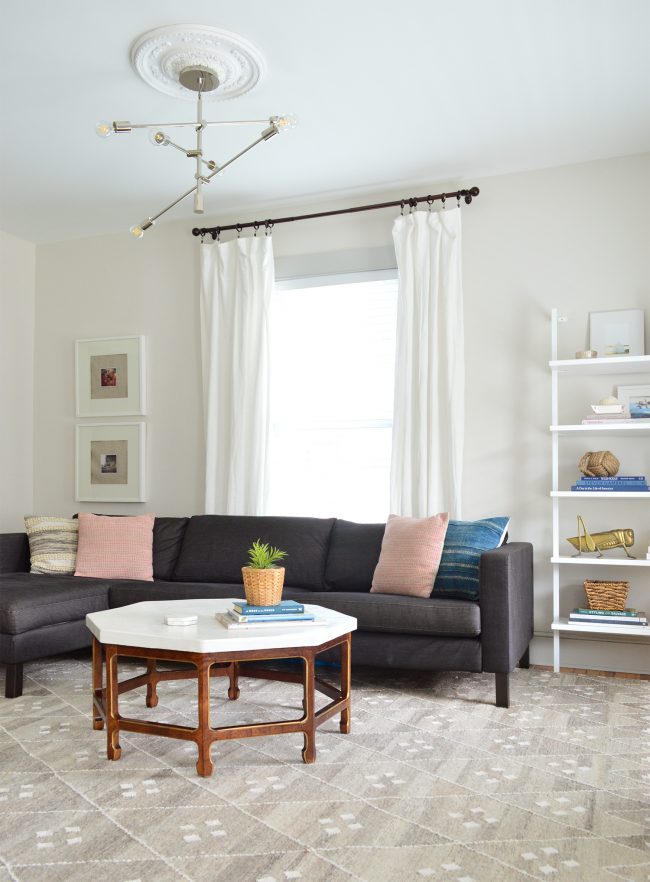
chandelier / ceiling medallionrug / bookshelf / curtain rod / curtains

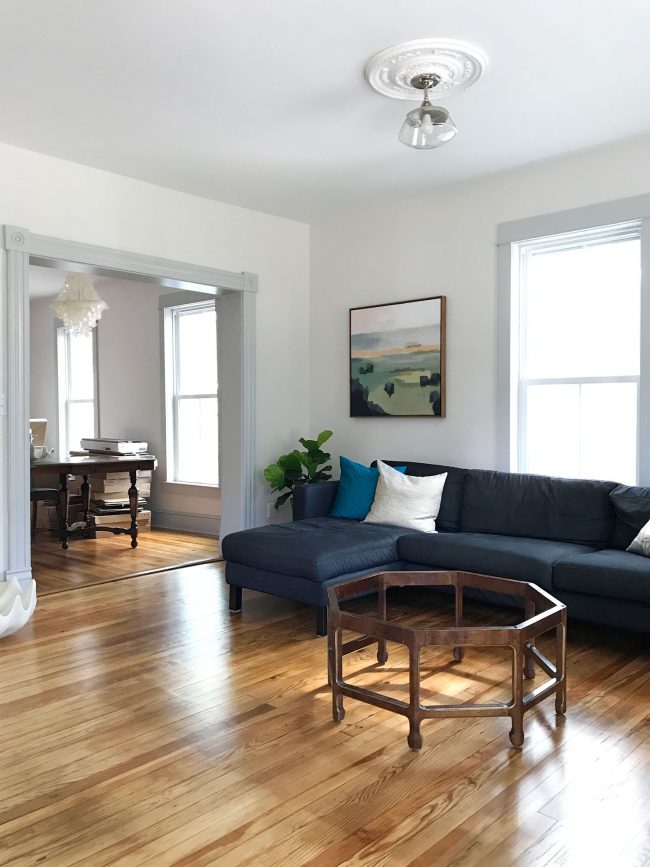
  • It’s been a little over a year since we first moved furniture into the beach house so it’s been fun looking back at the process and the progress – like this is what the living room looked like the day that we unloaded the moving truck.

  • It’s funny to look at what stayed right where it landed (like the coffee table base we got from a neighbor – which we later finished off with a DIY concrete top) and what got moved around (like that art above, which now hangs in the front bedroom).
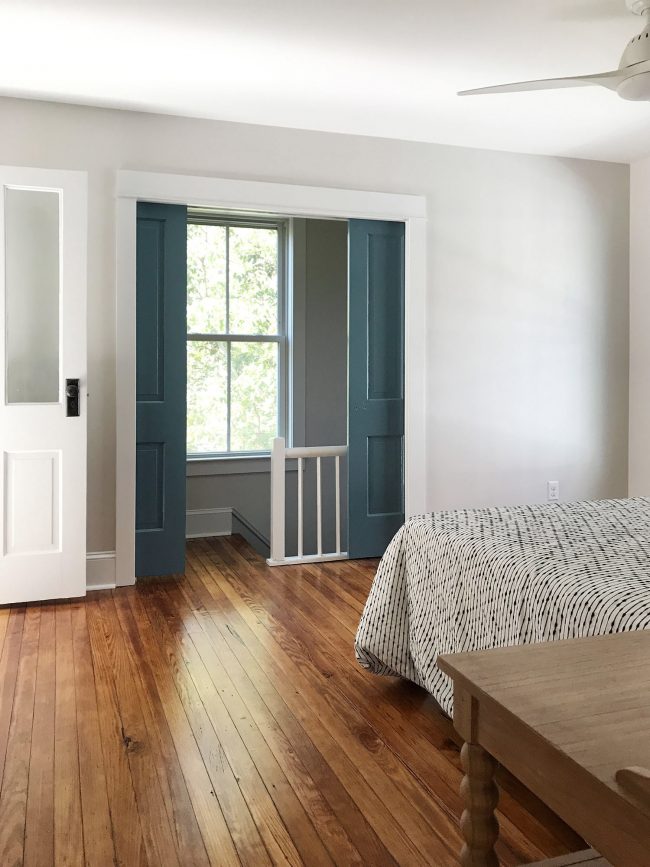
  • Here’s another angle that demonstrates how we were able to shuffle things around easily. This is how the master bedroom looked right after move-in day:

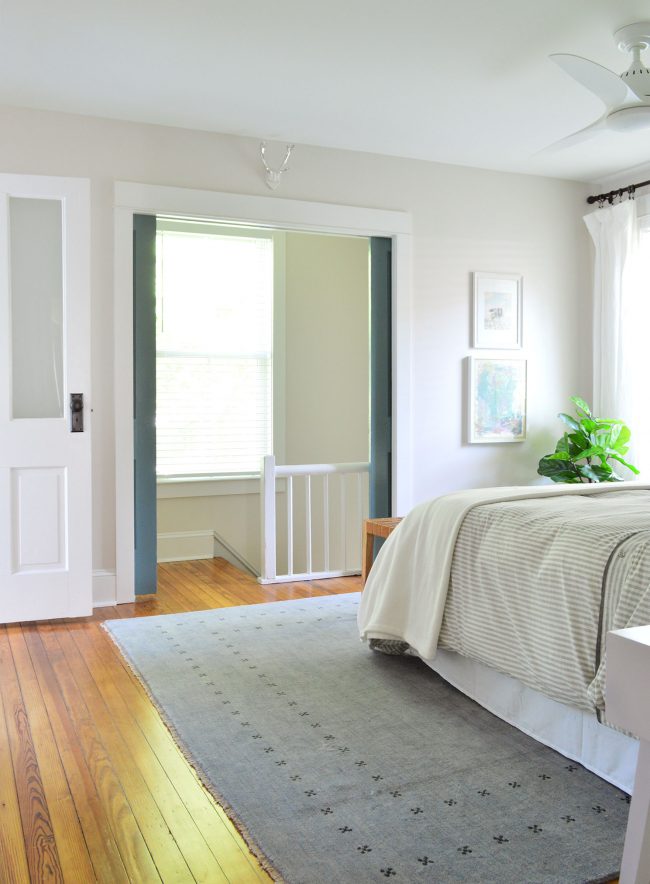
  • And now it looks like this. The original bedding went into the middle bedroom (and got flipped upside down to calm the pattern a bit) and the original nightstands are now in the front bedroom, where they have more breathing room. Also, the blue rug that’s in here is one that we bought for the living room but once it arrived we decided we liked it better up here.

rug / bedding / nightstand / fan

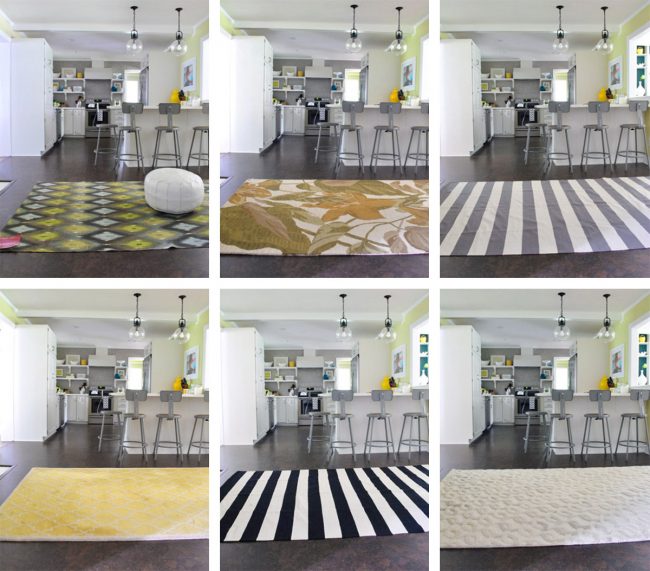
  • We also mentioned in the podcast that we could vividly remember a few old blog posts where we deeply deliberated single decisions like a light shade, a kitchen rug, and even bath mats. Man there’s “a lot of look” in this image below. Thanks 2012!

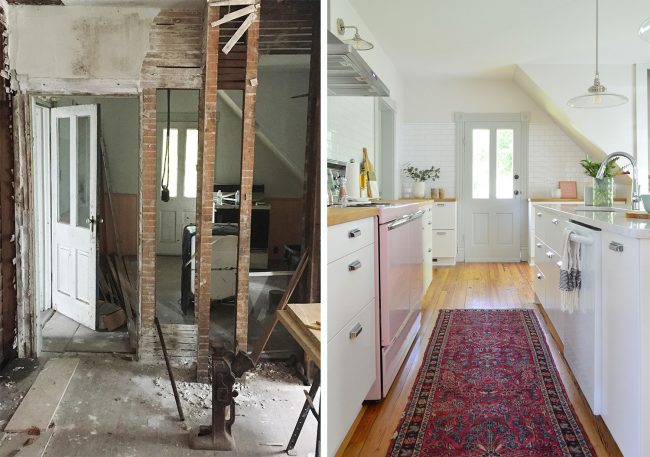
  • And like we said, we’re working on a big before & after post of the entire beach house (here’s a sneak peek below)  but until then you can see most of the rooms in their final state (and all of the sources that you might ask about!) on our Shop Our Beach House page.

We’re Digging

  • Don’t look now, but Sherry’s watching Housewives in the mirror (it perfectly reflects our TV for her – ha!)

  • There’s the NordicTrack Treadmill we got for our bonus room (we’re considering it Sherry’s early Christmas present due to her newfound love of walking). She still much prefers her walks outside, but when it’s too cold or rainy she hops on here and turns on Housewives.
  • I noticed there’s a code on the listing at the moment for “free expert set-up.” I would totally take advantage of that! It was such a pain for us to wrestle it up the stairs alone, and assembling it ourselves was totally doable, but it took about an hour and required two people at certain moments.

  • I’m wearing one of the two pairs of Goodfellow & Co pants from Target that I bought recently. They’re the Slim Straight Fit Twill Pants in “moss,” which have detailing that’s kind of like jeans (think rivets on the pockets), but I also got these Slim Fit Chinos in dark gray that feel a bit more like dress pants.
  • They’re very similar to the Goodfellow shorts I dug back in Episode #99.
  • And since I basically just bought an outfit off of a Target mannequin for this event, this is the blazer, shirt, and shoes I’m wearing in that photo above. #fashionblogger
  • And because I know you don’t care what I’m wearing and want the details on Sherry’s outfit, here’s her top, dark jeans, and shoes.

If you’re looking for something we’ve dug in a past episode, but don’t remember which show notes to click into, here’s a master list of everything we’ve been digging from all of our past episodes. You can also see all the books we’ve recommended on our Book Club page.

And lastly, a big thank you to Grove Collaborative for sponsoring this episode. Sign up at Grove.co/YHL to receive a trio of Mrs. Meyers cleaners and a set of walnut scrubber sponges, or if you’re already a Grove customer, visit that link to still get the free sponges!

Thanks for listening, guys!

*This post contains affiliate links*

The post #117: The Downside To Decorating One Room At A Time appeared first on Young House Love.


#117: The Downside To Decorating One Room At A Time published first on www.younghouselove.com

Friday, October 26, 2018

Alert! You’ll want to hack IKEA drawers after this

Mike shows us how to make custom fronts for IKEA drawers, which in his case, is the 4-drawer NORDLI dresser. His plan was to use his NORDLI hack as a combination dresser/ media center in his bedroom and wanted something that was not too obviously IKEA. This is before: And AFTER! Insanely gorgeous IKEA drawers […]

The post Alert! You’ll want to hack IKEA drawers after this appeared first on IKEA Hackers.


Alert! You’ll want to hack IKEA drawers after this published first on www.ikeahackers.net

Fall Checklist: Pressure Washing Away The Grime!

This blog mini-series is in partnership with Lowe’s! Thank you for supporting my sponsors!

Friends: I have picked up a new hobby. A passion project, if you will. The hobby is obliterating dirt and grime from various surfaces with water from a magic wand. Literally, it’s called a wand and it’s part of my new pressure washer!

Carrying on with the theme of trying to make the front of my house look presentable while it awaits restoration and I wrap up the huge restoration of the side of the house, I focused a little attention on the front porch!

From a distance, the porch looks…pretty OK?It appears to be mostly original, and the fact that it’s still there at all is the main bright spot. It’s going to need a ton of work eventually—everything from the cornice (which may or may not need to be at least partially rebuilt—the rot is bad), to the siding, to those gloriously large 6-over-9 windows, to the door, to the transom, to the floor, to the columns. Literally all of it! I used to think I’d tackle the whole front elevation of the house at once, but now I’m thinking restoring the porch may well take an entire summer to get right. Isn’t that center column crazy looking?

I think that’s what happens when a contractor temporarily supports the roof and removes the original columns to install a new floor (the original floor was almost definitely tongue-and-groove fir, not 5/4″x6″ pressure-treated pine decking!), and then doesn’t understand that the columns are tapered when he throws a level on the side of the original column to put it back. I’m presuming this contractor was male, because only a guy would be this dense. The column is tapered, genius! You’re doing it all wrong! It’s only super noticeable when you look at the porch head-on, but of course it makes me mad whenever I think about it. Poor beautiful house. Who hurt you like this?

IN ANY EVENT. I sweep the porch sometimes. That’s about it. To be honest it’s not like the porch is in constant use—looking out onto the street isn’t the most bucolic view in the world, but I do like to sit out there on warm days with a cup of coffee or a cocktail and my laptop, getting some work done and watching the world go by until I get bored of the world and want to go inside. Sadly over time I’ve definitely used the porch less, not more, which I didn’t think about much until I realized the reason for that is pretty simple.

OK fine I’ll show you.

Please be kind.

I’m sorry in advance.

GASP! I FEEL LIKE A MONSTER! Yes, for real: that’s how the vinyl siding under the porch looked until a few days ago. No, it hasn’t always been that bad. No, I have not doctored this photo for dramatic effect. Yes, I have completely neglected to touch it in five years because if I’m not actively renovating it, what is the point of doing even some light maintenance?

The point is this: restoring a house takes a long time, and in that time you constantly have to negotiate between quick and achievable solutions and long-term, more comprehensive work. Focusing only on the latter means that you’re ignoring the former (guilty!), and so everything starts to actually look way worse than it really is. When I look at things like this, my instinct is to just rip all the vinyl off the wall—can of worms be damned! But then I have to reign it in and remember that I will tackle that project someday, but not today. Today, I just need it to…not be disgusting. And if I’ve learned anything through working on the inside of houses, it’s that a good cleaning is the cheapest and fastest kind of makeover.

Just to cut myself a little slack, the whole house doesn’t look like this, I swear!!! The rest of the vinyl siding at least gets washed down a little when it rains, but these walls under the porch never get rained on, so all that road dirt and pollen and other dirt just kind of accumulates. Let’s try not to think too hard about what this may or may not suggest about my local air quality, seeing as I’d rather just keep living my life than figure out how to insert myself into a plastic bubble.

So. I described my gross situation to my fairy godparents at Lowe’s and asked if I could pretty-please have my very own pressure washer, and they obliged! #2blessed

As I have recently discussed, I have a deep and abiding aversion to equipment that needs gas or oil to work. Whether it’s a lawnmower or a weed whacker or a snow blower, in my mind they are all equally as complicated as an automobile or a fighter jet and I wouldn’t mess around with the innards of those either. I’ve had my car for like 4 years and only recently learned how to pop the hood…while I let the AAA guy replace my battery, which I’d sooner throw into the Hudson River than attempt to jump by myself. Way too risky. Are you nuts? I’ll stick to house stuff PLEASE AND THANK YOU and I just want my tools to work immediately and without hassle and this doesn’t seem like too much to ask out of life.

So anyway! My pressure washer is by Stanley, and it’s a plug-in model! And when you go to turn it on, it does so immediately and without hassle! It’s everything I ever wanted! Unfortunately it’s currently out of stock, but I got the inside scoop and they’re working on restocking them AS I TYPE THIS VERY SENTENCE so all is not lost. There are a bunch of electric pressure washers available, though, including this Greenworks one that’s evidently equally powerful, a little cheaper, and looks much more compact! Why didn’t I just get that one? NOT SURE. I felt like branching out into yellow machines. Like most new tools I buy, I generally don’t need the biggest, baddest, most powerful one out there, but I also don’t want the cheapest one because that often results in disappointment (and needing to replace it sooner). My Stanley machine lands in the middle/upper-end of available options, and seems more than sufficient to do the things I want it to do!

ANYWAY, back to my very disgusting siding. My basic strategy was to start up at the top of the wall and work my way down, concentrating on each horizontal run of siding on my way down. It took a few minutes to kind of get comfortable with it, and then it was ALL I WANTED TO DO for the rest of the day. I mean how satisfying, right? Included with the machine were a few different interchangeable nozzles for the end of the wand, which are helpful for different kinds of cleaning projects.

After giving everything a first pass, which maybe took about 20 minutes, things were looking about a thousand times better! DEFINITELY way more than a hose alone could have done, and way faster and less hassle than trying to do this by hand with a sponge and some rags which was my previous plan I’d been putting off forever.

Not all pressure washers have them, but one of the things I like about mine is that it has a separate chamber for detergent if you need something with more cleaning power than just pressurized water. It uses about 1 part of cleaner for every 10 parts of water, so concentrated cleaners that aren’t too gel-like work well. After I got most of the grime off, I filled the detergent compartment with regular white vinegar and went back for a second pass, figuring it couldn’t hurt and might help lighten some of the deeper staining. Lowe’s also sells a full line of cleaners for different applications—next time I want to add the Krud Kutter House and Siding Cleaner and see how that does! The regular Krud Kutter has become one of my indispensable cleaning products around the house, so I’m optimistic.

SO. TO REVIEW. BEFORE:

LIKE LITERALLY AN HOUR LATER:

I thought it would be cute to switch the coffee out for a cocktail and add a festive little lantern. This backfired because a) you can’t tell that the stupid candle is lit and b) my friend dropped by while this very profesh photoshoot was going on and I had to explain that I was not, in fact, fixing a cocktail to drink at 1 in the afternoon but rather to just take pictures of for the Internet, which I realized as it came out of my mouth just might actually be more embarrassing.

I TRY. But the point here is not my lackluster prop styling. The point here is my now positively LUMINOUS walls of vinyl siding that no longer look like they’ve been left to steep in a swamp for years on end.

It looks SO much better. One thing I didn’t totally know about vinyl siding is the extent to which it really does stain—you’d think plastic wouldn’t but it totally does. Most of the nastiness was surface dirt and staining, but even blasting at the highest pressure couldn’t get the deeper staining out. So it didn’t exactly achieve “it looks brand new!” kinds of results, but I blame the old vinyl (and MAYBE a certain someone’s years of deferred maintenance), not the washer. But this kind of improvement for a very little amount of work? I’LL TAKE IT! In fact, I really think this is a chore I can add to my seasonal to-do lists and do again a couple times a year to maintain it, and I know having my very own pressure washer will come in handy for ALL SORTS of things. I’m already giving my fence, garage and sidewalks side-eye. Also the street. Also my neighbors houses. What if I just start rogue pressure-washing things in the dead of night? Like I know I probably shouldn’t but just…WHAT IF? Watch out, world.


Fall Checklist: Pressure Washing Away The Grime! published first on manhattan-nest.com

Thursday, October 25, 2018

Got 2 free Kallax units and here’s what happened

I wanted a challenge to see if I could make the KALLAX units unique after we received them for free. Plus they fit the bill perfectly as home office furniture.

The post Got 2 free Kallax units and here’s what happened appeared first on IKEA Hackers.


Got 2 free Kallax units and here’s what happened published first on www.ikeahackers.net

Wednesday, October 24, 2018

MINE: Lighting and Lighting Parts

Welcome to another special episode of MINE, the show where I go out and buy cheap old stuff and then we play show and tell! Except I’m the only one playing! It never gets old! For me!

They say with thrifting, lightning never strikes the same place twice but I’m not sure that’s true. Point of fact, after some truly exhaustive research on Yahoo answers it appears it’s not even true when you’re talking about actual lightning. It’s sometimes true with regards to thrifting, but nevertheless I persist. I will return to that same funky watering hole 25 times because of that one time I showed up and there was a cold bottle of Fiji nobody else seemed to notice.

OK, that’s enough metaphors to last us a while. Point is, I went back up to Albany on a recent thrifting trip (friend needed interior doors, I needed to oblige my FOMO) and I feel I did PRETTY GOOD. My first stop is always the Historic Albany Foundation’s parts warehouse—I’d keep it a secret, but I love these folks so much, that wouldn’t be cool. The Historic Albany Foundation is a non-profit, so aside from a ton of other important work they do, they have an architectural salvage warehouse full of things saved from old buildings during remodels or prior to demolition. Prices are VERY fair—I can’t fault other salvage/antique places for needing to turn a profit, but it really feels this place is there to help and support people at any price point who are trying to do right by their old houses. This old house owner appreciates that a lot!

First up—such a pretty glass shade! I love that it’s so simple and versatile but still has some unique detailing. The rest of the light is missing, so this could become a semi-flushmount or a pendant. For $5, it was a buy-now-and-figure-it-out-later kind of situation. I try to keep an eye out for milk glass shades where you can’t see the bulb—I feel like LED bulbs are getting better and better looking all the time, but I still don’t really want to see one exposed.

Then I saw THESE and at $20 for the pair (in PERFECT shape) it was…the same situation. So pretty! I’d guess they’re kinda late Victorian? All these shades are good excuses to design and make some light fixtures. Which really is my idea of a good time (seriously, it’s relaxing!), although coming up with the supply list is kind of overwhelming. I’ll likely order parts from Grand Brass, which my friend Allison over at Deuce Cities Henhouse uses for her slick-ass DIY light fixtures (some of which are now available as kits—so smart!). I have some ideas! I’ve been considering using them for my main kitchen fixture. Hmmmmmm.

BTW, the bowls on the shelf above are by a local ceramist named Andrew Molleur who is SO goddamn talented. I have a few of his pieces around the house, and watching his work and business evolve since I’ve lived here has been a real treat. Plus he’s a really cool nice guy.

More Alabax lights! The one on the left is new (to me) and the one on the right you might remember from the last time I went up to Albany! I put them side-by-side so you can see the difference in shape/scale.

But even more exciting was that it’s a perfect mate with the other Alabax fixture I bought almost 3 years ago! What’s funny is that the one from 3 years ago was $85, and this recent acquisition was $5! The only difference is that the first one was fitted with new socket/wiring/crossbar, and the new one doesn’t have any guts. That’s a pretty easy fix, though, and it won’t cost nearly $80! I think these are both headed to the cottage, but that could change. I sort of feel like I overpaid the first time so now it’s like the balance has been restored. $45 a fixture, not bad! (that’s some Advanced Placement thrift calculus for ya.)

For something like $2, it just felt unethical to leave this cute little utility light behind. Even if it just ends up at the top of some basement stairs or something, still worth it.

AND THEN! To round out this theme! LOOK HOW CUTE IS THIS BABY DECO LIGHT! For $10! My friend said I shouldn’t buy it because it was “just so common” and I was like “I CAN DO COMMON! I’M FINE WITH COMMON!” and it was settled. I love the detail on the porcelain base, and the intact shade is just so classic.

I know, what a diverse collection of items—ha! Does this ever happen to you? I feel like it happens to me a lot when I thrift—everything I find that day will sort of adhere to a certain theme for whatever reason.  Like the other day, I bought several things and they were all green. Since I feel I’ve done my scientific research for the day with the aforementioned lightning thing, if anyone can shed some light on this phenomenon (I didn’t mean to write that pun, but once I did, I wanted everyone to endure it), I’d really like to hear it.


MINE: Lighting and Lighting Parts published first on manhattan-nest.com

Maximizing Our Mini Mudroom

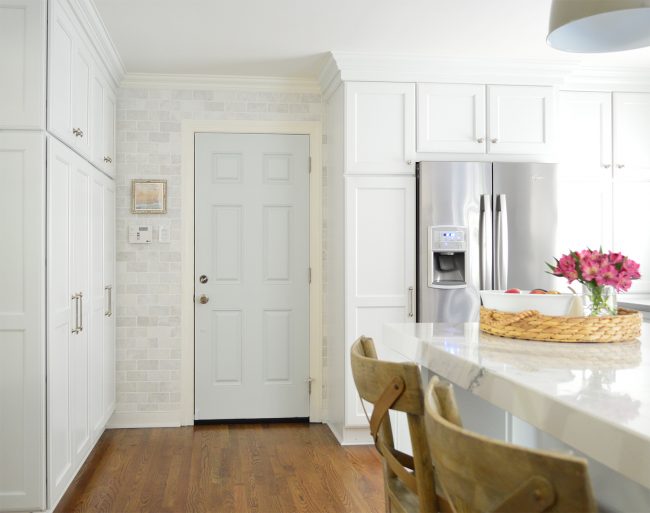
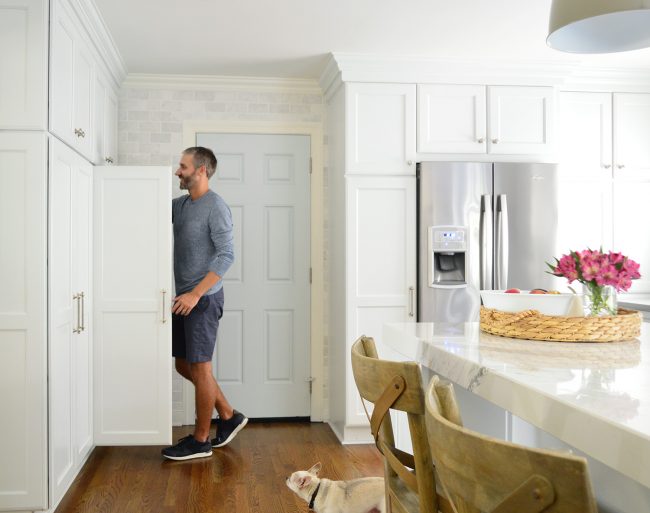
Since we don’t have a proper mudroom in our house (our garage door, which we use every day just dumps us right into our kitchen), you may remember that we squeezed the function of one into our big kitchen remodel by placing large cabinets – kinda like lockers, but prettier – right next to the door that leads to our garage. But now that we’ve lived with them for over two years (how has it been over two years since our kitchen renovation?!), we realized that a few easy tweaks would make these hidden cubbies work a lot harder for us.

(Since I know you’ll ask – here are Sherry’s shoes, jeans, fleece, & a similar purse)

To help you get oriented, here’s the area of our kitchen we’re talking about. That door to the garage is our main entry/exit point, and if you look at the floor plan options we considered during our renovation, you can understand why having this faux mudroom has been such a HUGE improvement for us. We get to keep shoes, coats, backpacks, purses, gloves, and hats conveniently by the door, but all of that clutter gets hidden away. It has been such an upgrade from our old system of walking halfway through the kitchen to dump shoes into one big dusty shoe basket that was out in the open, and then trekking even further around the corner to the coat closet to hang everything else.

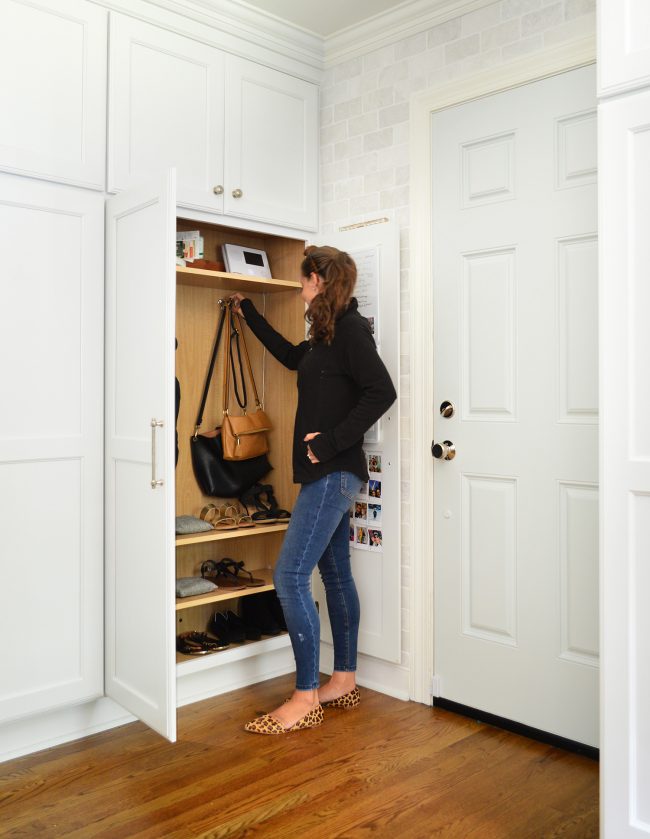
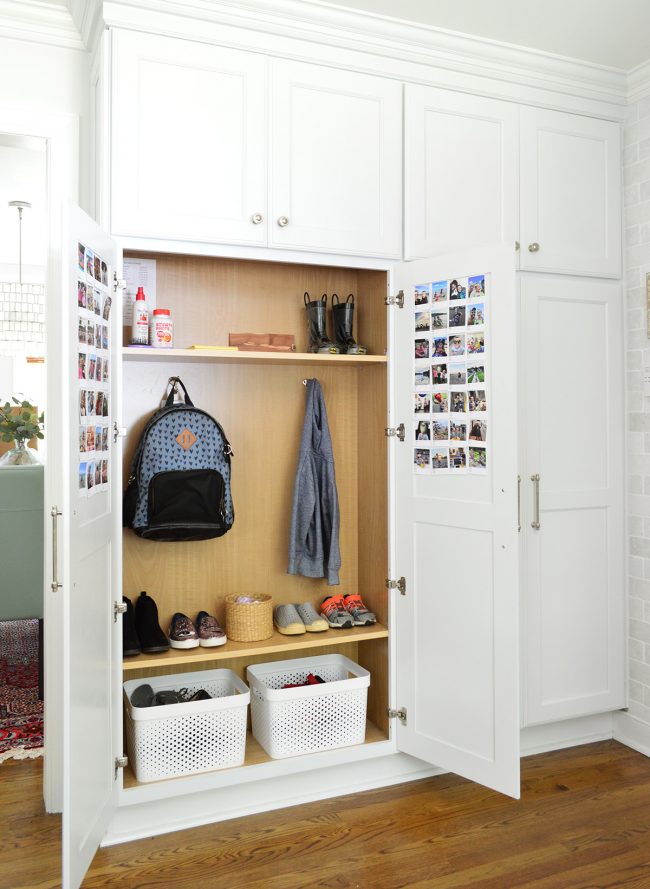
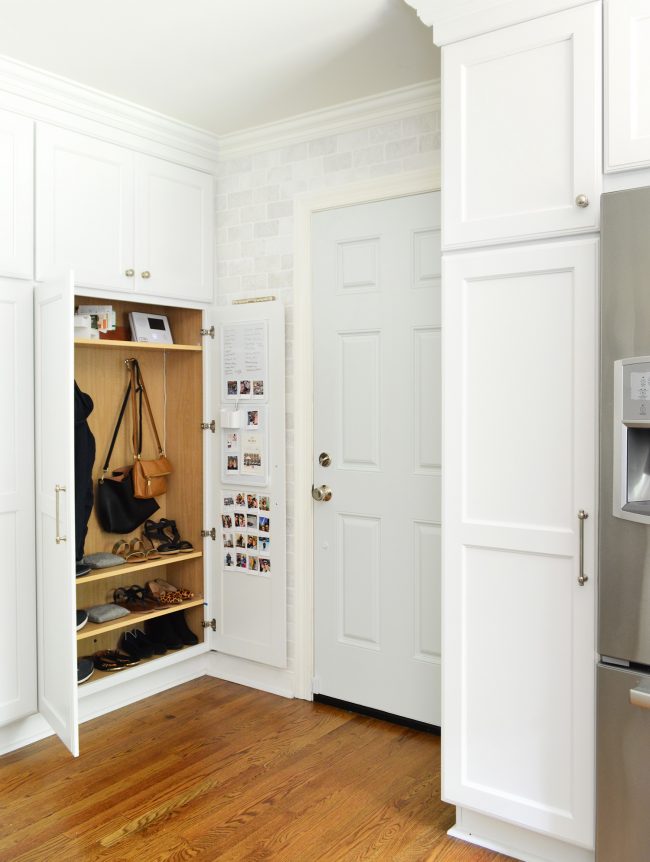
Our “mini mudroom,” as we call it, is made up of two large cabinets that go from floor to ceiling. And each of these two cabinets have two doors – meaning each of our four family members has their own side (or locker, if you please). You’ve probably seen our kids’ side the most, which has looked pretty much like this since the remodel was complete. We added hooks for their coats and backpacks, and a basket underneath to corral extra shoes. It gets a little messy sometimes, but overall it has been SUPER functional for us and for them. Tip: we keep a basket of socks in there along with their shoes, which makes it so much easier to get out the door than having to send them back upstairs for ’em. 

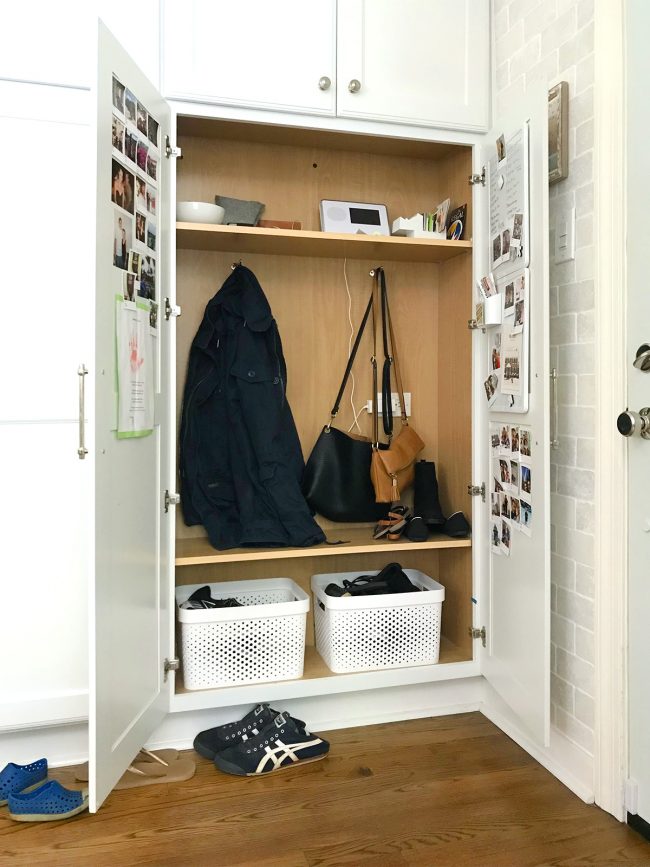
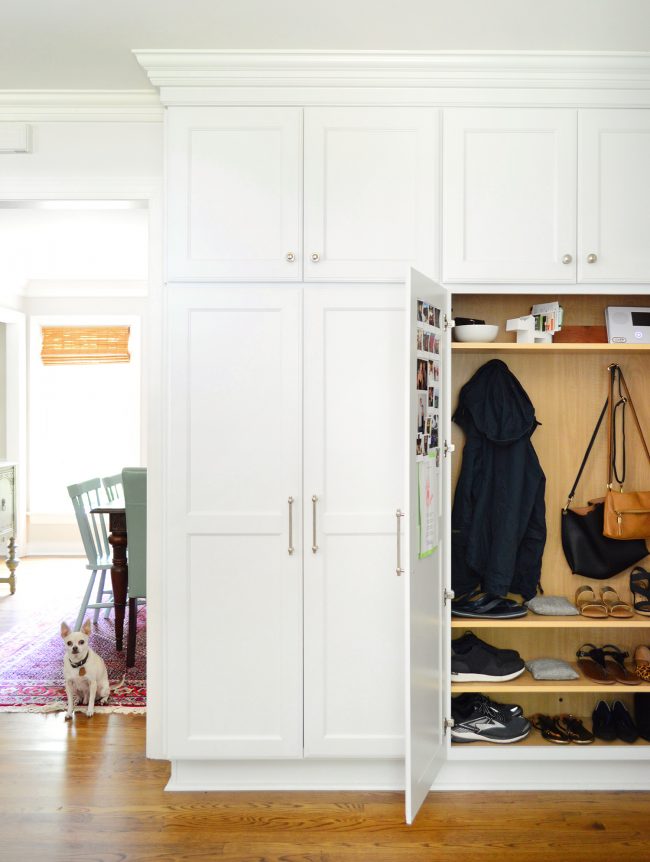
Our side has had the same setup over the last two years: hooks, shelves, and shoe baskets… but over time we realized it wasn’t working as well for us as we’d like. The primary issue is that our stuff is just bigger. Our coats are longer, so sometimes they’d get bunched and wrinkled on the bottom where they’d hit the shelf below (instead of freely hanging), and the baskets barely hold more than three of my shoes (and 3 shoes is NOT a helpful number). Sherry’s basket could hold more of her shoes since they’re smaller than mine, but it would get so crowded that it was impossible for her to grab a pair quickly without taking the whole basket out every time. Meanwhile, our kids’ little shoes could slide out with just a slightly tip of the basket. What works for them just wasn’t working for us.

I know you’re probably thinking: just adjust the freaking shelves then! Well, the problem – and actually the reason why we had set it up this way in the first place – is that the shelves are set at the highest and lowest points they can be, based on the pre-drilled holes in the cabinet. So back in 2016 when we wrapped up the renovation we really didn’t have the appetite or energy to go drilling extra holes and moving things around. “It’ll be fine,” we said. Eh, we were tired. But fast-forward to 2018 and it finally felt like an easy weekend task.

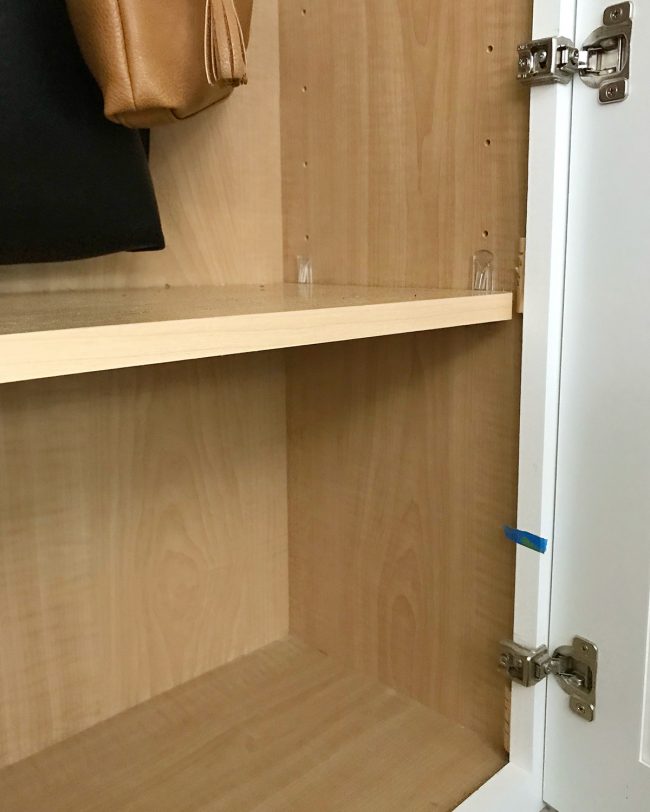
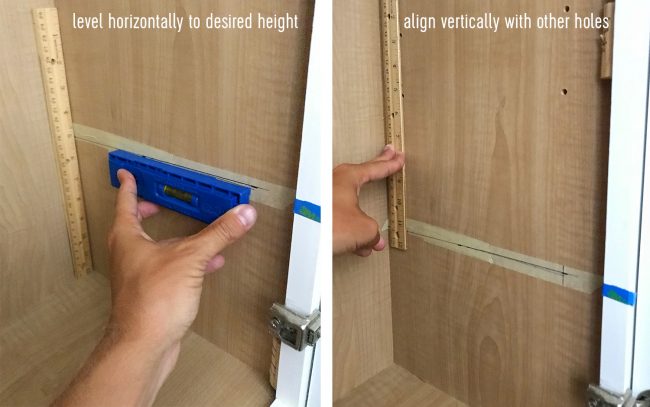
That blue tape mark above is where we decided we wanted to move the shelf, and therefore drill a new set of holes. They sell shelf pin templates and jigs for making holes like this, but I wasn’t about to spend $20 or $30 for a couple of holes, so I went old school and just marked everything on tape using a ruler, making sure it was level and vertically aligned with the holes above. The tape not only protected me from writing on the cabinet itself, but also helps to keep wood veneer from splintering when you drill into it.

Once everything was marked, I just stuck different sized drill bits into one of the existing holes until we found the one that would create a matching hole. Then I used blue tape to mark the depth of the existing hole on the drill bit, so I didn’t end up drilling through the entire side of the cabinet. Once my drill bit sunk to meet that piece of tape, I knew it was deep enough, and stopped drilling. Boom: instant holes that were the same size and depth as the pre-drilled ones that came with the cabinet.

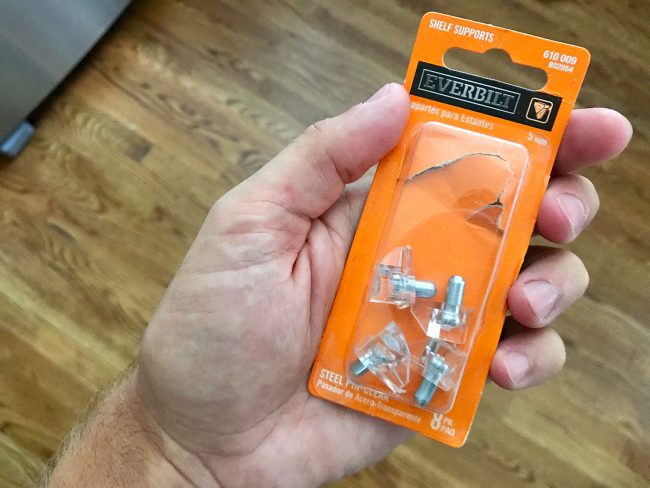
We didn’t have any more pegs in the cabinet to use to rest an extra shelf on, but you can find a box of them at the home improvement store. The store didn’t have of the click lock variety that came with our cabinets, but these fancy pegs with a sturdy plastic platform were under $3 and did the trick just fine.

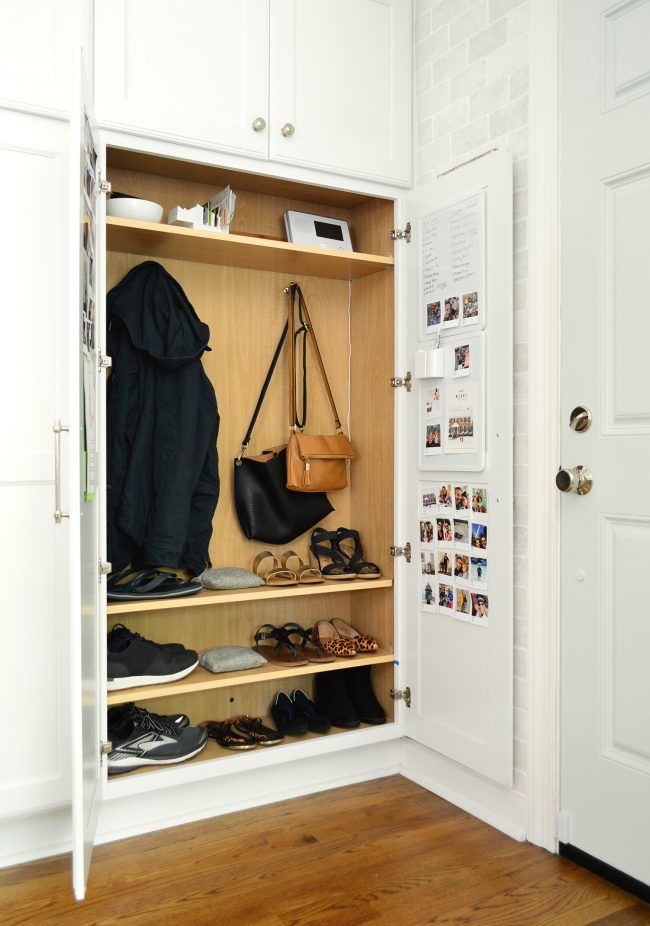
After drilling all of the new holes on the bottom (we just added two on each side) we also drilled a new set of holes up top so that we could raise the top shelf and, in turn, raise our hooks a little bit too. Suddenly our coats could hang without hitting the bottom shelf. And we had room for not one, but two shelves of shoes on the bottom thanks to moving the top shelf and the hook up. Then all we needed to do was dig out one of the extra shelves we’d been keeping in the attic (we also could have made one with plywood if we didn’t have one on hand) and – BLAMMO! Now our side of the mudroom looks like this:

Tip: those two gray bags above are these random charcoal bags that Sherry loves. They absorb odors so they’re great for a mudroom or a shoe basket, and you just lay them out in the sun for an hour a month to air them out and then toss them back into the cabinet to keep doing their job.

It may not seem like a dramatic difference, but by adding the extra shelf on the bottom we were able to ditch the shoe baskets entirely, allowing us grown-ups to store MORE shoes and access them MUCH more easily. In fact, Sherry now can keep pretty much all of her go-to footwear down here (seven pairs!) so she’s not having to make those last minute runs up to the bedroom closet anymore. And the three pairs that I usually wear can easily fit too, even though they’re significantly larger than Sherry’s.

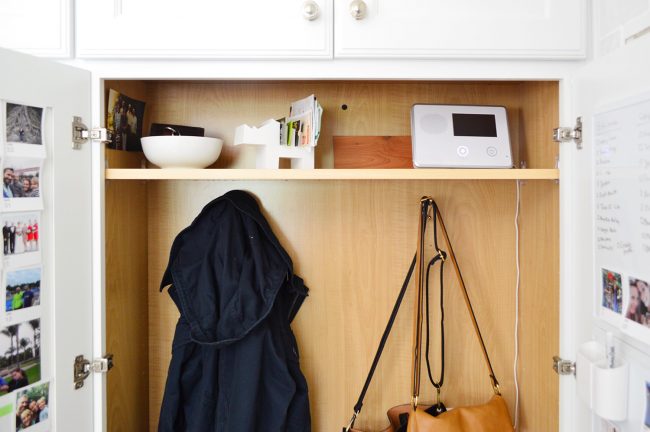
We couldn’t have found that extra space for shoes had we not moved the top shelf and the hooks up (we had a lot of dead space above the top shelf initially, but it had been on the highest pre-drilled holes before so we just sort of said “ok, if that’s the highest hole we’ll put the shelf there”). It’s a great spot for a few practical things that keep us organized, like a bowl for our keys and my wallet, a mail holder that Sherry got from Target to serve as a gift card organizer, and our alarm pad. Oh and that rectangle of wood that you see at the top is another one of Sherry’s deodorizing tricks – it’s one of these cedar panels, which definitely keeps these cubbies smelling good. There’s one on the kids’ side too.

This small update was a reminder to us that sometimes you just have to live with something for a little while to find the best ways to make it work. And sometimes at the end of a BIG project, it’s ok to be tired and think “it’ll probably be fine, and if it’s not I’ll deal with it later.” And when you finally find the steam to address them down the road, they can be surprisingly satisfying. I mean, just check out how satisfied Burger looks below:

Speaking of Burger, he likes to hover nearby whenever we break out the camera and tripod. But this time he got nervous that we were actually leaving – not just posing like we were leaving – so he was extra vigilant.

Poor guy. Photos can be so stressful.

Oh, and since I know this question will come up. All of those photos taped inside the cabinet doors are from our custom page-a-day calendar that I rave about every year. You upload 365 photos and for $40 you get a personalized page-a-day calendar. I collect photos from my siblings each year and make one calendar that we get printed like six times (for all of us and my parents and our grandma) for Christmas each year). It’s like a rotating family album that sits on our kitchen counter and we all get to see the same photo every day, so it sparks texts about a certain memory or event.

Might sound silly, but we all feel more connected when we look at the same family photo everyday. And at our house we tape up our favorites on the cabinets throughout the year, then when the new calendar comes each January we clear the ones off from the year before (saving them in a memory box) and we start fresh.

And again, if you want to learn more about kitchen remodel and how we decided on this layout (and this unconventional mudroom) you can see it all summarized in these three posts (which also include measurements of the entire room for anyone wondering how big our island is or how long the room is, etc):

Also I know I already said this, but how was that over two years ago?!

*This post contains affiliate links*

The post Maximizing Our Mini Mudroom appeared first on Young House Love.


Maximizing Our Mini Mudroom published first on www.younghouselove.com