Monday, April 30, 2018

BBQ grill table for my mini-kamado

This mini-kamado BBQ grill table hack is not my original idea. I saw a few examples on Facebook, but didn’t like the way they were done. So I decided to find out how to properly do it.

I’m 100% satisfied with the end result and it brings my mini-kamado BBQ grill to a proper work height.

IKEA items used:
Other materials and tools:
  • Electric precision saw
  • Drill with various sizes wood drill bits
  • Philips head screwdrivers
  • Flat paintbrushes
  • Mahogany colored clear lacquer
  • GAMMA* Jasper coat-hanger
  • 2 pieces of decorative 300x400mm Aluminum plates from GAMMA* to distribute the weight on the shelves (and they look nice)
  • Anodized steel furniture corner-supports
  • A bunch of stainless steel screws 20mm

*GAMMA is a DIY/Builders-shop in The Netherlands

Mini-kamado BBQ grill table: The build

First of all, to make sure that you have all the parts, and a proper trolley, build up the furniture as advised by IKEA.

Once done, flip it upside down, and outline the inner side underneath the table so you know where you can cut your opening, and where you should not.

Once that has been done unscrew the 4 screws and take off the tabletop.

For aesthetics, you can first measure the dead center and outline the cut from there. I personally found that having it a little more to one side will allow me to have more “table space” on one of the sides. So as you can see I went with a little off-center for my opening.

My bbq is around 31cm diameter on the spot where it will stick out of the table, the hole is about 34,5cm to allow heat to escape.

To create the circle I used a nail in the center of the area and a pencil attached to a piece of string.

mini kamado BBG grill table

I cut the hole using an electric precision saw. Then proceeded to finish the BEKVÄM with 2 thick coats of mahogany colored clear lacquer.

It’s recommended to do 3 coats, but I personally did not want the BEKVÄM to become any darker, so I stopped after one rich coat.

I measured the height of my BBQ on its stand and found that the top shelf should be 4cm higher to seat the bbq correctly.

To resolve this I simply took off the shelves again, removed the wooden rivets holding the top shelf, and drilled 4 new holes for them 4 cm above the original holes. we will also re-enforce this shelf later with the anodized steel corner supports (after paint has cured).

Make sure to thoroughly clean/de-grease the BEKVÄM. I coated it as 2 pieces (tabletop off), between the 2 layers I scuffed up the paint a bit with some 600 grid waterproof sandpaper. Each layer took me about a day to dry.

mini kamado BBQ grill table

This is the finished outcome of one layer of lacquer. On the floor next to it you see the aluminum sheets I found to put on the shelves to distribute the weight more evenly and protect from hot items (dropping ash etc). My local DIY/ builders shop only had 300x400mm sheets. 400×400 would look even better! You also see the coat hanger I scored from the discount bin in that same shop.

mini kamado BBQ grill table

After 2 coats and assembling the BEKVÄM again. The result is like this.

mini kamado BBQ grill table

All that’s needed now is to add the corner supports onto the bottom of the top shelf and to add the aluminum sheets.

And shove in the BBQ grill.

Which results in this:

mini kamado BBQ grill table

How long did it take to complete the BBQ grill table?

It took 3 days to complete the build. Purely because of the 20-hour drying time the lacquer required. Without the paint job, it should be manageable in a few hours.

What was the hardest part about this hack?

Waiting for the paint to dry, and lifting in the BBQ grill alone. For those who don’t often use an electric precision saw, most likely making the round cut will be the hardest part.

What to pay special attention to?

Make sure to support the upper shelf correctly with the metal corner-supports, the original wooden pivots can support it, but I do not trust it 100%. (It’s better to be safe than sorry.)

~ by JoSchaap

The post BBQ grill table for my mini-kamado appeared first on IKEA Hackers.


BBQ grill table for my mini-kamado published first on www.ikeahackers.net

Friday, April 27, 2018

Loft beds using IKEA KRITTER kid’s beds

I just wanted to share an idea that can help people with limited space and want to re-use KRITTER type of kid’s beds for making loft beds.

KRITTER beds

The messy BEFORE. Space was tight

Materials for our KRITTER loft beds:

Related: Hack a KRALLAX, a toddler mid-sleeper bed


We had 2 KRITTER beds from IKEA. And my 2 daughters needed space for their study tables. My idea was to make 2 loft beds so I could install a table on top of 2 drawers.

First, I purchased some 25mm thickness boards and copied the same holes as the boards that the KRITTER beds have.

Loft beds using IKEA KRITTER kid's beds

AFTER! Study tables tucked neatly beneath the elevated KRITTER beds

Then, I reinforced the bed using lateral stiffeners. This way the beds were strong enough. But the addition of some lateral buffers from wall-to-wall made the beds really stable.


Related: Doubling the single KRITTER beds into bunk beds


I used 4 STUVA drawers and placed 2 table tops on top of them.

Loft beds using IKEA KRITTER kid's beds

With the leftover bits of the table tops, I made some the ladder.

~ by Aitor

The post Loft beds using IKEA KRITTER kid’s beds appeared first on IKEA Hackers.


Loft beds using IKEA KRITTER kid’s beds published first on www.ikeahackers.net

Thursday, April 26, 2018

Kitchen Pantry: Get organized with STUVA units

Thought I’d share this kitchen pantry as I was so pleased that my partner was able to accomplish it. Not much hacking involved, rather a repurposing of the STUVA system. The STUVA was destined for a kid’s bedroom, but we decided to use it for our kitchen pantry. It gave enough storage space for kitchen items.

IKEA items used:
  • STUVA Frame – one medium, one small
  • STUVA MALAD Door 2 pack x 3
  • STUVA GRUNDLIG Wire Shelves x 7

Unfortunately, some of these items are no longer being produced but we bought these from IKEA Rhodes and they are there until they run out of stock.

Other materials and tools:

How we used the STUVA for our kitchen pantry

We had moved into a new apartment and the kitchen pantry was not user-friendly. There were no pull out shelves though it was deep. After scrambling over kitchen items and things falling over in order to reach the back, we had to find another way. The STUVA was the solution to it.

We used 5 GRUNDLIG wire shelves to create a user-friendly pantry so I could see what was in my pantry and separate the shelves by sweet/ savory/ carbs/ party items/ water etc. Every time I pulled out a shelf I could actually see what was left.

Kitchen Pantry using STUVA units

It took two days to create our kitchen pantry. The first day we decided to buy the two frames and leave one shelf without doors. We found that it was better to buy the medium and short frame instead of the tall wardrobe length.

We realized that a) this was better in terms of transporting things around (fitted in the boot of the car) b) one medium and one short gave us greater height (206cm vs 192cm for the tall frame)

Kitchen Pantry using STUVA units

We also didn’t find the solid shelves useful as they were immovable – so we decided to use the wired ones instead as they could be taken out.


Related: STUVA kitchen pantry using the tall wardrobe cabinets. See more.


The second day we decided to buy one more wire shelf and one pair of Malad doors as it was better to have a closed rather than an open look for food.

The cost:

Stuva Frame – $80 (medium); $50 (short) = $130
Stuva Malad Doors – $50 (for a pack of 2) x 3 = $150
Stuva Grundlig Shelves x 7 = $70 (2 solid; 5 wire baskets)

Total: AUD $350

Kitchen Pantry using STUVA units

What I like most about my new kitchen pantry is cutting down on my food waste. I can see what items I have left in the pantry and use them before they expire. Everything looks tidy and clean. The wire shelves are also very handy. I want to incorporate them in a lot of things now!

The hardest part was the doors. They didn’t really align so well and may have to do with the latches. We have to open all doors before we can take the shelves out.

What to pay special attention to?

Make sure you give enough space for the wire shelves i.e. whether you want the small frame on top or at the bottom. We chose the bottom as we are placing heavier items there.

We are pleased our local IKEA still had the Stuva. For a kid’s bedroom furniture, this is a sturdy piece and the other storage wardrobes that we looked at didn’t look as solid as this one. It solved the problem we had which was an unfriendly kitchen pantry.

~ by Marie and Aaron from Sydney

The post Kitchen Pantry: Get organized with STUVA units appeared first on IKEA Hackers.


Kitchen Pantry: Get organized with STUVA units published first on www.ikeahackers.net

Wednesday, April 25, 2018

Let The Duplex Rebuilding Begin!

I should warn you that most of the pictures (and the video!) in the post don’t really scream “rebuilding” (it’s more like “WHAT HAPPENED TO THAT HOUSE?!) but there has actually been a ton of progress at the duplex. So we thought we’d update you guys on the flurry of activity that has occurred over the past few weeks, along with some floor plan changes and some of the curveballs we’ve already been thrown.

We talked on this week’s podcast about why the duplex is giving off that bare bones vibe right about now. The short answer is: when you have to rebuild the inside of a house (because it’s full of rot, mold, termite damage, and some failing framing) and you have to rebuild the outside of the house (to make the old rotting siding and roofing actually do their jobs), this is what you’re left with:

All this demo also makes it easier and cheaper to install completely updated and safe systems – like all new electrical, plumbing, and HVAC when the time comes. So yes, it feels like a ridiculously dramatic process to witness, but at any given time you can drive by at least one of these major restorations going on in the historic downtown district of Cape Charles, because it’s actually pretty normal to take things this far back after decades of rot and moisture within the walls of an old home like this one.

If you’re wondering,”isn’t it just cheaper to knock it all down and start over?” It’s not! Pouring a foundation and framing a house are some of the biggest line items in the budget when building a new house (a friend of ours said the line item for framing her new house is 75K!), so we get to avoid those “big whopper” expenses by using what’s already there. Plus, these beach houses are in a historic district, so nobody would be allowed to come in and bulldoze something, even if they wanted to… which we like, because it preserves so much charm in this old neighborhood.

We actually went through a very similar skeleton-ization process with the pink beach house, which you can see below in a comparable stage of the project. In fact the same framing crew worked with us on both houses, and they all said the beach house was in even worse condition than the duplex (the foundation was actually sinking into the ground on one side and had to be fully rebuilt from scratch). So there’s something to be excited about dodging this time around, right? This is the rebuilt portion of the beach house from about a year ago:

One reason the duplex demo looks more dramatic is that the roof had to be completely removed. At the pink beach house we just reshingled the existing roof (while keeping the original roof framing), but at the duplex we got approval from the historic review board to slightly increase the roof’s pitch to help it shed water better (we knew it would be a good choice in the long run since the existing roof was really faulty & leaked due to such a slight pitch). But that choice did mean that we had to take off the whole top of the house so the roof could be reframed.

After posting some photos of this on Instagram we learned the house was built using “balloon framing,” which means the exterior studs go all the way up from the foundation to the roof. Most wood isn’t sold this long anymore, which is why modern houses are built one level at a time, each story resting on a separate platform for each floor. Google tells me that balloon framing was a popular technique in houses built between 1880 and 1930, and we’re told this one is from right around 1920.

The photo above was taken right before the windows were removed. Don’t worry – we’re preserving the original diamond grills in those center windows along with those cool old corbels under the roofline that you see in the before photo below – but many of the other windows were just junky broken vinyl ones that weren’t original, so they’ll get replaced with some nicer windows that actually work and are energy efficient (just like we did at the pink beach house).

One unlucky surprise during demo was learning that we’d have to strip back the porch a lot more than we expected. The framing itself turned out to be more unstable than we anticipated, so it will need to be completely rebuilt. Cha-ching!

BUT… the foundation was in better shape than we expected, needing hardly any work at all (we had allocated around $3K to reinforcing it, just in case). So we were able to move our “foundation repair” money over to the “whoops the porch is busted” fund, and the budget basically balanced itself. It was a lucky break, which doesn’t happen often in these types of renovation, so we’re relishing the moment while it lasts!

The duplex sadly has fewer original details that we can save & restore than the beach house did. Aside from those original diamond grills in the middle upstairs windows and those cool old corbels under the roof that we mentioned saving, there’s not any old stained glass or a back staircase like we got to keep at the beach house. Many years of being a rental were not kind to this place, so almost everything had already been replaced (like the broken vinyl windows) and there was a lot of “covering” going on, like sheet vinyl flooring and wood paneling that was used to hide damage and moisture in the walls and floors.

Luckily, we should have no trouble saving the original hardwood floors that at some point had been vinyl-stick-tiled and carpeted over. I can’t express to you how sticky this bedroom’s floor was from the leftover vinyl tile residue when we bought the house last fall. Sherry literally lost her flip flops while walking on it.

And speaking of the hardwoods, that’s another hugely expensive line item we get to dodge by working with the original materials. Refinishing the hardwood floors that we have upstairs and downstairs (yay!) is so much cheaper than buying all new floors.

We also got questions about how you protect original hardwood flooring when a house is all gutted and open to the elements. The answer is kind of strange and sounds completely counter-intuitive, but you actually just leave them open. They might get a little wet over the few days they’re exposed, but then the sun comes out and they dry out. Tarping them could actually cause more damage by trapping moisture in, so this is actually pretty standard procedure in this area.

Our floors at the pink beach house were exposed (aka, not tarped during demo) and once they were all sanded and sealed they ended up looking so beautiful. We also restored these old doors in the pink house, which turned out really well too:

So here’s hoping these duplex floors clean up just as nicely.

The photo above is the living room on the left side of the duplex as we first saw it (remember, they’re identical on each side – just mirrored) and below is that same space after the interior was demo’d.

This is the same space as it looks right now. All of those diagonal boards are just temporary supports to keep the walls in place while they work on getting the roof back on and the interior re-framed to shore everything up again. The back left corner needs a ton of new framing to make it safe, so we’re really happy that we stripped things back enough to find those danger zones and remedy them. But yeah, it kind of looks like a game of Pick-Up Sticks right now.

Of course, the really dramatic view was from the second floor, since it was just open to the sky before the roof framing went back up. Call me a nerd, but I could not get over how cool it looked up there. It’s like a giant just came and lifted the roof off!

But back to the less exciting stuff. The curveballs!

In taking off the old siding, it confirmed some problem areas that we knew about and uncovered a few more. We already knew the back side of the house was poorly constructed, with the studs placed FACING THE WRONG WAY. This was originally a side porch that later was (poorly) enclosed and turned into an odd little galley kitchen (we’re turning it into a laundry room/mudroom area).

We even Boomeranged our contractor, Sean, showing us how little effort it took to shake the whole thing. I mean, could he look more chill about it? And one-handed, no less!

So all of that will get some new framing to make it super secure. You know, so a person can no longer shake it with one arm.

The other curveballs are less interesting – some sagging in one corner on the second floor (it just needed some better framing – thankfully wasn’t a foundation issue) and some interior flooring that needed to be reframed. Actually, you can see that in the GIF above. See how the floor almost looks like it’s two layers thick? Well, it is. Someone built an interior floor on top of an old porch floor, using some 2 x 4″ boards to raise the floor up to be level with the rest of the house. So we’re stripping things down to the floor joists and raising the floor the right way – so it’s all level and not some double-floor contraption that shakes and shifts underfoot.

Most of the photos above were actually from two weeks ago when we made our first trip back after spring break. We went again last week and, surprise, the roof is already back up! Well, it still needs to be shingled, but the framing and plywood cover for it is all done. I’m gonna miss having all that natural light up there. ;)

The thing you can’t really tell from that picture is that Sean, our contractor, had also started mapping out our new upstairs floor plan. We showed you our plans for improving the layout last month, but we also planned to walk everything in person before finalizing anything. The three of us walked the house together and made a few tweaks, which Sherry outlines in the video below (sorry it’s vertical – she originally planned to put it on InstaStories but it ended up being too long). You can also watch it here on YouTube. Note: if you’re viewing this in a feed reader, you may have to click through to the original post to see the video. 

As Sherry mentioned in the video, I’m including the rough floor plan so you can see the areas she’s describing. And you can read more about it here, including how it differs from the original floor plan.

Oh and we also made some shifts in the laundry room / mudroom, but didn’t capture that on video. Maybe we can render that for you guys in a future post or another walk-through soon. We’re headed back again this weekend, so feel free to check in on Instagram (Sherry loves to share quick updates while we’re there on InstaStories). We’re entering a weird phase of the renovation where the updates are less visually dramatic (oooh, those new support beams are so pretty!) so I’ll leave you with one more before and after to scratch my itch for big changes. Here was the left side when we bought it last fall:

And here it is a couple of weeks ago. Gulp. But it’s an exciting gulp. It can only get better from here, folks.

And on the bright side – all three of the satellite dishes are finally gone! Hasta la vista, baby.

P.S. To read more about how we bought this duplex, what our plans are for it, and to see some other video walk-throughs, you can always click into our duplex category for every post we’ve ever written about it. 

The post Let The Duplex Rebuilding Begin! appeared first on Young House Love.


Let The Duplex Rebuilding Begin! published first on www.younghouselove.com

Hackers Help: Can I stack and connect two ASKVOLL 3-drawer chests?

I am considering purchasing an ASKVOLL 3-drawer chest. The dimensions work well for me, but it doesn’t provide as much storage space as I require. My question is whether I can stack one ASKVOLL unit on top of another? If so, I would definitely want to secure the top unit to the bottom unit so the top unit would not fall over. It is not for a small child, so I don’t need to secure the pieces to the wall.

Hacking a 3-drawer chest into a 6-drawer chest

I just want to make sure there is some structural stability to the overall piece if I attempt to open one of the drawers in the top unit. I was thinking about some screwing in some pieces of metal hardware on the back of the unit that I can connect the units together. Does anyone have any good suggestions?

Thanks!

~ by Scotty81

***

Hi Scotty

I don’t see any reason why the ASKVOLL can’t be stacked. But yes, you would definitely need to secure the top unit to the bottom one.

Turning a 3-drawer chest into a 6-drawer chest

Method 1

Looking at the assembly instructions, the bottom section of the unit does not appear flush with the top panel (because of the overhang). Your idea of screwing in metal brackets at the back to secure the units together can be done. But you’ll need to add pieces of wood to even out the levels between the top and bottom panel. (See blue lines). Then secure one to the other unit with mending plates, fixing your screws on the new pieces of wood.

Hacking a 3-drawer chest into a 6-drawer chest

Method 2

If you do not want the hassle of getting extra wood, I would suggest adding a few corner brackets to the inside of the top unit. Using the corner brackets, fasten the sides (and back, if you want to) of the top unit to the top panel of the bottom unit. Add the L-brackets and secure the units together before inserting the drawers.

Hacking a 3-drawer chest into a 6-drawer chest

This method will leave holes on the top panel of the bottom unit. Should you ever decide to detach and use them separately again, you’ll need to patch the holes with some putty.

Lastly, though the unit won’t be used by children, I would still recommend securing it to the wall. A fully loaded top drawer when extended can cause a tip-over, which can be nasty, even for an adult. Stay on the safe side.

Hope it helps.

Happy hacking

Jules

The post Hackers Help: Can I stack and connect two ASKVOLL 3-drawer chests? appeared first on IKEA Hackers.


Hackers Help: Can I stack and connect two ASKVOLL 3-drawer chests? published first on www.ikeahackers.net

Tuesday, April 24, 2018

Chic bedroom storage from two $35 RAST dressers

We got the RAST chest of drawers for our tiny bedroom because nothing else could fit. Before I even knew how I was going to hack the bedroom storage, I fell in love with these beautiful brass handles from Aliexpress. The delivery took a while but when the beauties finally arrived we started hacking.

Materials for our bedroom storage:
  • IKEA RAST 3-drawer chest
  • New handles or knobs (or you can keep the originals and just paint them)
  • 4 caster wheels (you can also use just simple legs)
  • Two pieces of wood: 1.8 mm X 58.2 cm X 8.5 cm for the toe kick
  • One board of 30 cm X 124 cm or 3 of 8-10 cm X 124 cm
  • 4 mm glass top 30 cm X 124 cm
  • Painter’s tape
  • Wood color
  • Wood glue
  • Glass top
  • Wood boards
Tools:
  • Drill
  • Screwdriver
  • Painting kit

Steps for the RAST bedroom storage makeover:

Step 1: Assemble
Assemble the dressers according to IKEA’s instructions, but do not insert the drawers yet.

Step 2: Join the dressers
Join the two dressers together. I used screws. Pay attention and place the screws above or below where the drawer should fit when it is closed. Two screws on top and two on the bottom should be enough. Choose screws less than 2.8 cm long (the thickness of the two side panels).

Chic bedroom storage from two $35 RAST dressers

Step 3: Add a base
Next is to add a base, in order to attach the wheels and to create a square shaped frame for the dressers.

Attach the board (or boards) as a base to the bottom. Because a full board was too expensive in our local wood store, we decided to take 3 cheaper pieces. We screwed them to the edges of the dresser, and you can hardly notice them from the sides.

Chic bedroom storage from two $35 RAST dressers

Step 4: Add wheels
When the base is done, attach the wheels with screws.

Chic bedroom storage from two $35 RAST dressers

Step 5: Fill the toe kick
Next is to fill the toe kick to keep the front aligned at the same level. We used the two shortboards and glued them in place. At the bottom, we inserted folded pieces of paper to help center the panel so that grooves of the same thickness are created on each side.

Chic bedroom storage from two $35 RAST dressers

Step 6: Fill the holes
If you intend to replace the knobs that come with the RAST, now is the time to seal the existing holes with wood putty. Apply the putty and wait for it to dry then smooth with sandpaper.

On this dresser, as you can see where the light stains are, I used white colored putty. Before I started painting, I meant to paint it with an opaque color, but at the last minute I changed my mind and decided on a striped pattern. Please, don’t be reckless like me! Plan ahead and pick a compatible shade of putty to your final design.

Chic bedroom storage from two $35 RAST dressers

Step 7: Paint the frame
I painted it white after I inserted the drawers and locked them inside, but it’s actually easier to do it when they are out.

Step 8: Create the pattern with masking tape
Insert the drawers and make sure they are all in the right place (each drawer can be slightly different).

Now we start the really fun part

First I created a big X with the tape between the corners (1). Then I added strips from above and below (2), and then again (3), and then I took away the middle strips (2) keeping it exposed to the paint to come. I continued the same process from the center outside until the entire front was covered with masking tape stripes.
In some places (4) I used 2 strips together in order to get thicker spacing.
Then I started to cut out the little pieces in between in order to create the triangles. In The image, you can see in blue the outline of the strips that should remain before painting. I’m sorry the image is cropped that way, I forgot to take a pic of the full front.

Chic bedroom storage from two $35 RAST dressers

Step 9: Paint
Start painting the stripes!

I used a synthetic brush, and Americana DECOR chalk paint, and you can use whatever type of paint you’d like as long as it’s suitable for wood. I chose to paint all the strips with the light turquoise paint and the external strips with dark blue.

You can see the video here:

The post Chic bedroom storage from two $35 RAST dressers appeared first on IKEA Hackers.


Chic bedroom storage from two $35 RAST dressers published first on www.ikeahackers.net

Monday, April 23, 2018

EKET CD rack: How to add a shelf to the cube

My daughter likes to listen to music or audiobooks with her CD player. To keep her CDs organized, I was looking for a small CD rack. Unfortunately, they were only ugly, huge or no racks to be found in shops (yes, CDs are soo old-school!) So I transformed an EKET shelf in no time at all into a CD rack. The shelf is mounted at a height to also serve as a bedside table at her KURA bed.

Materials for EKET shelf:
  • 1 EKET cube (25cm)
  • 1 MDF board (31.4 x 22cm)
  • 2 MDF boards (15 x 22cm)
  • Spray paint
Tools:

Using a pocket hole jig (and securing it with a clamp), you drill pocket holes into the underside of your MDF board. Then spray paint the board.

After the paint has dried, turn your shelf upside down and place the two smaller MDF boards left and right.

EKET CD rack: How to add a shelf to the cube


Related: Turn the EKET into a hairpin leg nightstand


Then place the painted board on top. Screw the board through the pocket holes to the shelf. The smaller board help with the exact placement of the rack. After screwing in the board, the two small boards are removed.

EKET CD rack: How to add a shelf to the cube

Turn the EKET shelf around, hang it on the wall mounting rail and you are done!

EKET CD rack: How to add a shelf to the cube

~ by Eva


Related: Kid’s closet in the hallway for shoes and bags


The post EKET CD rack: How to add a shelf to the cube appeared first on IKEA Hackers.


EKET CD rack: How to add a shelf to the cube published first on www.ikeahackers.net

Friday, April 20, 2018

MINE: Porcelain Treasures + A Mirror

Yesterday I went on a high-stakes salvage adventure up to Albany. See, right now I’m looking really hard for nothing in particular so unfortunately it just had to be done.

I got a few things. You don’t drive an hour to simply turn away empty-handed. That would be unethical.

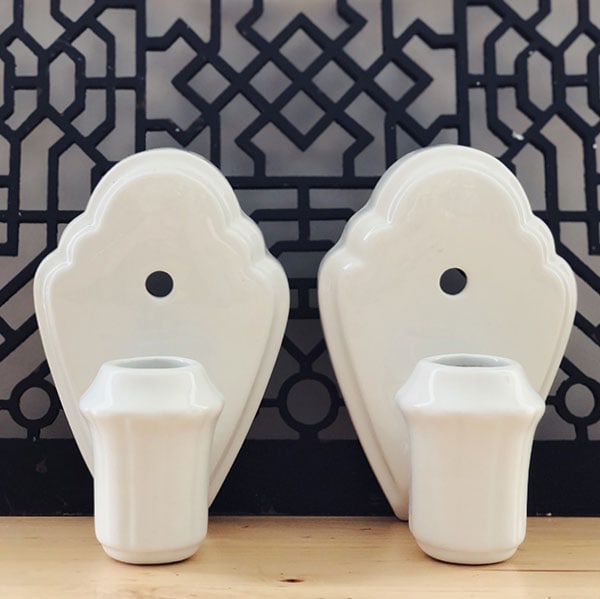
How stupid cute are these little porcelain bathroom sconces??? I’d guess they were made in the 1930s. I’m used to seeing sconces all the time that are similar to these, but I’m not really used to seeing that sweet bubbly rounded cloud-like shape on top. Precious! Naturally, every item in this store had price tags except all the things I bought (I don’t know why—it is just my way), so I was pleasantly surprised when the manager suggested $15 for the pair. Sold! They don’t have any sockets or wiring, but that’s easy enough to replace.

Where will these go? I don’t know, but I do know that $15 to have these two in my back pocket for some future bathroom renovation even if it isn’t my own makes me feel PREPARED.

By the way, they were super grody so I used my tried and true cleaning method of sticking ’em in the dishwasher. Thanks, Cascade!

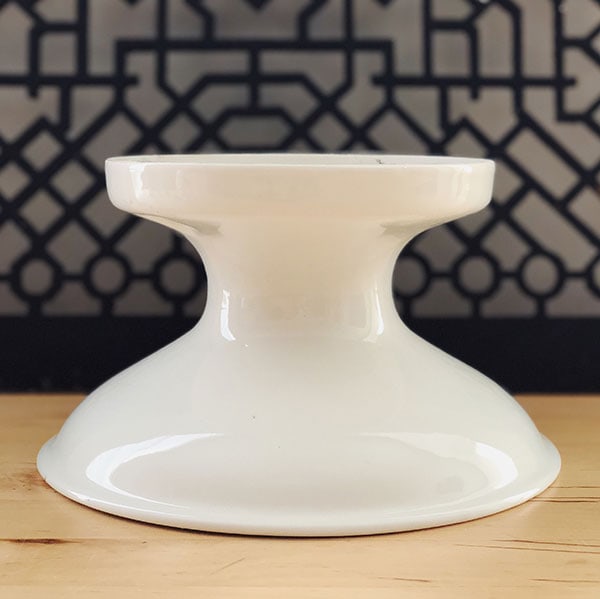
Sometimes when it rains it pours, and yesterday’s theme was porcelain! ‘Tis what the thrifting higher being dictated. This is another porcelain light, also likely from the 1930s, also with no socket or wiring, also with no immediate function, but $5! You just gotta! I have a few lights very similar to this (including one I blogged about a while ago), and they just seem so handy for when you just need a little tasteful inconspicuous-but-still-special ceiling light.

I noticed later that it says “Alabax” on it, which I didn’t realize was actually a whole line of porcelain light fixtures produced by Pass & Seymour Inc. starting in the 1920s! I only knew it as the name of Schoolhouse Electric’s new production version, which I’ve used in a couple spaces over the years. IT’S ALL MAKING SENSE! The Schoolhouse versions are really lovely, and Rejuvenation has a few vintage ones available, and a nice write-up on their history.

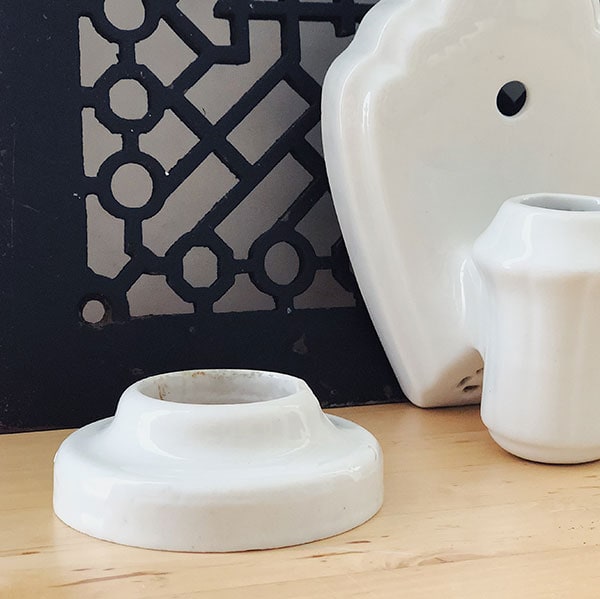
More porcelain please, I do not have enough. Here we have a $1 plumbing escutcheon, sized for a 1 1/4″ pipe which is generally what’s used for a bathroom sink drain. I think this one will be for my downstairs powder room once I get around to it! It’s also just another good thing to have on hand because of COURSE when you really need one, they’re nowhere to be found.

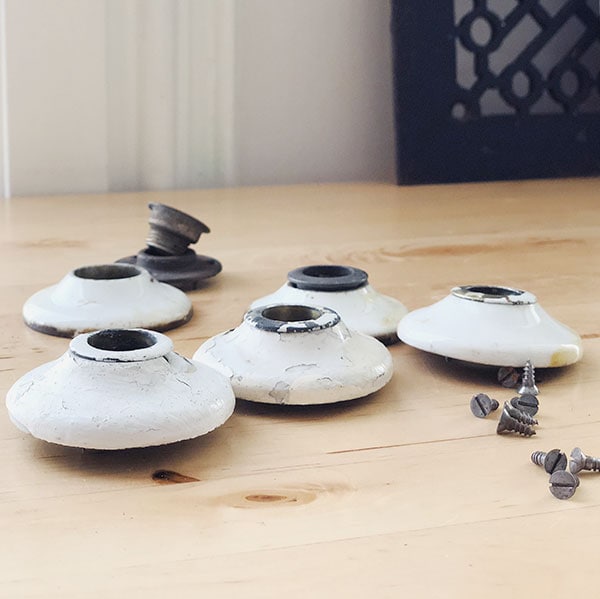
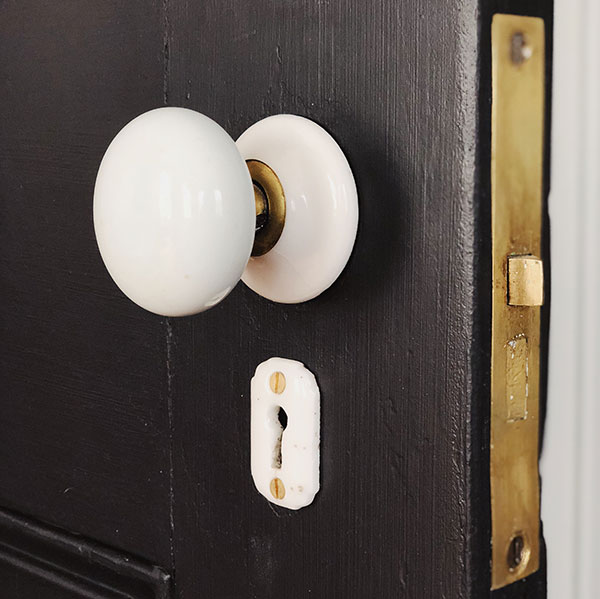
ANDDDDD to round out the theme, I scrounged up 5 porcelain door knob escutcheons which match the door hardware in my house!! SEEE?!?!

It’s the little things! These have been super hard to find and of course break easily, so I’m missing a few around the house and unreasonably stoked to have a little stockpile to draw on as I inch along with restoring all the doors. At $2 a piece, they’re also by far the cheapest ones I’ve ever come across.

Amazingly, these literally came into the salvage place about an hour before I got there, and were still attached to the doors that the rad salvage guys had just pulled out of a DUMPSTER. Ugh, I mean, can you even? DOZENS of solid oak 1860s doors without a lick of paint on them and all the original hardware, in a goddamn dumpster. People are so infuriating. I’m so glad they got saved.

Anyway, salvage places usually remove all the hardware so they can store the doors more easily (and sell the hardware separately), so I offered to pitch in and take the escutcheons off myself and they gladly passed me a screwdriver! You can sort of see in the back of the group one that’s dis-assembled: there’s a round metal plate that screws into the door, and the porcelain part covers that and then a brass threaded piece screws into the metal plate and holds the porcelain part in place. Naturally these pieces always get separated from one another, so having FIVE complete sets is very exciting.

BTW, if you ever see those little white porcelain keyhole covers like the one on my door while out and about and they’re under like $10 a piece and you don’t buy them for me, we’re not friends. I’ll pay you back!!! They’re so elusive and so fragile.

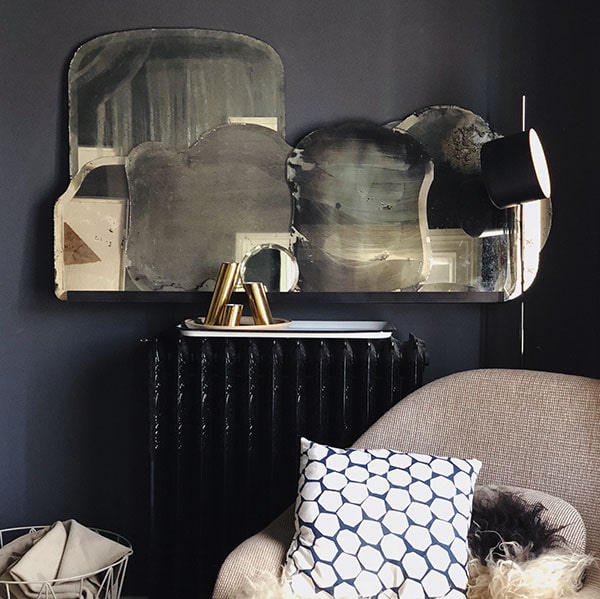
Finally, this specimen. If you have more than two of something, it’s a collection, and therefore I collect mirrors like this. They have to be missing their frames (otherwise they’re just part of the mirror collection—I think of this more as a sub-collection, but it’s also been labeled “hoarding”), be an interesting shape, have beveled edges, and foil backing in vaguely this kind of disintegrating condition.

Right now they live in this totes-normal arrangement up in the den, but someday I’m sure I’ll do something else with them. It’s not like they’re creepy or anything.

Just don’t look directly at them or you’ll see the ghost. K have a great weekend everyone!!!


MINE: Porcelain Treasures + A Mirror published first on manhattan-nest.com