Saturday, March 31, 2018

New Series: Preparing For Summer At The Beach House!

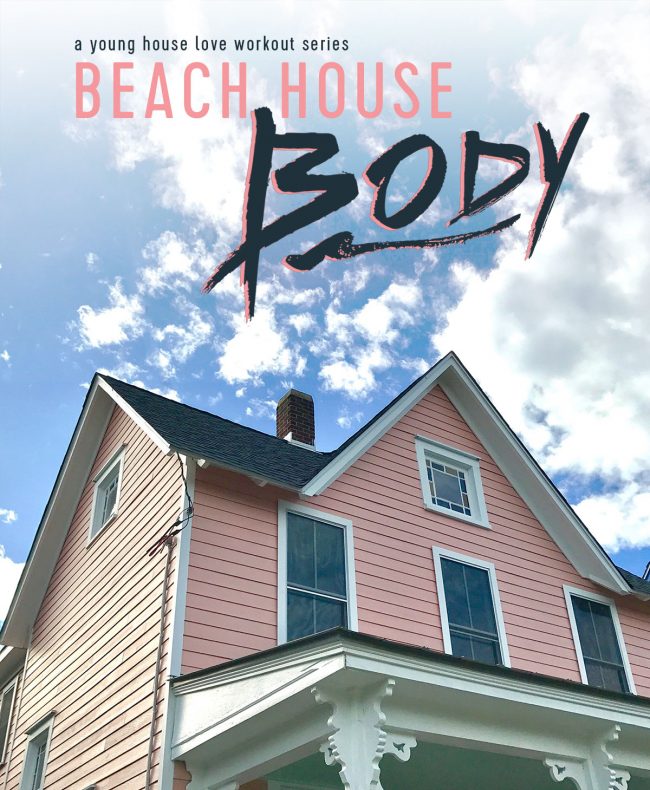
Since spring is finally here, we can’t help but feel like summer is right around the corner. This will be our first legit summer using our beach house (last year we were still tiling all three bathrooms well into Labor Day) and our goal is to spend lots of time there, both to whittle down our to-do list and TO ACTUALLY ENJOY THE BEACH.

But in all the work we’ve been doing to prepare the house for our first summer, we realized we’ve been neglecting to prepare something else: ourselves!

All of the fast food we’ve been eating on our drives there and back have only been made worse by the workouts we’ve missed over and over due to being out of town or just simply being too worn out from house projects. So in these last couple of months before Memorial Day, we’re recommitting ourselves to getting into better shape for summer. And we’re inviting you guys to come along with us in a new series we’re dubbing: Beach House Body.

We’re not fitness experts (and certainly not fitness models) but isn’t that part of the fun? Who wants to watch bodybuilders and athletes with perfect form when you can watch regular people who sometimes hold the barbell wrong? It’s approachable fitness at its finest. We’ll be releasing a short video each Saturday leading up to summer with some of our favorite ways to stay fit. They’re all designed to be beginner-friendly and fun for average folks like you and me.

And to get everyone pumped up for its kick off next weekend, we threw together a short preview video. So crank your speakers to 11 – nay, 12! – and hit play.  You can view it below or here on YouTube.

Note: if you’re viewing this post in a reader, you may need to click through to the original post to see the video. I promise it’s worth it. 

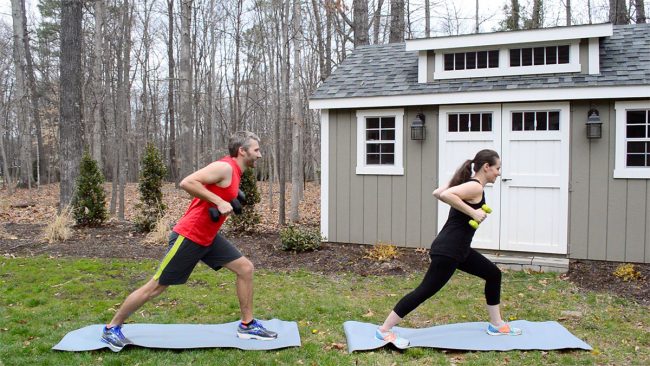
But in case you can’t tune in right now (you’re missing out!) here’s a preview of the types of exercises we’ll be covering. We’ll kick things off with standard gym fare like strength training and core work.

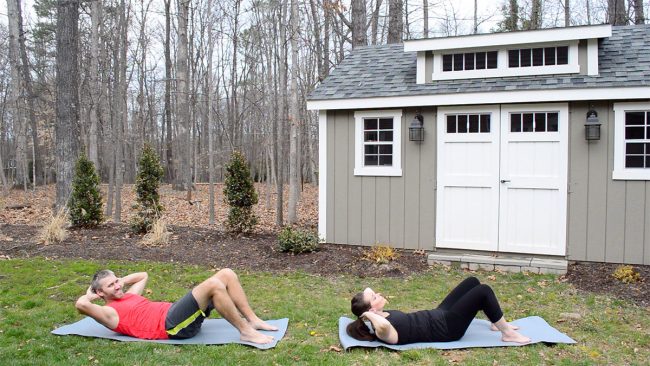
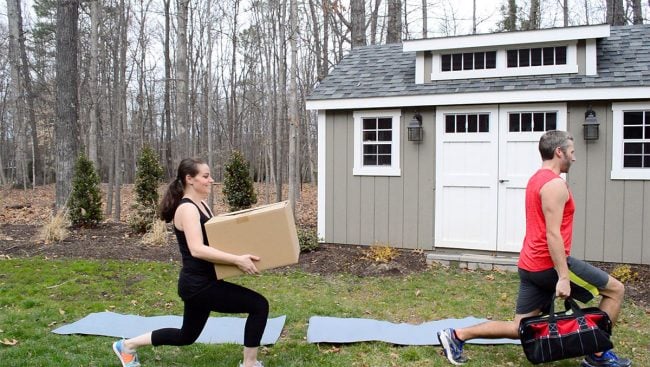
Then we’ll mix it up with some lower intensity yoga, followed by some high energy aerobic stuff. The move below is a Sherry favorite. It works those all-important paint-rolling muscles.

But just in case you’re thinking “snore, I’ve seen these moves before,” we were sure to incorporate bonus exercises that are specifically tailored to DIYers like us. Who needs a kettlebell when you’ve got a spare paint can hanging around?! As the old saying goes: the fuller the gallon, the better the workout!

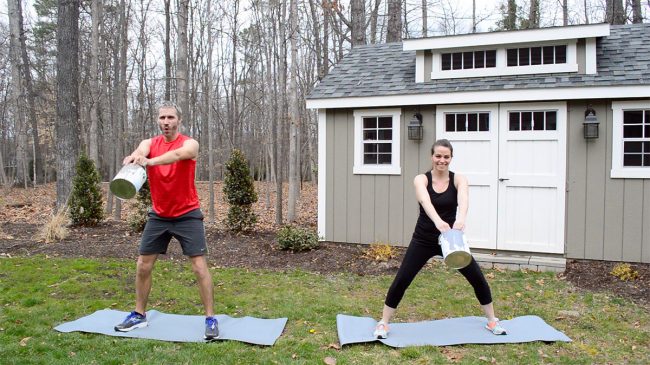
We actually sourced a lot of our “weights” from our garage. Gotta love repurposing! I’m used to lugging our tool bag around, but incorporating a walking lunge was an exciting spin on an otherwise ordinary movement. And Sherry discovered that lunges are a lot more fun when you carry a box of tiling supplies. Who knew?!

The series is designed to be a complete set, so be sure to stick it through to the end – and remember to go back and watch the video for all the exciting info whenever you have a spare moment.

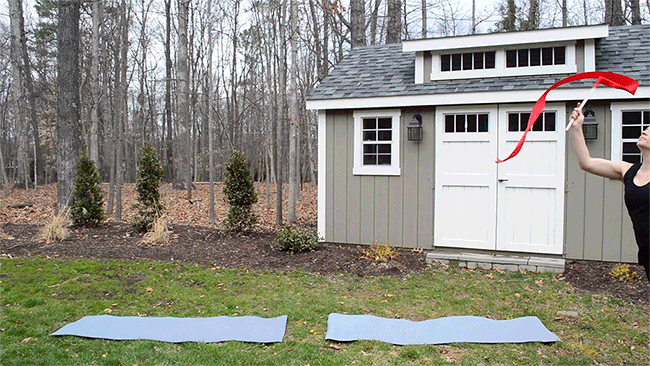
Our workouts get very, um, creative by the end.

Oh, and one last thing….

… APRIL FOOLS!

I’m sure some of you were onto us as soon as we mentioned Sherry working out (podcast listeners know she prefers “accidental exercise”) but we hopefully got a few of you for at least a second. While we definitely could stand to get back to more regular exercise and less fast food, I can promise that’s not a “journey” we’ll ever be subjecting you guys to.

But if you’d like to be subjected to more April Fool’s shenanigans, here are the links to our past pranks. This year marks our tenth year of ridiculousness!

Hope you all have an awesome April Fools Day and an even better Easter!

The post New Series: Preparing For Summer At The Beach House! appeared first on Young House Love.


New Series: Preparing For Summer At The Beach House! published first on www.younghouselove.com

Friday, March 30, 2018

Faux fretwork panel as large scale wall décor

Bet you never thought IKEA picture frames — sans pictures — could be wall décor? Carol and Mel did just that. They arranged a bunch of the affordable FISKBO picture frames into a fretwork panel for their wall.

IKEA Item:

FISKBO

Other Materials:

Lay out frames on a large space that you won’t need for a few days.

Faux fretwork panel as large scale wall decor Faux fretwork panel as large scale wall decor
Arrange them into a formation that you like.

Follow instructions on back of adhesive tube and glue the frames together.

Faux fretwork panel as large scale wall decor

Pay attention to keeping frames straight and aligned with even spaces.

Then, let the glue cure thoroughly. We used some heavy books to keep the frames down.

Lastly, install your faux fretwork wall décor with the appropriate wall fixings.

Faux fretwork panel as large scale wall decor

before

Faux fretwork panel as large scale wall decor

after

The total cost of our project was $41.

~ by Carol & Mel Davis


You may also like these wall décor ideas

#Affordable metal and thread wall décor

wall decor ALGOT

Heidi salvaged two ALGOT metal shelves which had been smashed in the transportation. Rather than binning them she re-purposed them and made some wall “art”. See how she did it.

#2 Turn cheap postcards into chic wall art

postcard wall art

Liskat bought some IKEA art cards that were perfect for the kitchen. She was looking for a way of displaying them so they looked a little less cookie-cutter and a little more high-end. A quick trip to the local DIY store provided all the necessary materials for this easy to assemble project. See the full tutorial.

#3 Floor panels for the wall

wall panel - IKEA tundra

Wooden walls make a room feel homey. There’s no reason why floor panels can’t be placed on the wall. If the IKEA TUNDRA is unavailable in your country, any laminated flooring should do the trick. See more photos and steps.

#4 A magnetic cover up

metal fireplace cladding

Peter was tired of looking at the original brick fire place in his main living space. Inspiration struck and they clad the fireplace with SPONTAN magnetic boards. Get the details.


The post Faux fretwork panel as large scale wall décor appeared first on IKEA Hackers.


Faux fretwork panel as large scale wall décor published first on www.ikeahackers.net

Thursday, March 29, 2018

Fabric sliding doors gets dust away from BILLY

I have 2 BILLY bookcases for some years now. And I wanted to close them up but not with the classical doors (heavy, not nice and expensive) and more in line with my living room style. So I decided to hack fabric sliding doors for my BILLYs.

I tried to find some hanging system that could be fixed by the side of the rails but they were more or less all to be fixed at the top.

Materials used:

Tools:

Fabric sliding doors gets dust away from BILLYFabric sliding doors gets dust away from BILLY

How I made fabric sliding doors for my BILLY bookcases

Firstly, I decided to use wood to create the rails and fixing system. Flat pieces of wood for the rails and round dowels for hanging the YRLA curtain. The fabric sliding doors looks a bit more stylish and less invasive in my space than other system. Better yet, it costs in total probably something around 5-6 eur for the wood.

Next, at the top of the YRLA curtains sew a hem on to insert a dowel. This part slides above the wood rails allowing the curtain to be opened or closed. The tricky thing was that the top part needs to slide above and not fall between the rails.


Related: How to add PAX sliding doors on your own wood work. See tutorial.


Fabric sliding doors gets dust away from BILLYFabric sliding doors gets dust away from BILLY

To be able to sustain the weight of the curtain, I chose a harder wood for the rails and measured about 2 cm in height. In the end, the height didn’t really impact the results but the rigidity of the wood did. So just be careful that the wood is not too thin that warps under the weight of the curtains.

Fabric sliding doors gets dust away from BILLYFabric sliding doors gets dust away from BILLYFabric sliding doors gets dust away from BILLYFabric sliding doors gets dust away from BILLY

I’m super happy with my fabric sliding doors. It slides well, I can access my books and it looks definitely more stylish.

Fabric sliding doors gets dust away from BILLY


Related: Change your existing closet doors to PAX sliding doors. See how.


The only downside is that, if I move from my flat, I’ll either have to un-glue and redo some parts. Alternatively, I’ll just need to move the BILLY bookcases super slowly. 😉 This is also one of the reasons why I chose to do the central fixing in two parts corresponding to the 2 ends of the BILLY instead of using a longer wood rail.

Fabric sliding doors gets dust away from BILLY

Some things to consider

Tip 1: The parts to glue and screw are small parts. You need to pre-drill slowly and screw carefully to not split the wood.

Tip 2: I also made a hem at the bottom and inserted what was left of the dowels so that the curtain falls and slides perfectly.

Tip 3: If you want your curtains to join nicely between one piece and another in the middle, you will need 3 pieces if I remember well. Probably if you get organised and think through/ try this before starting you can manage with 2. I thought about this when a part was already cut, hence the need for 3.

~ by Jerry, Belgium

The post Fabric sliding doors gets dust away from BILLY appeared first on IKEA Hackers.


Fabric sliding doors gets dust away from BILLY published first on www.ikeahackers.net

Wednesday, March 28, 2018

The Best LED Light Bulbs We’ve Found For The Entire House

Hackers Help: Room divider ideas for kids’ shared room

We have recently moved and my two “oldest” (3 and 2) are now having to share a room… needless to say this is not going well. I have looked into tents, curtains etc but they just won’t respect the space, I am needing some more “permanent” room divider ideas — however we rent so it can’t be too permanent! Any ideas? We are so desperate!

Thank you.

~ Katie

***

Hi Katie

Sharing a room can be trying for kids, if they have not grown up with it.

You did not provide any information on the size of the room so I can’t be too specific. But here are a few room divider ideas that can help delineate each child’s space. They are certainly more permanent than tents and curtains but rent-friendly too.

Room divider ideas for kids room

#1 PAX wardrobes as room partition

Richard used the PAX wardrobe system to partition out a room for his son.

room partition

The PAX wardrobe is definitely a good way to add storage and carve out 2 separate spaces for your kids. But you’ll quite a bit of room for this work. Anyhow, take a look at the hack and see whether it works for you.  

#2 STOLMEN/ ELVARLI for bookcase and desk divider

desk room divider

You could make a semi-permanent structure from the ELVARLI system and use it as shelving and desks for the kids. A space to read, write and draw on their own may keep them occupied separately, hopefully. See more of this hack here

#3 KALLAX to the rescue
Room divider ideas for kids' shared room

KALLAX | IKEA.com

And of course, there is the KALLAX, the all-time favourite room divider. I have a crazy idea and it could potentially work if your room has space for it. You can have 2 KALLAX units spanning the width of the room to create a “partition wall”. Then add a hinge door (or curtain) to close up the doorway when they want some privacy. 

Room divider ideas for kids' shared room

#4 STUVA room divider with storage

stuva room dividerAnd finally, if you prefer something closed up instead of open like the KALLAX, the STUVA units are perfect for it. Plus you’ll get lots of storage space. See how it’s done

Hope you get some thoughts going from these room divider ideas.

Lastly, don’t forget to fasten the units to the wall to avoid tip-over accidents.

If you have more ideas for Katie, do chime in.

Good luck and happy hacking,

Jules

The post Hackers Help: Room divider ideas for kids’ shared room appeared first on IKEA Hackers.


Hackers Help: Room divider ideas for kids’ shared room published first on www.ikeahackers.net

Tuesday, March 27, 2018

8 Years!

Let’s just make this clear right off the bat: I’m not stopping this blog train! I’ve noticed that every time I open a blog post by talking about blogging, or life, or anything not explicitly house-related, inevitably a contingent of readers thinks I am trying to signal the end times. Not so! Relax! I am, however, immensely flattered and still amazed that anyone would find such an announcement even mildly consequential or distressing. But that’s not what’s happening so don’t work yourself up! It’s only Tuesday! We have the whole week for that! Pacing is key!

Here’s what is happening: Sunday marked EIGHT YEARS since I published the first post on Manhattan Nest. I think that’s almost a century in Internet-time? What a crazy thing.

Eight years is a long time, I think, for most people to stick with any one thing. Which isn’t to overstate the longevity here—I mean, this morning I fell down an Instagram rabbit-hole and discovered that Heidi and Spencer have now been married for almost NINE years, and that shit knocked me right back down to size. But still, 8 years is something. Can we just IMAGINE for a second if I had applied the same level of long-term commitment to, say, physical fitness? Who even KNOWS the heights of hotness I could have reached! I certainly don’t. But it’s sort of fun to think about.

It feels a little funny/wrong/weird/indulgent (maybe because it isssss!) bringing up this 8-year milestone at all, primarily because of all the things this blog is not. You’d think after this much time, I might have figured a lot of stuff out about blogging, or at least about my own blog, but the truth is…nope, not really. Stuff like…is there a goal here with this thing that I’m doing? Why am I doing this? How does it fit into my life?

You know that feeling that everything we do ought to be undertaken with a specific goal in mind? Yes hello. You get the degree to get the better job. You practice the sport so you can win the game. You stitch this piece of fabric to that piece because all the small efforts will add up to one hawt caftan, or whatever. But what if you don’t know if you’re sewing a caftan or a quilt or a circus tent or a throw pillow? What if you just kind of like the activity of it? That can feel a little aimless, because it is. And not very worthwhile, sometimes.

I’ve been lucky to meet and know a lot of bloggers over the years, and have always felt super out of place when a conversation shifts to posting schedules or strategies to grow follower counts or subscribers or newsletters or video content or sponsorship deals with the kind of budgets that have definitely never come anywhere near my inbox.* In 8 years, I’ve never been successful at sticking to a posting schedule for any significant amount of time. I’ve stepped away from it all for weeks or occasionally months when other stuff took over my life. I’ve never done any of the smart things bloggers do to organically grow traffic and increase shares and gain larger followings. I’ve never pitched myself to a brand. I’ve never created goals for blog-derived income or really any blog-related goals, period. Yet, 8 years. Here we are.

*For the record, pretty much all blog people I’ve ever met IRL are really cool and fun and smart and mostly talk about things other than blogging.

For a long time, I felt like I was doing this whole blog thing very wrong. Actually, not even a long time—I mean pretty much the entire time. Like I accidentally created this thing that had potential to be…something…and I never got my shit together to really figure out what that thing was. I’ve never been able to figure out if this is job, or not a job, or kind of a job but totally different than my actual job, or an extension of my actual job, or what. It’s personal, but how personal? It’s professional, but how professional? Sure, I think I should be entitled to make some money off of it, but how much money? And how? And at what cost? How much time is too much time to spend on something that isn’t how I make a living, but contributes to it? Could I make it a job if I really dove into it with everything I had? Would I even want that if it was an option? Questions like this are shockingly easy to avoid thinking too much about, but I think the consequence is creating an abyss of not-knowing-ness. Without the clarity of a direction, often you don’t really know what to do. I guess you can just stop, but if it feels good…what’s the harm in continuing? For eight years.

I don’t have an answer but maybe that’s because I’ve been considering the wrong question. Maybe it doesn’t have to matter all the time what something should be, because how often in life are we honestly allowed to just not really know? Through what other mechanism can I have fun shooting the shit about stuff in my life and get paid even a little bit for it? And interact with a bunch of awesome people who want to talk about it? And make some legit friends along the way and see some amazing things and learn so goddamn much?

Maybe it kind of already is what it should be, which is a collection of all those things. That doesn’t mean it can’t be more. That doesn’t mean it won’t at times become less. But recently I realized that I was looking back on my 8 years of blogging as story of underachieving, a collection of personal and professional shortcomings, of all the things I somehow never wrote about or didn’t complete, of taking for granted what I know plenty of people work really hard for. We tell ourselves harsh stories, sometimes. But that’s one perspective, and it’s a bad take. My idea of a big project when I started this blog was building my own desk, and now I’ve built a housemaybe what this thing should or shouldn’t be just isn’t all that relevant.  The fact that we’re even talking about it at all 8 years in is worth something. The fact that it’s still fun is worth something. It actually feels like it’s worth a lot of somethings, at least to me.

This blog is, and has been, a source of incredible good in my life—this I know. And maybe a consequence of sitting for so long in that abyss of not-knowing-ness was the creation of this space, right here. This kooky little dimple of the internet where people are actually fucking nice to each other, and smart, and knowledgeable, and generous, where we can freely engage big ideas as much as fawn of pretty stuff and adorable raccoons. Sometimes I worry that acknowledging the rarity of that will come off as self-congratulatory, but honestly? I didn’t create it—you guys did. There have been almost 36,000 comments posted on this blog, and I don’t even think I’d need all ten fingers to count the shitty troll-y ones. Where else does that happen? I really don’t know, but it’s a real honor to be part of it here.

I don’t know what the next 8 years or 8 months or 8 weeks looks like with this blog, but I’d like to approach it with less concern about what I should be doing and more about what I want to be doing, since that’s pretty much all I’ve ever been good at anyway. It’s the internet, guys. We can do that kind of thing. And I hope you’ll come along for it, because I really like having you here. We have a nice time together, I think.

So from the bottom of my heart, thank you, thank you, thank you for these past 8 years! Year 9—let’s do this thing.


8 Years! published first on manhattan-nest.com

This Guard Rail will stop your kid from rolling off the bed

I made this IKEA hack because the VIKARE guard rail is too low to use in a kid bed with a little thicker mattress. It was super easy and so much cheaper than buying it from another store. I call it, “ARVID”, named after my son who easily fall down from the bed without a guard rail.

The hack is made of the following IKEA items:

  • VIKARE guard rail x 1, 79 sek ($12)
  • EKBY HEMNES shelf x 1, 125 sek ($19.99)

Vikare guard rail

EKBY HEMNES shelf

VIKARE and EKBY HEMNES | IKEA.com

Steps to a taller kid’s bed guard rail:

1. Mark where to drill holes in the EKBY board using VIKARE as template, marking the holes in VIKARE onto the EKBY HEMNES shelf.


Related: How to make padded guard rails for the DALSELV bed. See tutorial.


2. Drill new holes in EKBY HEMNES shelf.

3. Install the VIKARE mounting gear to the EKBY HEMNES shelf.

This Guard Rail will stop your kid from rolling off the bed

4. Ready to use! You can use it to any bed.

~ by Jenny

Note: You can also round the edges of the EKBY HEMNES to avoid your kid bumping into the sharp corners.


Liked this? See more kid’s beds hacks.


The post This Guard Rail will stop your kid from rolling off the bed appeared first on IKEA Hackers.


This Guard Rail will stop your kid from rolling off the bed published first on www.ikeahackers.net

Monday, March 26, 2018

Smart sewing table with sliding tray for sewing machine

This is my sewing table project. It’s smart because it has a sliding tray that makes it easy to store the sewing machine when I don’t need it. Makes it super easy to store and access the sewing machine.

IKEA Items used:

  • LINNMON table top x 1 at 150 x 75 cm (art. 202.511.39)
  • ALEX storage unit x 2 (art. 601.928.26)
  • RILL casters x 2 packs totalling 8 pieces (art. 966.713.00)
  • KALLAX shelving unit x 1 (art. 202.758.14)
  • UTRUSTA pull out waste sorting tray x 1 (art. 702.461.12)

Other items used:

  • Wood panel x 2 at 36cm x 58 x 3cm
  • Contact glue
  • 4cm screws x 16
  • 1.5cm screws x 32

Instructions for my smart sewing machine:

1. Assemble KALLAX Shelving Unit and place it against the wall.

2. Next, assemble the 2 ALEX storage units but do not install the upper panel and the inside shelves yet. Mount RILL caster wheels under the ALEX units.


Related: Hack a Cutting table for your sewing room. See how it’s done.


3. Then, turn the LINNMON table top upside-down and glue (as shown in the diagram) the two wood panels onto the table top.

My smart sewing table with sliding tray

4. With the table top still on the ground, screw the two ALEX upper panels to the wood panels. You should avoid screwing the LINNMON table top directly onto the ALEX units because it is honeycomb inside. It won’t hold.

5. After that, attach the ALEX units to the upper panels. Turn the desk right side up.


Related: Dining table to sewing table with storage. Get the details.


6. Lastly, mount the inside shelves and place UTRUSTA tray in the right ALEX cabinet.

This sewing table costs 190 euros and I like it that the UTRUSTA tray can hold the sewing machine and slide it into the cabinet when I don’t need it.

My smart sewing table with sliding tray

~ by Cristina Marcon

See more Craft room hacks.

The post Smart sewing table with sliding tray for sewing machine appeared first on IKEA Hackers.


Smart sewing table with sliding tray for sewing machine published first on www.ikeahackers.net

Friday, March 23, 2018

Beauty bar for less than 40 quid. No hacking required.

This is not a ‘hack’ as such, more of a change of item description! I have created a beauty bar within my bedroom using a selection of IKEA products.

On the right of the dressing table is the IKEA TROFAST drawer set, which can be found in the children’s section. You can choose a selection of shallow or deep drawers to fit your beauty products.

Just below the table is the IKEA SUNNERSTA containers with the SUNNERSTA rail, which I picked up from the kitchen section. This combination is a fab way of storing and organising my makeup, hair brushes, etc.

Beauty bar for less than 40 quid

And what makes it even better is the rail was £1.50 and the containers were 50p. The TROFAST unit was £25 and the drawers were £1.50 for the small ones and £3 for the deep one.

Total £37.50 for complete beauty bar and storage! I am incredibly happy with it.

Beauty bar for less than 40 quid

~ Emma Hazell, Hertfordshire UK


You may also be interested in these beauty bar hacks

#1 GRUNDTAL rails to the rescue

Grundtal beauty bar

Squeeze a beauty bar into a tiny room with vertical storage. This idea uses the GRUNDTAL rail as the solution. Just hang all your beauty tools off it. Add a drop leaf table below should you need more “workspace”. See more.

#2 BESTÅ BURS as a slim makeup table

slim makeup tableIf you do not have space for a traditional vanity this is just right for you. Mount the shallow BESTÅ BURS to the wall below a mirror. The depth is perfect for makeup storage and is narrow enough to fit into a small bedroom. Get the details.

#3 Modern makeup table with lots of storage

modern makeup table

Need a makeup table that’s shallow yet provides storage? You’re looking at it. This uses 2 EKBY ALEX drawers combined with metal legs. Love how very modern and classy this is. See the tutorial.


The post Beauty bar for less than 40 quid. No hacking required. appeared first on IKEA Hackers.


Beauty bar for less than 40 quid. No hacking required. published first on www.ikeahackers.net

Thursday, March 22, 2018

Tree Shelf – FROSTA X goes green

I’m a French YouTuber who makes vlogs, each week a new topic. I hacked the IKEA FROSTA stool into a tree shelf and I made a video about it:

The post Tree Shelf – FROSTA X goes green appeared first on IKEA Hackers.


Tree Shelf – FROSTA X goes green published first on www.ikeahackers.net