I’m not sure I’ve ever been so excited to share before and after photos as I am today. Last month marked the 2-year anniversary of buying the beach house and while we never like to declare a home “done,” this place has come so far that this felt like a good moment to look back at everything (and to document what’s still ahead).
We’ve dug up dozens of before photos (including many that we haven’t ever shared!) and we’ve done our best to find or take similar angles to match up with them. There are so many angles to show you, and so much to cover, we’re just doing the downstairs today – and then we’ll follow up soon with the upstairs once we can shoot those photos and organize another big before-and-after-fest of a post.
We’ll link some of the key items in each “after” for you, but remember you can always visit our Shop Our Beach House page for the paint colors and source info of each room (it’s always linked up in our menu bar right under our blog header). And before we dive into the photos, you may want to treat yourself to this walk down memory lane: the before video tour! Note: if you’re reading this post in a feed reader like Bloglovin or Feedly and can’t see the video below, you may have to click into our post to view it – but trust me, it’s worth it.
The Exterior
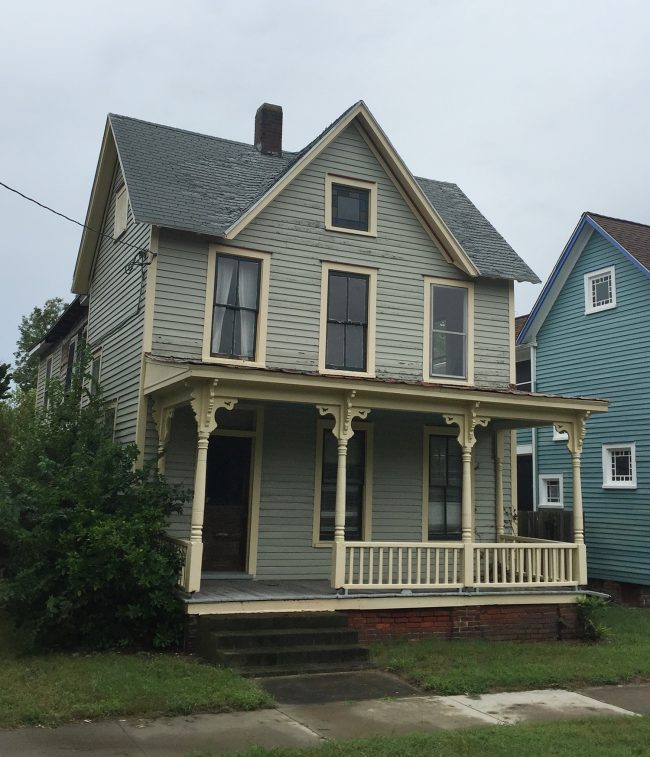
Before we head into the downstairs, let’s look at the outside. This is a shot of it from the sidewalk back when we bought it. Did you even remember that “the pink house” was once “the greenish-gray house?” Complete with cream trim, mismatched windows (some of which were boarded up), and cinderblock steps.
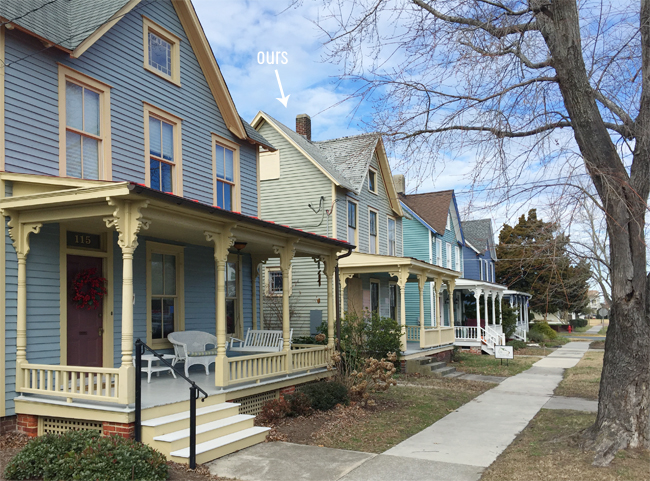
And here it is from a similar angle (a little closer up). We snapped this photo this summer:
Here’s another before shot. The cinderblock steps and the sad rotting siding weren’t gorgeous… but we loved the old bones.
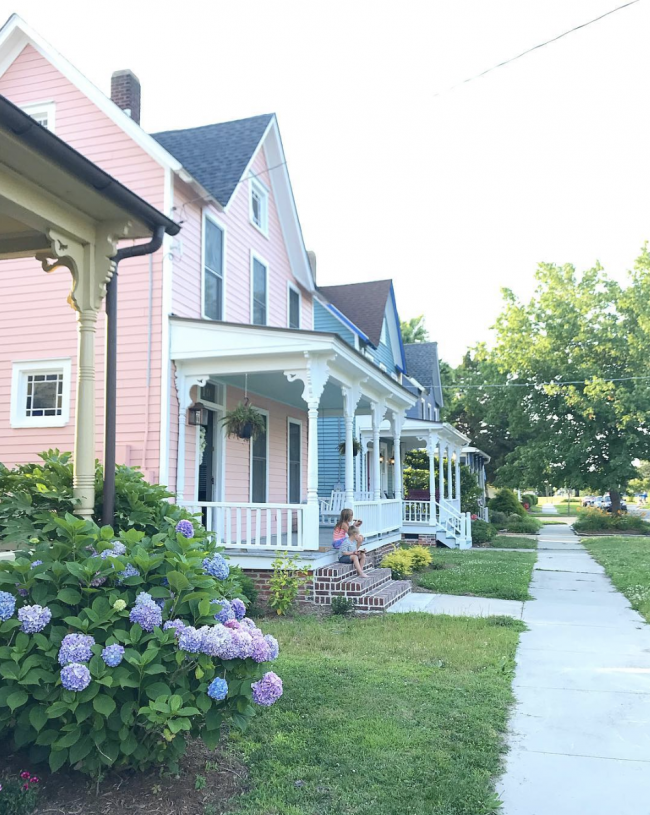
Thanks to a new roof, new siding, new windows, new steps, and a repointed brick foundation, we got the house looking a lot happier. After much debate, a takeout coffee cup helped us choose pink for its new color scheme (Sherwin William’s Mellow Coral, with SW Snowbound for the trim).
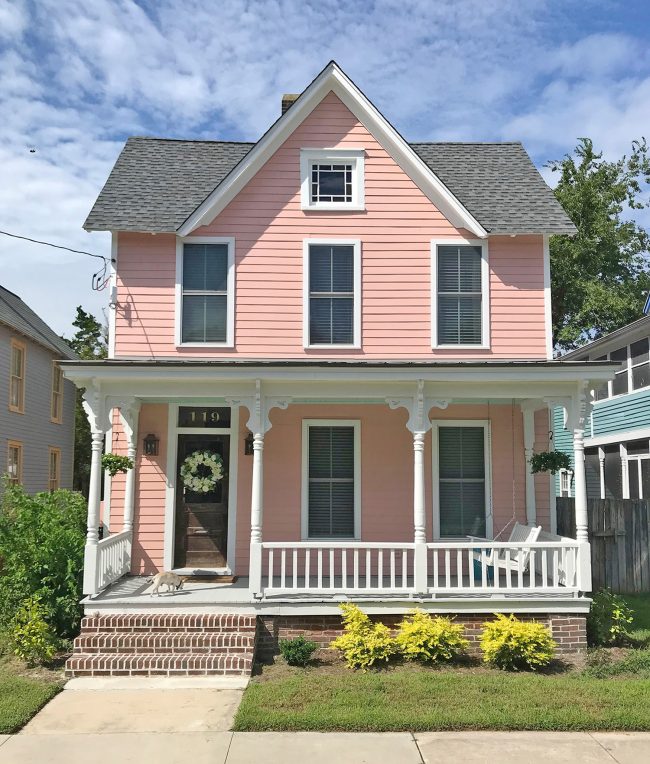
Here’s another angle of the front of the house. Fun fact: that vine had snaked its way into the house and was growing in there as well as on the porch. For real.
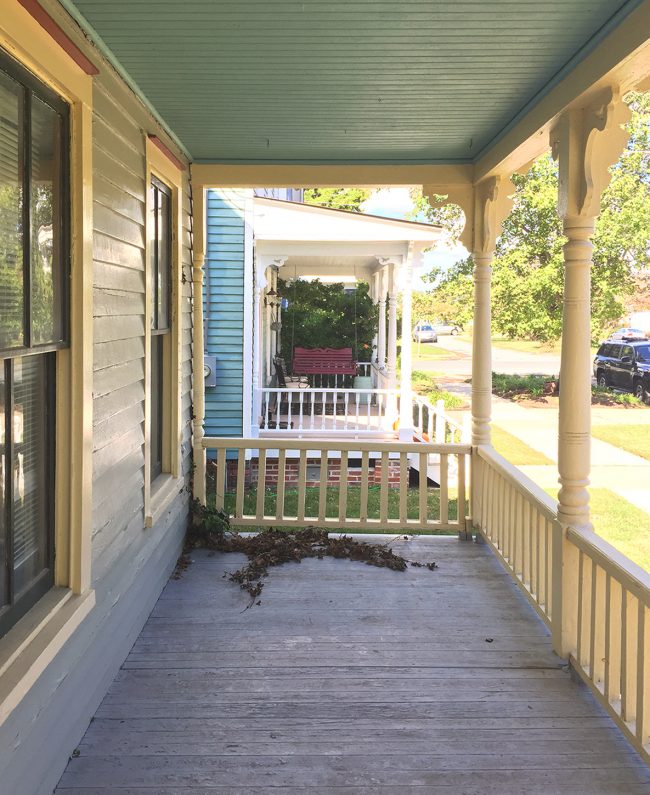
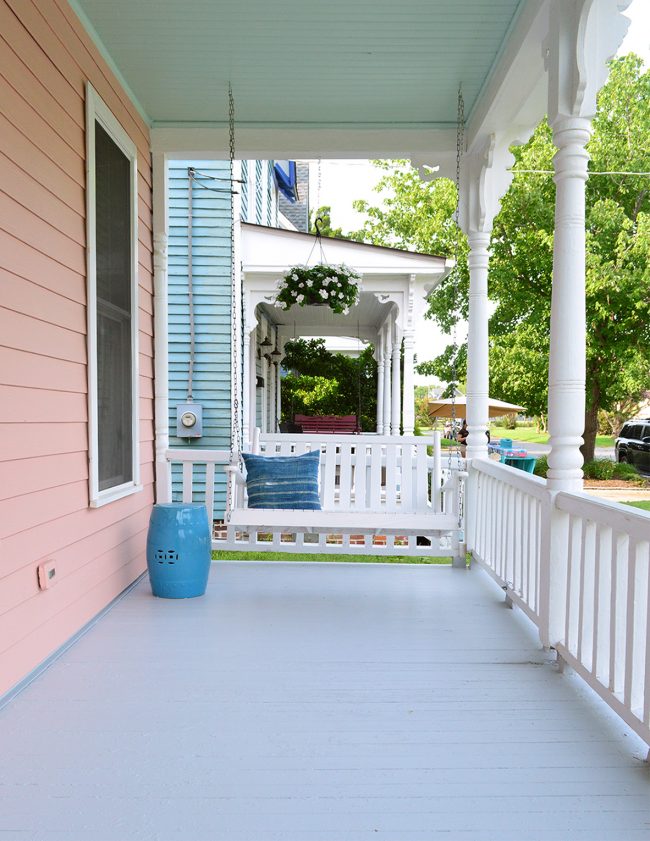
We actually repainted both the porch ceiling and the floor their original colors, or at least the best we could match. The ceiling is Sherwin William’s Breaktime and the floor is Behr’s Pacific Fog. The ceiling also already had hooks in it for a porch swing, so we ordered one, popped it up, and called it done.
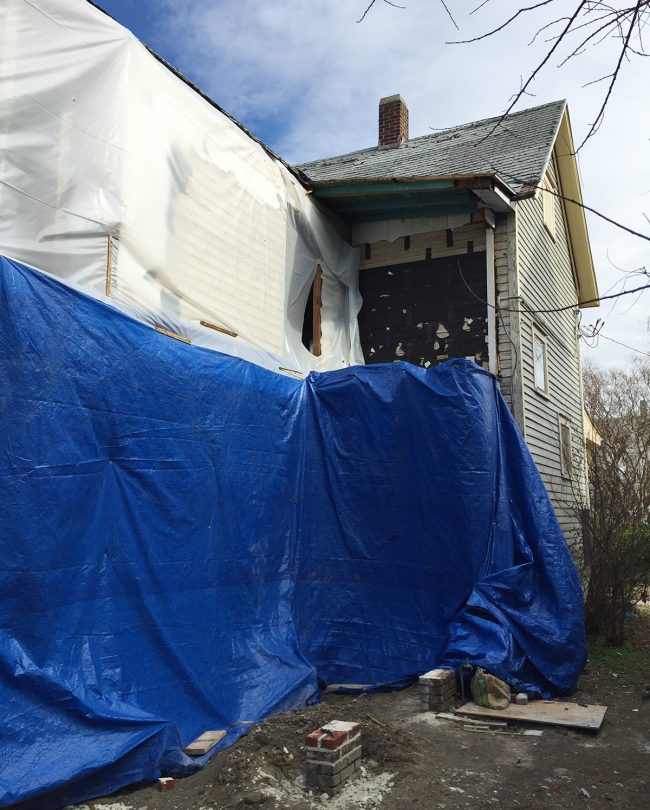
We still haven’t done most of the landscaping or hardscaping that we have planned for the side and backyard yet, but we could resist sharing one last angle. Remember how rotten this side of the house was??? This was a former porch that someone enclosed with interior wood floorboards instead of actual weather-proof siding (they had rotted so badly that you could stick your fist through the siding and into the house in a bunch of places). So yeah, it had nowhere to go but up.
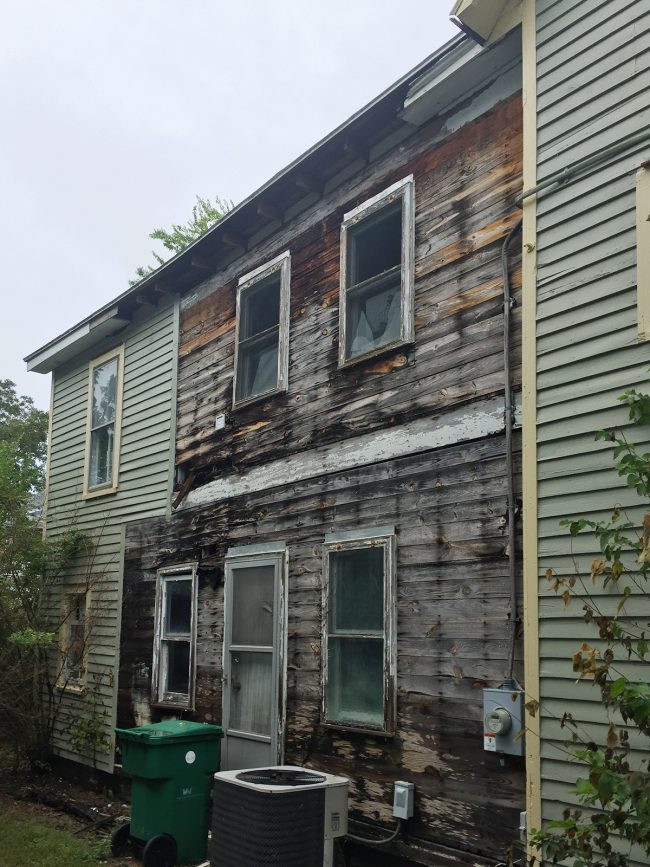
This was the side of the house that had to be completely torn off and rebuilt due to a sinking foundation and a ton of weather damage to the support beams. So at one point this whole section was completely missing! This is where the mudroom, pantry, bathrooms, and bunk room now are. So, for reference, that exposed wall on the second floor that’s all black is where the bunk beds now hang. Crazy!
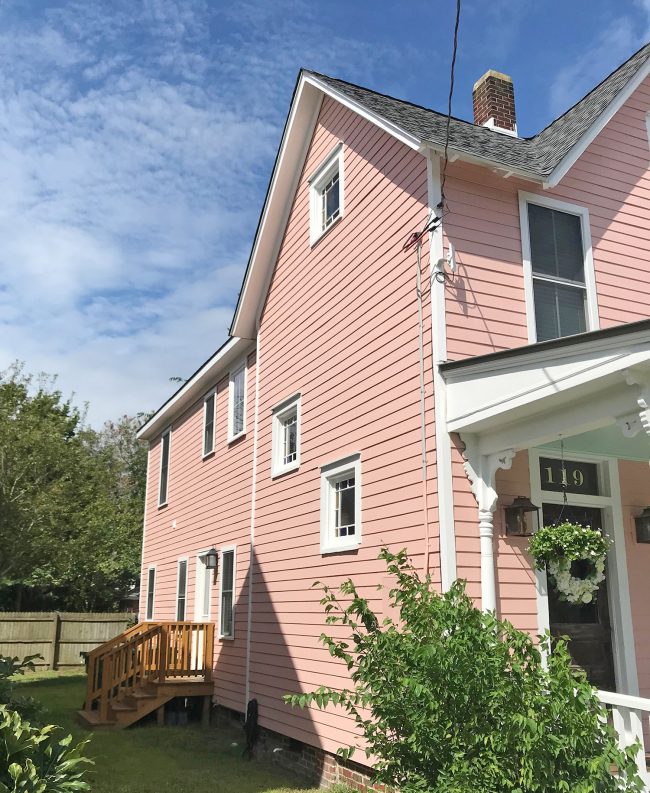
Now it’s looking more like this (minus that giant bush in the front that we learned is actually a tree that would grow taller than our house – so we had to get it outta there before it wrecked our freshly fixed foundation). We still have to landscape the entire side of the house and add a stone pathway to lead people back to the outdoor shower, but it’s a far cry from where we started.
The Entryway
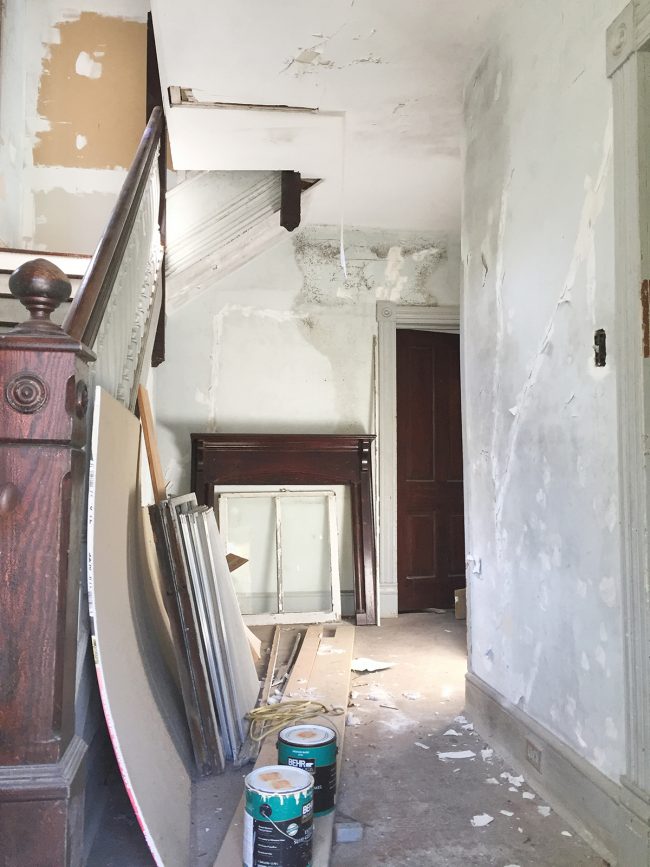
Despite the crumbling plaster, unfinished drywall, and water damage – this view into the foyer was immediately charming to us. That fireplace mantle was not original, it was just one of many items that the previous owner had collected over the years (there were also two old stoves, various rolls of paintable wallpaper, and even an old boat in the shed out back).
This is the entry now. It, like the rest of the house, got fresh drywall and paint, refinished floors, and a whole lot more. We were able to salvage enough of the home’s original trim to use it throughout the first floor – and the original color of it in this foyer (see it in that photo above around the doorway?) is what inspired us to use non-white trim throughout the downstairs. The color is Sherwin William’s Stone Isle. The walls in the entire house are painted Sherwin Willaim’s White Heron and the floors – OH THE FLOORS! They’re the original heart pine that we had refinished and clear sealed with water based sealer (extremely durable but it won’t yellow over time like poly). It’s so hard to believe they’re the same floors in some of these photos because they were looking so rough when we bought this house.
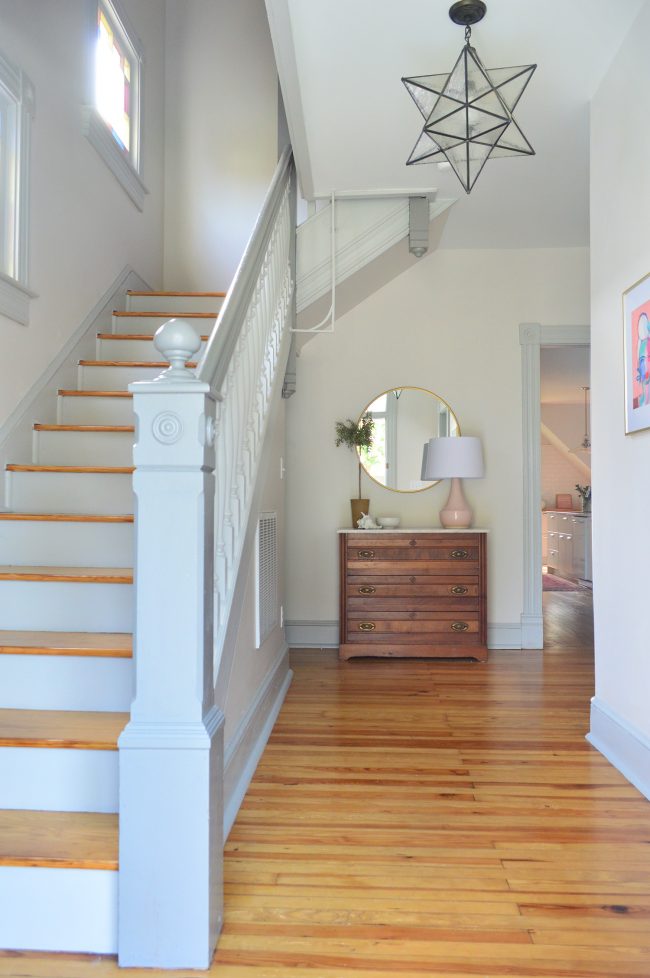
mirror | similar light | similar lamp | similar dresser
It’s worth noting that we attempted to keep the railing wood (but stain it to match the floors since it was much redder than they were), but it proved impossible since it’s not heart pine like the floors and steps are. So we painted it a slightly deeper gray color than the trim, which allows the floors to sing instead of competing with a different tone of wood all the way up the stairs.
The Kitchen, Dining Room, & Pantry
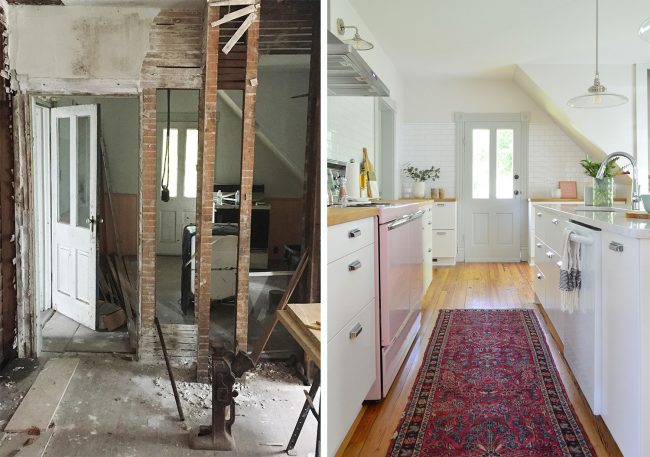
Through the foyer is the largest room of the house, which we turned into a kitchen/dining space. It was a giant mess when we first bought it, but have no fear, that beautiful original light fixture is the one we had rewired that now hangs in the pantry!
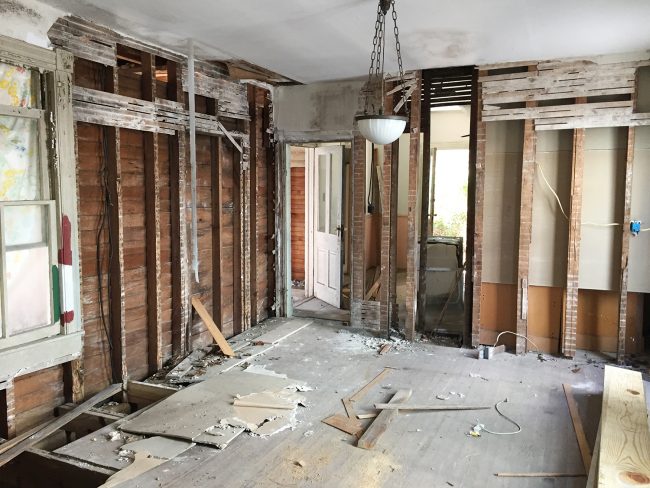
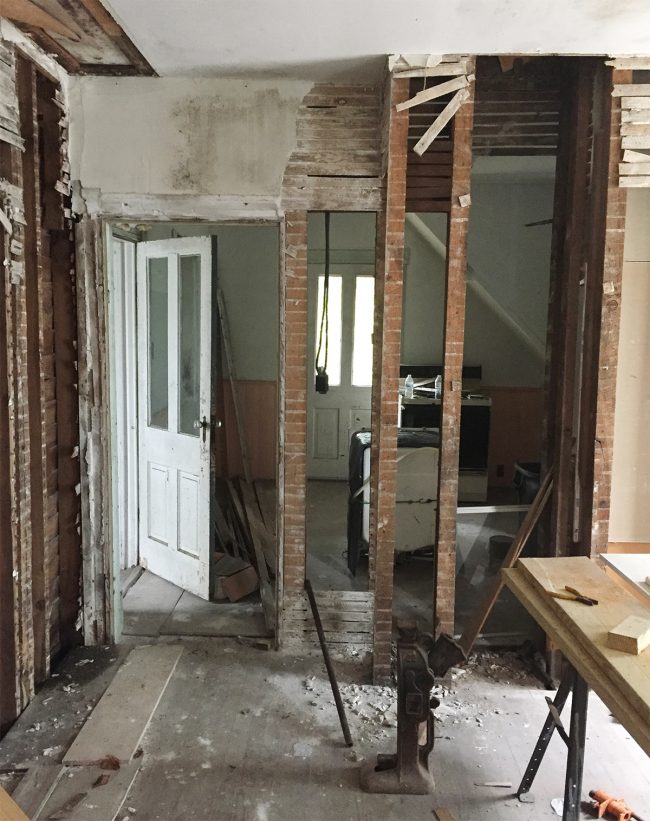
Before jumping to the after on this one, I’m actually going to take you through the progression of this angle, since it tells a nice story about the journey this house went through. Below is what it looked like during demo. The mess was cleared (mostly) but there was still a long way to go.
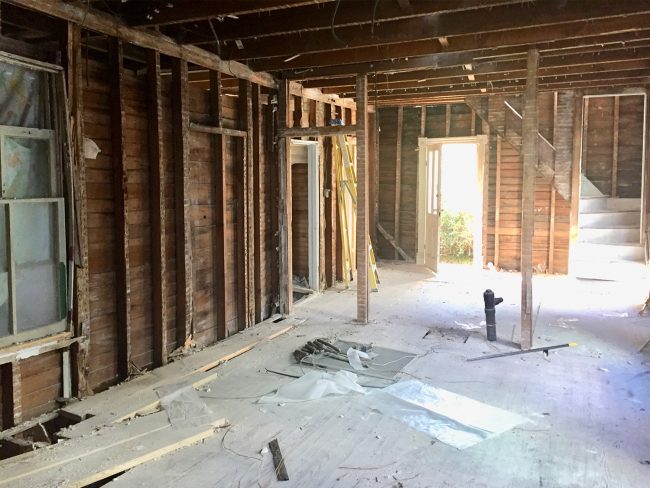
Then here it is being rebuilt. That area to the left that’s all new wood is the side that had to be completely torn down and rebuilt – and a lot of the ceiling joists in the kitchen had to be reinforced with new boards.
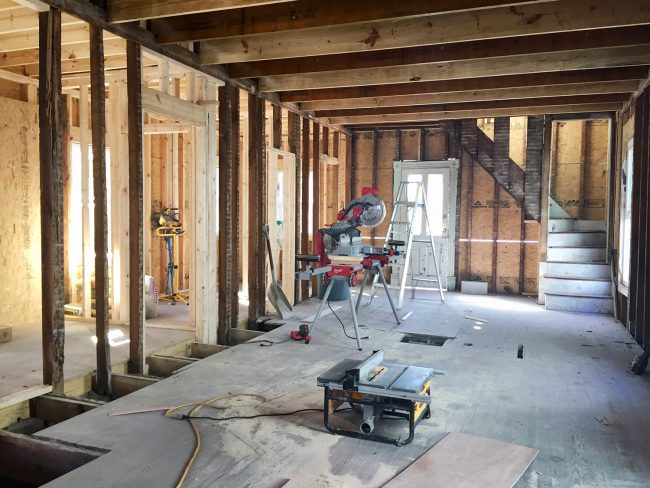
I won’t bore you with photos of all of the new plumbing and electrical that got added (we redid those systems as well as installing new HVAC throughout the house), so let’s jump to drywall. It’s starting to look like a house again.
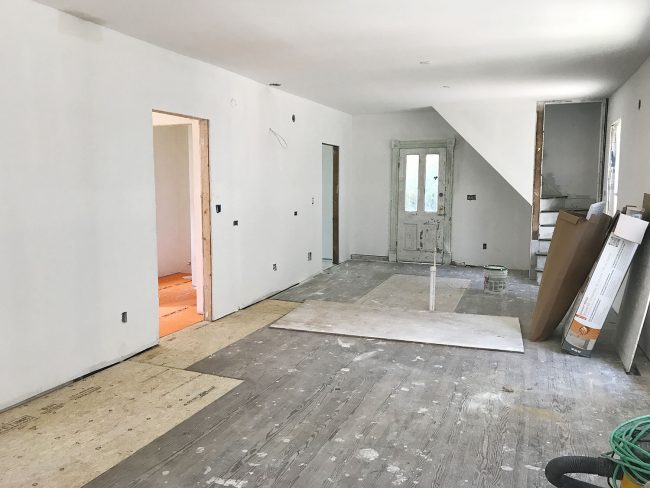
And now another big jump forward to present day. After some debate about the floor plan, we actually ended up with both the dining and the kitchen functions in relatively the same spot as they originally were. Let the record state that we love this downstairs layout so much that if we could blink our eyes and have our Richmond house laid out this way – complete with the back staircase – we would in a heartbeat. It’s not huge but it feels nice and open, and when we spend time downstairs we all feel close and connected but not cramped.
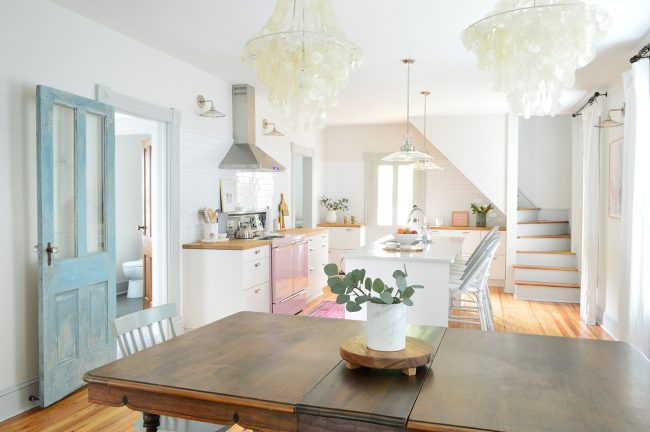
dining chair | chandeliers | sconces | pendants | barstools
Here’s the before photo again for comparison:
Here’s another view of this space. You can see the previous stove there next to the back door. And note that pink beadboard that runs along the back wall. We didn’t even register that it was there until way after we painted the house pink and it caught our eye in old photos from our initial walk-throughs. Sherry swears the house wanted to be pink all along and it was trying to send us signals (all of which we missed until after the fact).
Here’s that same view now. Even though it made floor planning a little more challenging, we were intent on keeping the placement of the original back door and that back staircase (some of our neighbors with similar houses don’t have them anymore) and we’re SO GLAD we did. They limited the useable wall space for the kitchen itself, but we ended up shifting that doorway on the left that you see above (which used to lead to the rotted side porch) to give us room for the wall that hosts the vintage pink stove now.
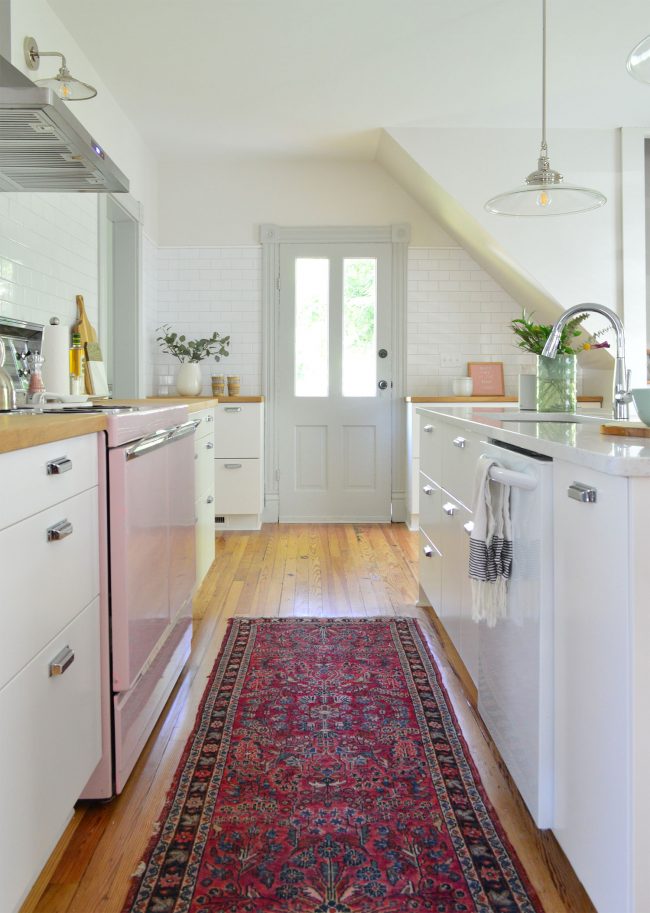
hood | cabinet pulls | similar runner | sconces | pendants | faucet | pink letterboard
It basically just got moved about 5′ further down the wall towards the dining area and it now leads to the laundry room/mudroom (which you enter through the house’s side door) as well as a full downstairs bathroom.
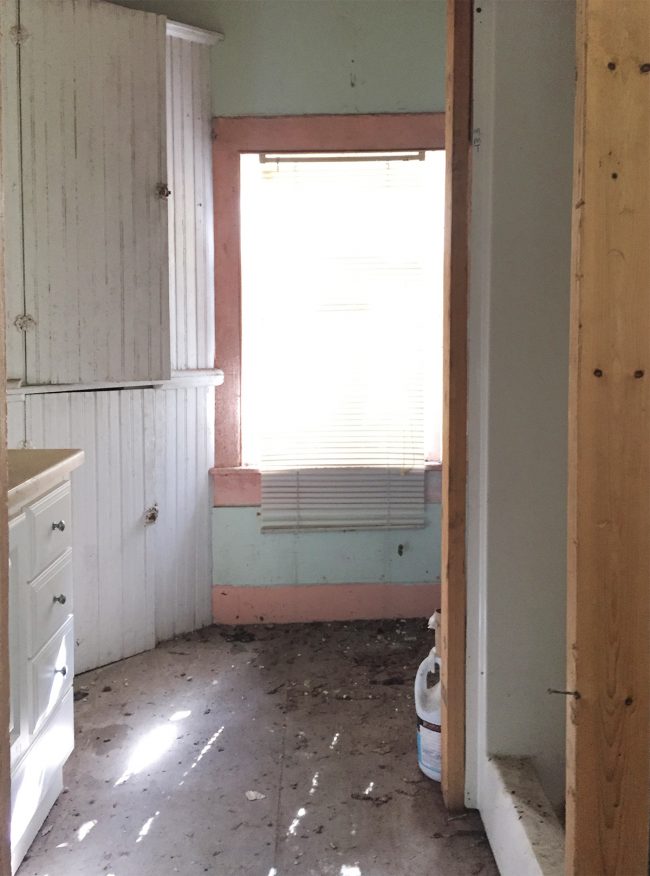
And that doorway that you see in the back left corner of the kitchen leads into our pantry, but that room used to be a full bathroom…. complete with pink trim. See it’s like this house wanted to be pink! There was a plastic shower stall between those exposed studs and a toilet tucked behind it.
You saw that the full bathroom downstairs shifted over by the mudroom, which freed up this space for another super functional area that took some trial-and-error to figure out: our walk-in pantry. We’ve got a full tutorial on building pantry shelves like these if you’re interested. Also, there’s the original light fixture that used to hang in the kitchen – we had it rewired so it’s safe.
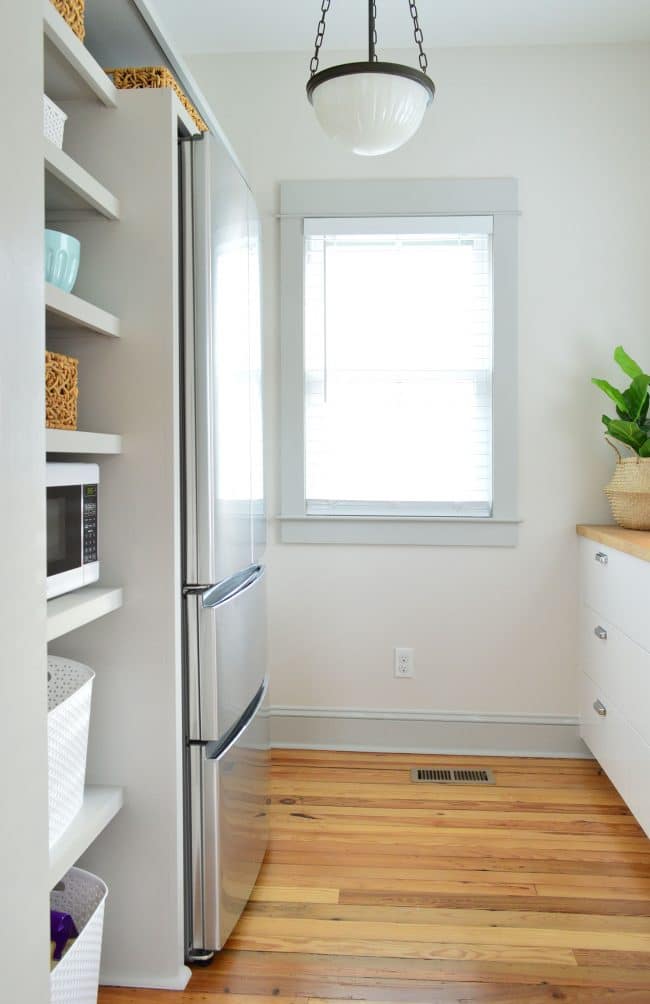
Sherry often declares the pantry to be her favorite room in the house (especially this time of year because she stands on the floor vent to heat her feet while snacking). As weird as it sounds to declare a pantry your favorite, I’m going to top that. My favorite = the back stairs… which I know isn’t really a room… but hear me out! This is what they looked like before:
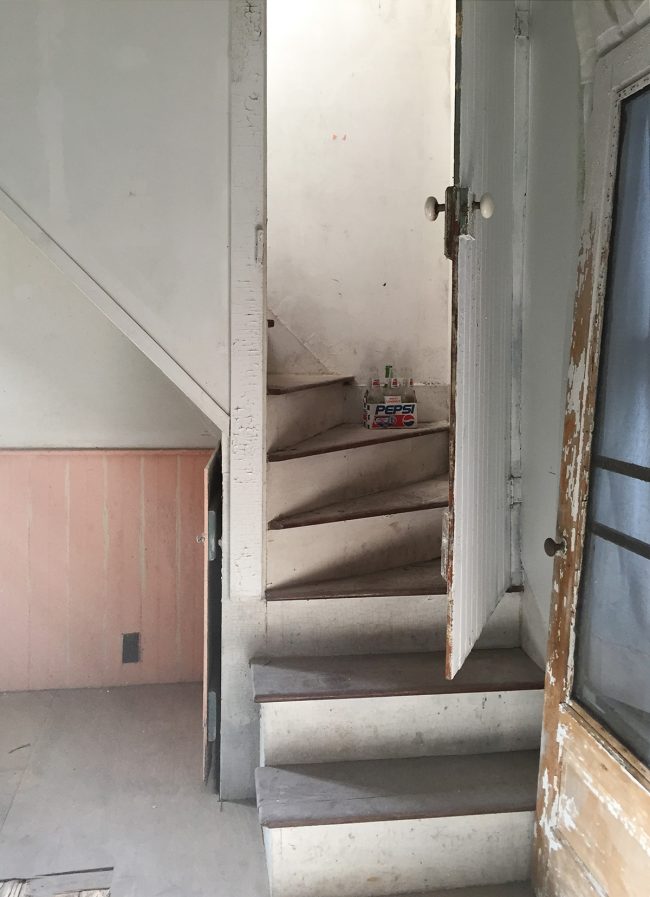
The old door on the third step up from the floor wasn’t to code anymore (you’d need a landing to stand on when opening a door) and we knew the stairs would look much better being open. So now we’ve got doors at the top of the stairs instead – which provide some nice privacy to anyone sleeping in that bedroom without blocking the view of the stairs from the kitchen.
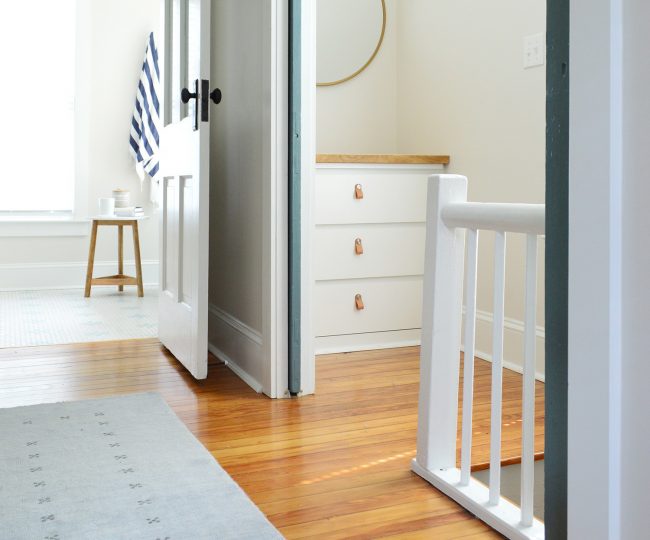
I know this is a downstairs tour, but this photo will help to explain what I mean. Now when you reach the top of the stairs there’s a landing with a built-in dresser and these pocket doors can be closed for privacy.
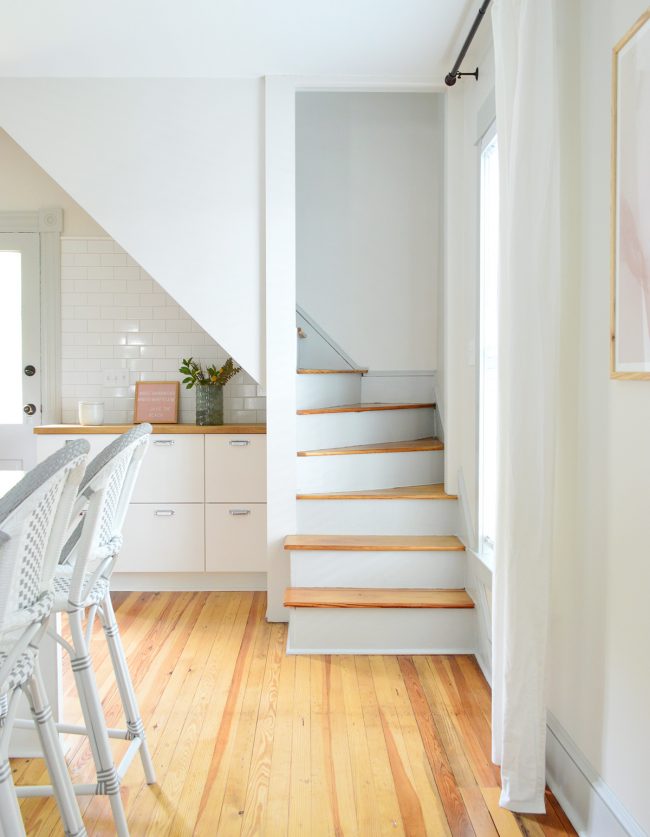
Ok, back to the downstairs tour. I love these old stairs because (1) they’re such a cool quirky original detail and (2) they’re crazy functional. We weren’t even sure if we’d use them much (we thought maybe just the kids would love sneaking up them) but they act kind of like a private entry into the upstairs master bedroom for us, and I’m now so spoiled that I wish we had them in our Richmond house too.
Here is a view from the stairs themselves. It’s a “before” angle you probably haven’t seen before (probably because it’s blurry – ha!) but it’s looking towards where the pink stove now sits. The main thing to notice here is the blue door….

…that’s the one we kept as is (well, after carefully removing the flaking paint and clear sealing it with Safecoat Acrylacq so any old lead paint is completely encapsulated – you can read how to deal with lead here – BE SAFE GUYS). So that’s the very same door, it just got rehung in the doorway to the mudroom. We leave it open 95% of the time, only closing it while laundry is running, because it adds a nice dose of age and color to the room. This photo is from before we finished the backsplash, hence no finish piece across the top, but you get the idea:

If you’re wondering in all of this: “Well, where was the kitchen before?” allow me to show it to you. Since we bought the house in the midst of some stage of demo, we’re not entirely sure where appliances went (remember there was no working water meter that led to this house when we bought it, so it’s very possible it hadn’t had a functional kitchen in decades), and these clearly aren’t the original cabinets from 1920, but they were cornered against this wall that the previous owner was in the process of taking down. Btw, we donated all of the cabinets and appliances to the local Habitat ReStore, which was an easy way to dispose of them without them going to waste. They even came and picked them up, so that’s an option if you’re renovating – just call to schedule a pickup!
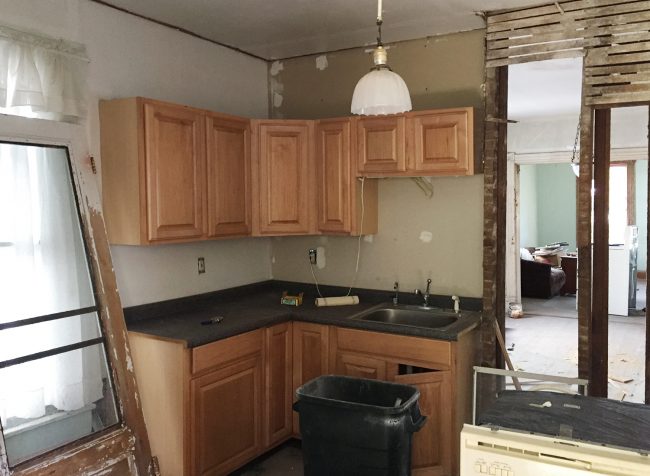
This is that same view now. I almost laughed out loud looking at this photo because it feels like the sink ended up in almost exactly the same spot.
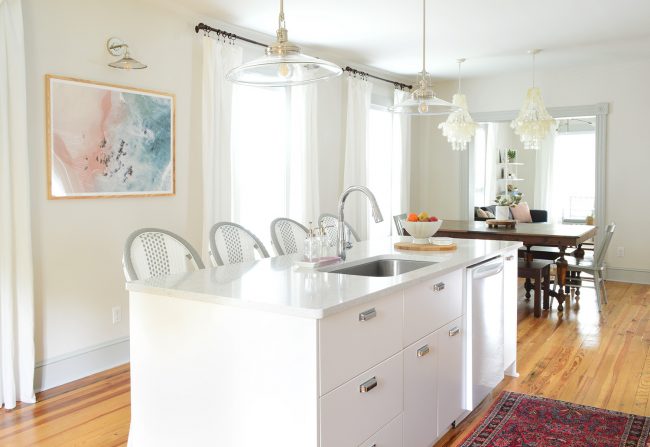
framed art | curtains | curtain rods | sconces | pendants | barstools | similar runner
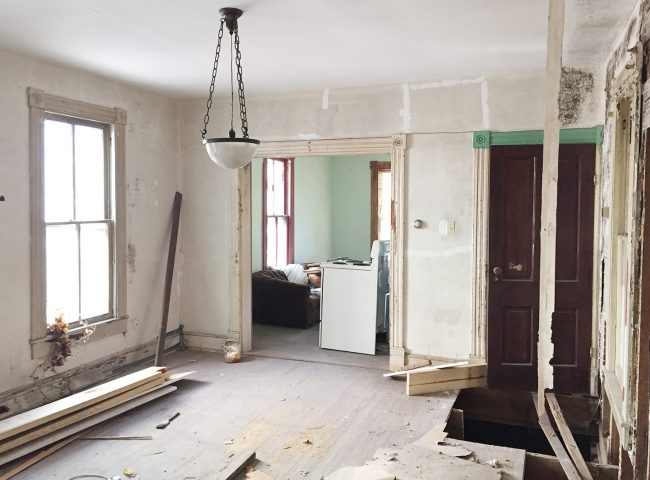
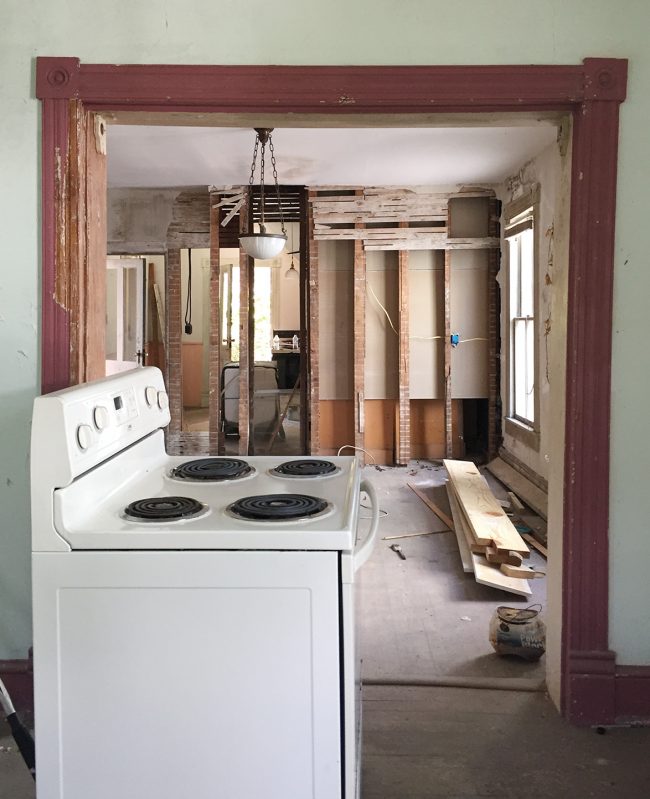
Stepping forward in this room, here’s another view of the previous dining area. There’s a lot to take in here – the giant hole in the floor (lower right), the vine creeping through the window (lower left), that hit of bright green trim (?!), and that second stove sitting in the living room.
But here we are today. At some point the secondhand table needs to be refinished (the leaf is a darker color than the rest of it) and we sometimes think we’d like to add a rug under the table (although we love the ease of cleaning the room just like this – so maybe not). Either way – still a big improvement over the before!
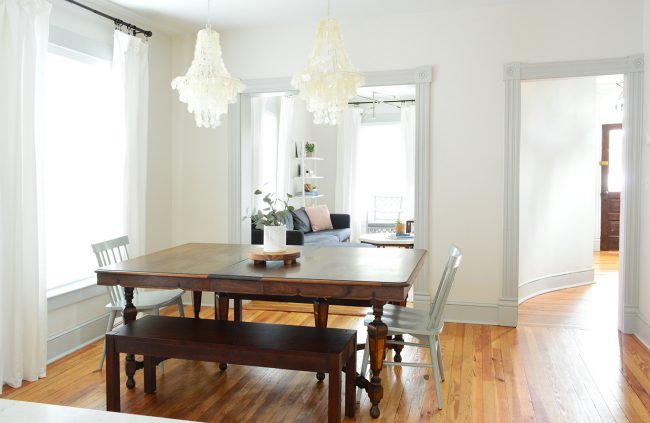
dining chairs | dining benches | similar chandeliers |curtains | curtain rods
The Living Room
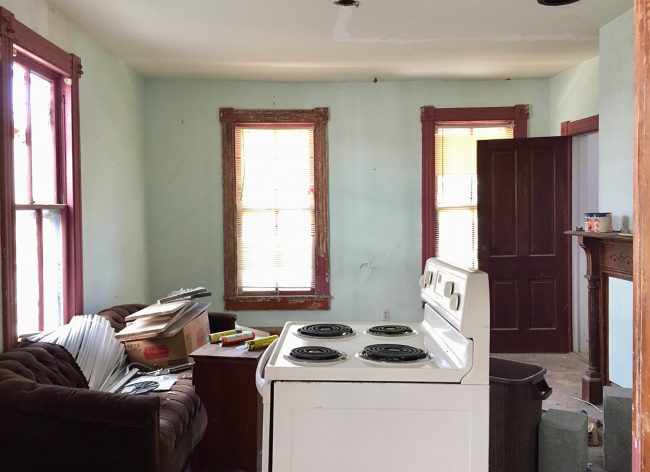
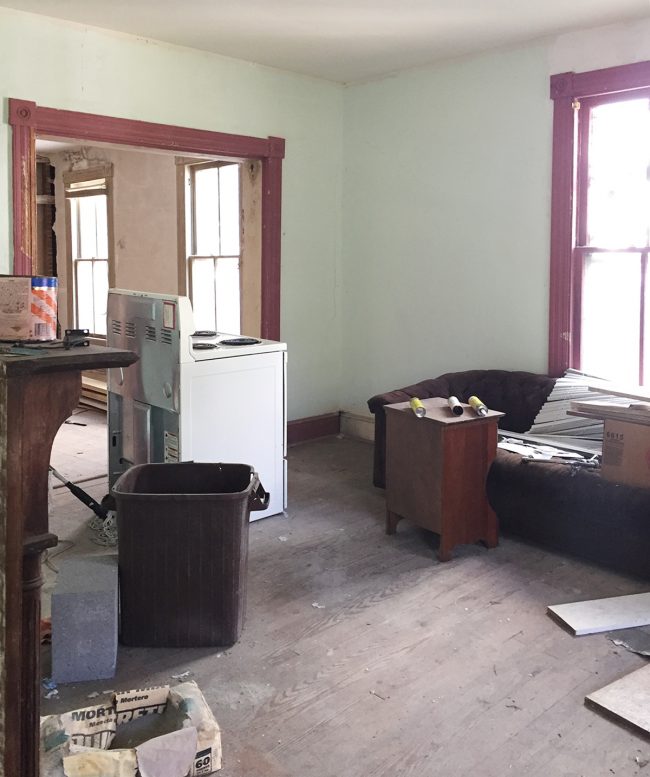
If you step forward through the dining room doorway, this is the view you see – well, or would’ve seen two years ago. Again, there’s a lot to take in: the always-damp couch, maroon trim, that second stove. Not pictured are the new rolls of paintable wallpaper piled in the corner. The funny thing is that by the time we bought the house, no amount of paintable wallpaper was gonna save it.
Here’s how that same angle is looking lately. The fireplace mantel in the before photo wasn’t original and actually didn’t even fit on the wall (it overhung the far corner by an inch or two). So we donated the mantle and exposed the cool old brick chimney that had been hiding behind the plaster.
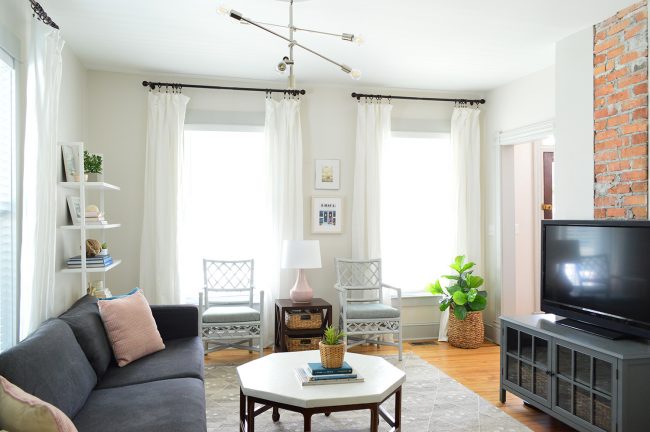
chandelier | rug | bookshelf | media cabinet | curtains | curtain rods
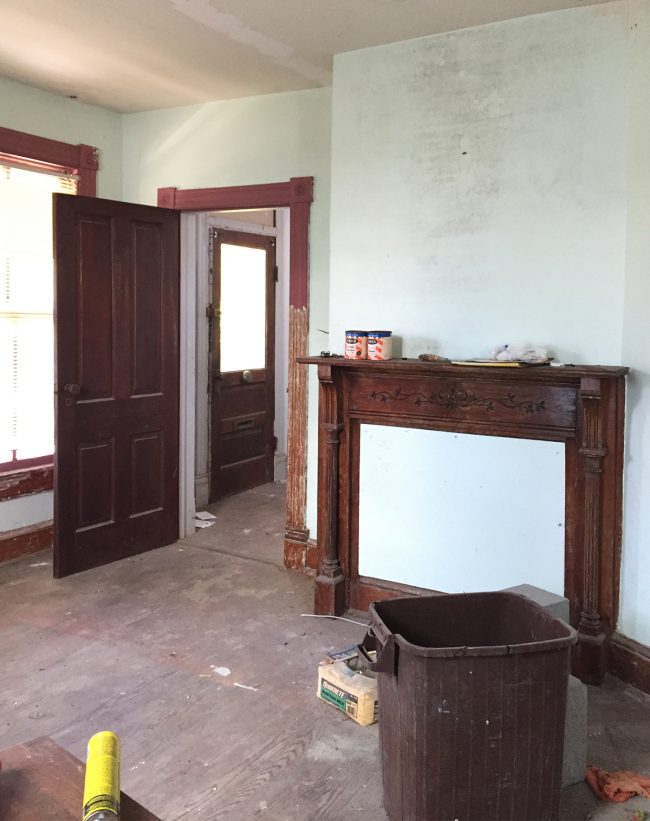
In this before photo you can sort of see better how the fireplace mantel didn’t fit on the wall (it was too wide on that left side). And while we didn’t rehang that door in that exact spot, this is one of the many original wood doors we had stripped down to the original pine, clear sealed, and then rehung throughout the house. I can’t say where this exact door ended up, but you’ll see one of them in a minute on the downstairs bathroom. All of the interior doors on the house are original (and all of the exterior ones except for the side door – which was a dinged up 50’s metal one – are too!).
Looking at this area today, you can better see how the exposed brick chimney adds a little bit of age and interest to the room. The warm tones of the brick also look great with the warm pine floors, which are balanced by the gray trim and some of the cooler colors we worked into the space, like the rug and the media cabinet.
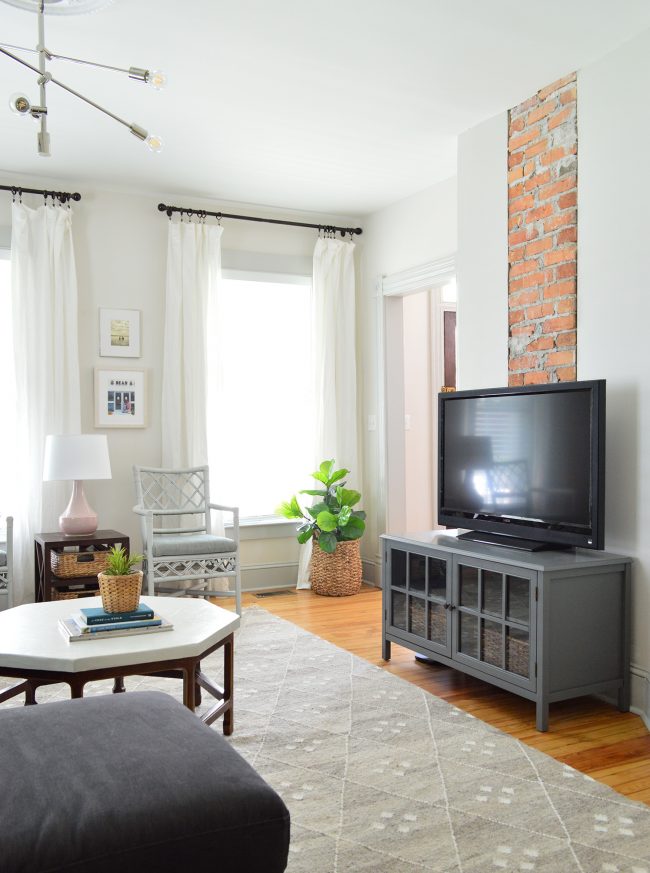
rug | media cabinet | curtains | curtain rods | similar chair | similar table
And if you thought a second stove in the living room was weird, I dug up this before photo from another angle that featured a doorless fridge in there too. And there’s all that paintable wallpaper I mentioned.
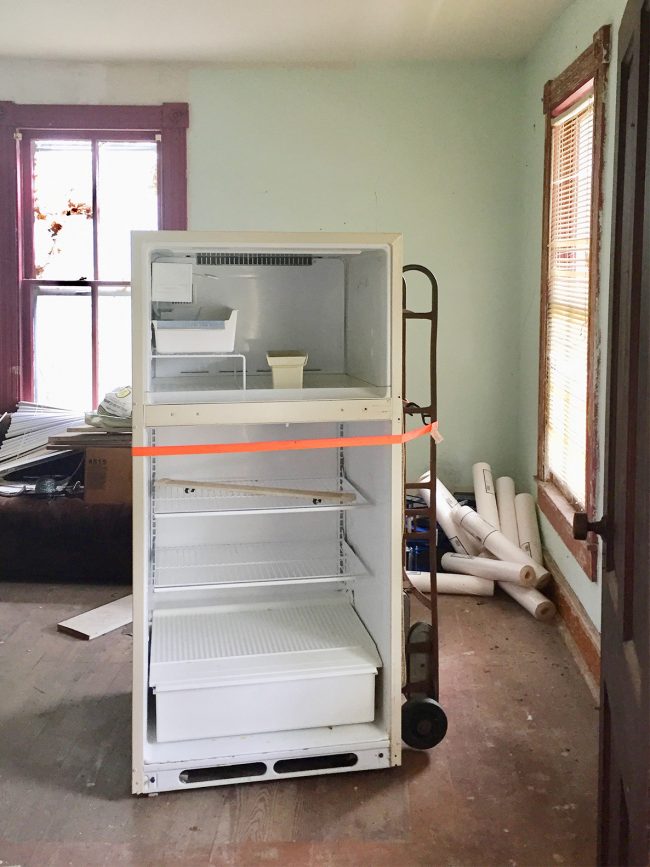
Here’s that same angle now – taken from standing in that doorway that used to have the wood door on it. This is one of the first views you see when you walk into the foyer (when you step into the house, this is immediately on your right) and we love how light and bright this room has become.
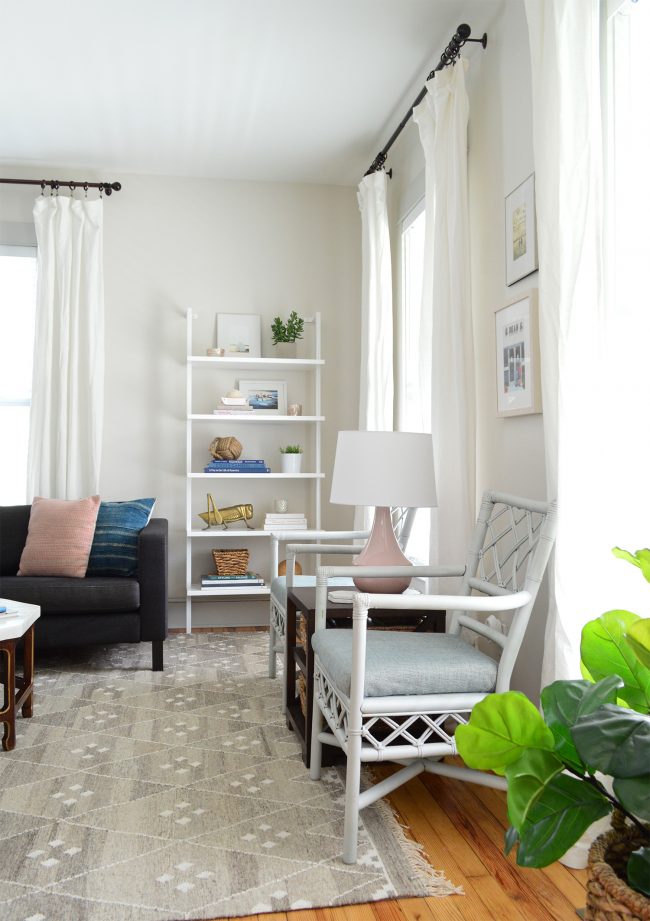
rug | bookshelf | curtains | curtain rods | similar chair | similar fig
Here’s a similar vantage point, just looking slightly back toward the dining room. This must’ve been after closing since the doorless fridge is gone (the seller took that out before we closed), but at least now you can see the open bag of concrete left on the floor… WHICH HAD COMPLETELY HARDENED. I guess I shouldn’t be mad at that though, since it made it less messy to clean up.
Here’s an after from a similar POV. This room actually didn’t have an overhead fixture before, so we had one wired and added a decorative medallion to balance out the modern chandelier. We’re planning to swap out our 7-year-old Ikea sectional for the Mellow sofa from our own furniture line whenever we bring a moving truck out for the duplex. Can’t wait!

chandelier | rug | bookshelf | curtains | curtain rods | similar table
Okay, one last angle of the stove, I mean, living room. This is standing in the living room looking back through into the dining and kitchen area.
And here’s a similar view now, which shows you how the dining table helps act as overflow seating for the living room, since someone can easily sit on the bench and face into the living room to chat. We love how flexible it is, and we’ve had big groups over for a casual meal and it works so well.
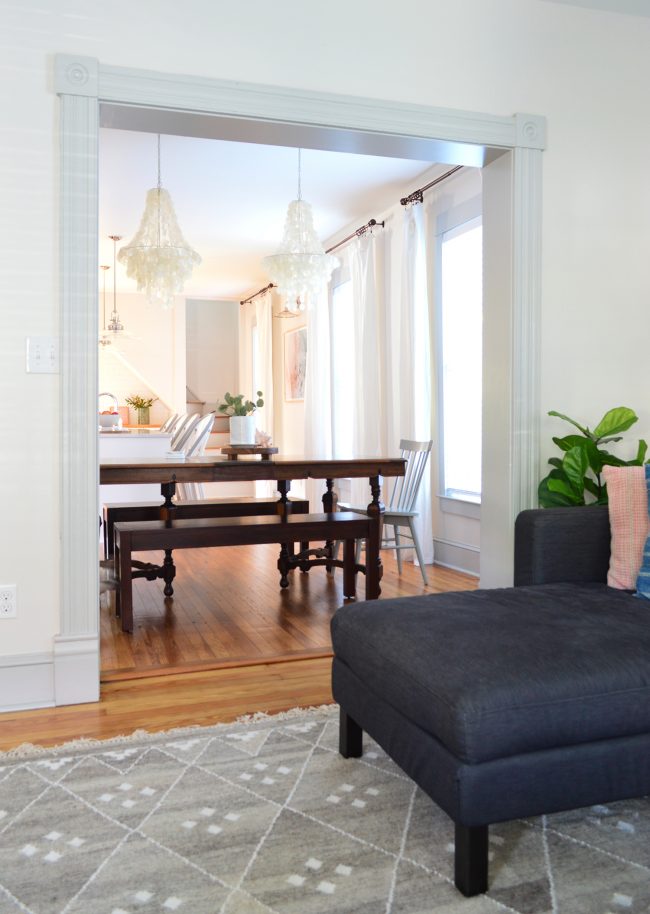
rug | dining chairs | dining benches | similar chandeliers
The Mudroom & Bathroom
The last two rooms to show you downstairs are some of our hardest working spaces in the house. The mudroom and the downstairs bathroom, (along with the pantry) were located in the section of the house that had to be completely torn off and rebuilt. Remember that rotted exterior side of the house that we showed you with fist-sized holes? Well, this is the room behind it (note the sunlight streaming in between the gaps in the “siding”).
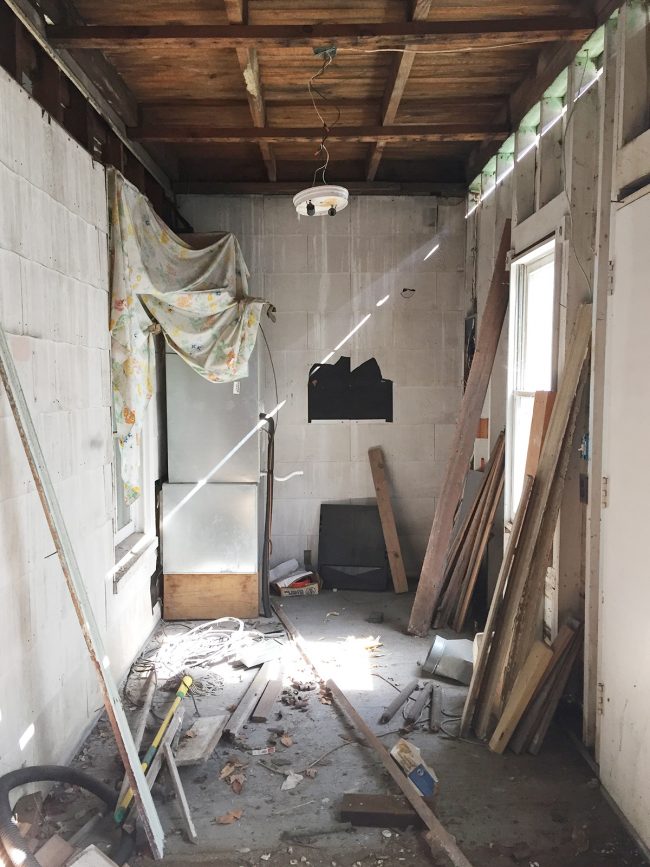
I can’t get quite far back enough to take that same angle now, because we added a wall to split the space into two rooms: the mudroom and the bathroom. But the wall seen above is now home to our laundry area and – since this is the room you enter from the side door – it acts as a mudroom of sorts too, complete with an oversized wall hook rail, a bench, and baskets for shoes. That tall Ikea cabinet also hides our tankless water heater while storing brooms, a vacuum, and other cleaning supplies.
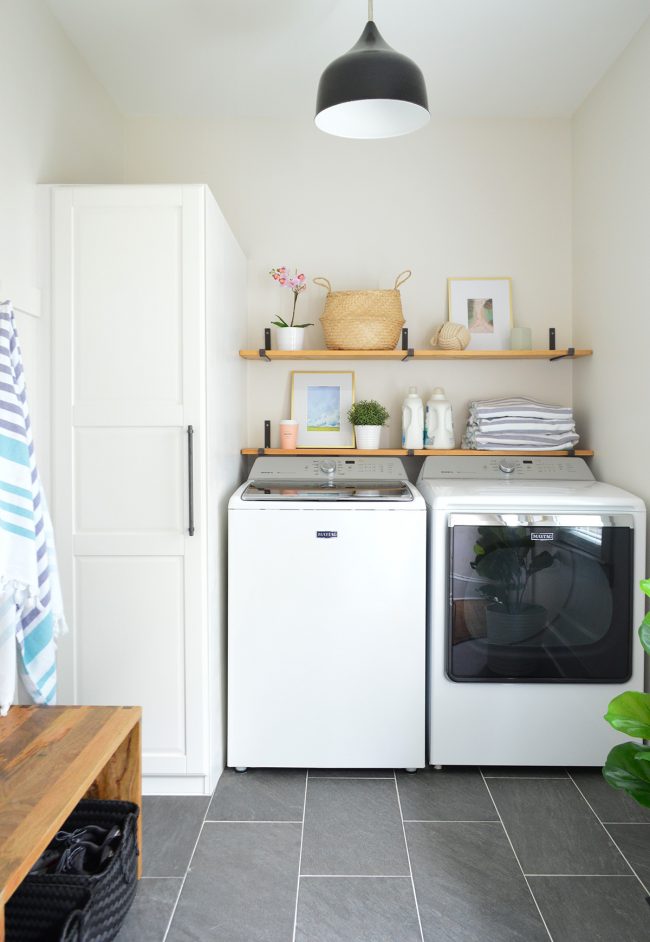
floor tile | washer | dryer | light | shelf brackets | towels | similar bench | shelf basket
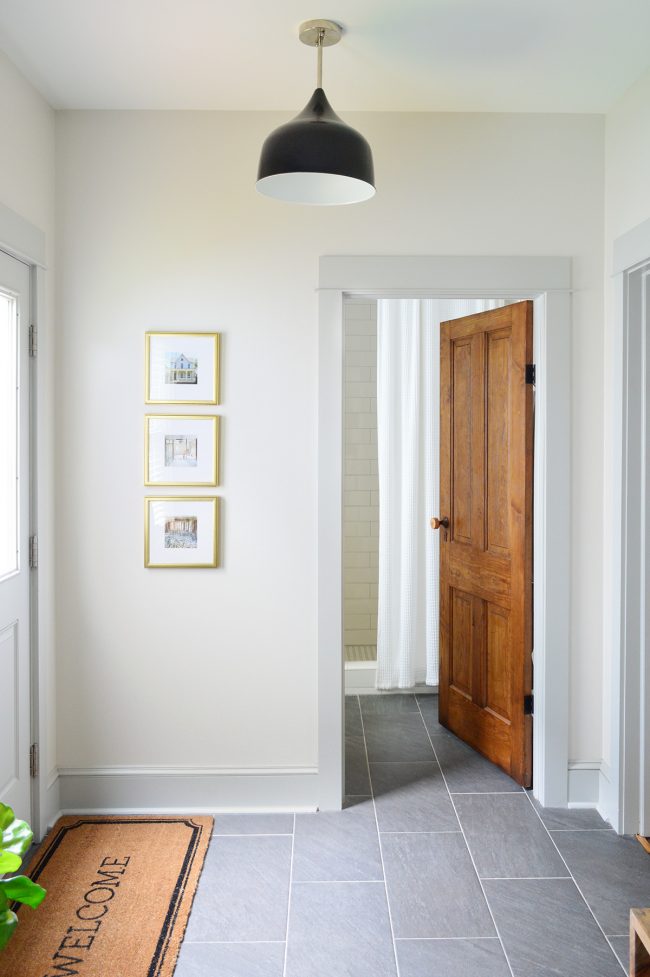
Turning around, this was the view of the other side of that room when we first bought it (standing where the washer & dryer are now). It’s a little hard to orient yourself since we changed the layout, but just note the location of the door and window on the left side.
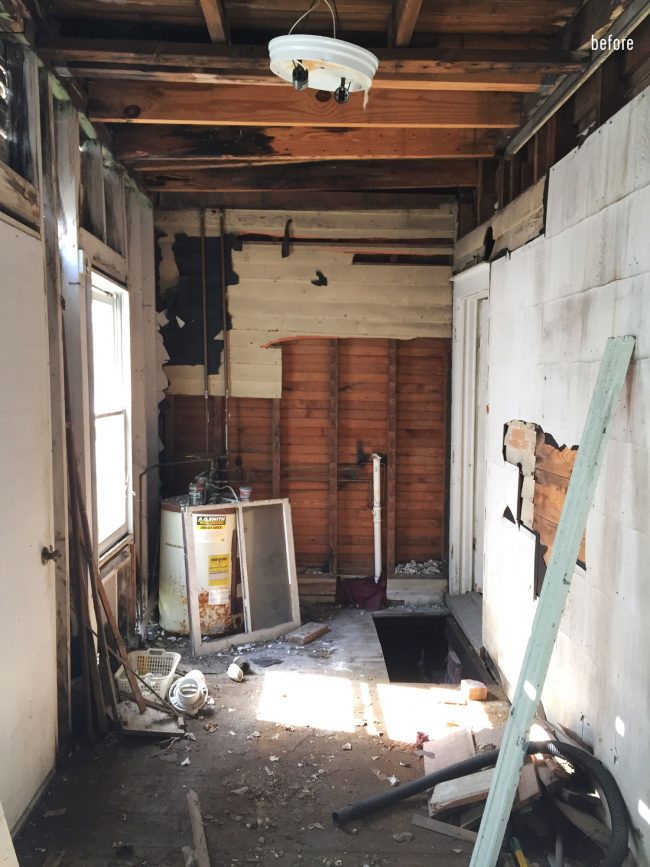
Now, looking from the washer and dryer today, the door and window stayed in the same spot – but there’s a wall between them to create the downstairs bathroom (which now has that window in it). And in this photo you can see one of the original wood doors after it was stripped and resealed. Plus, see that trio of photos? Those are “before” photos that we had framed so anyone who visits can appreciate how far this house has come.
Now I’ll show you the bathroom up close. I don’t really have comparable “before” photos because this didn’t exist as a separate room before, but in many ways it matches the layout of the original downstairs bathroom (which is now the pantry).

floor tile | shower wall tile | wall art | shower curtain | toilet | tp holder
And here’s the view of the other side of that wall, where you can see the vanity area. Just like the picture frames above the toilet, we chose a mirror with wood accents to pick up on the original wood doors. This one was actually a more recent swap (we had a larger rectangular one there before) and this suits the space much better.
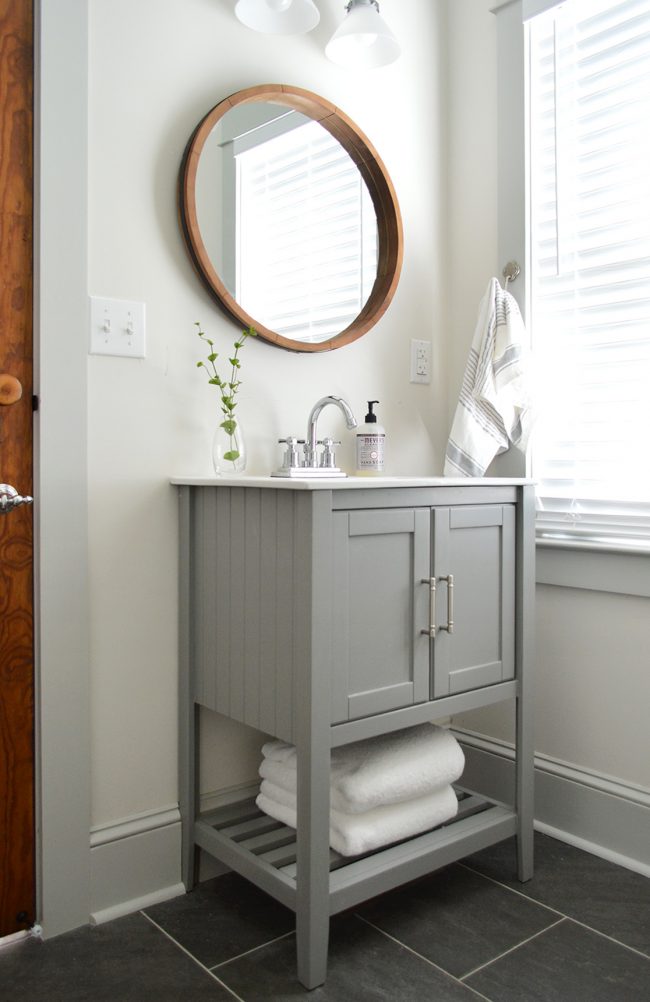
mirror | vanity | faucet | light | hand towel | floor tile
So now that you’ve seen the entire downstairs both before and after, I’m gonna end with a deep dark confession. We filmed a video tour of the beach house on the last weekend before it started to get overtaken with duplex materials (think tile piled up in the foyer and extra furniture and frames everywhere) and when we got home, the video was a fail. I won’t bore you with the details, but it was a focusing issue I couldn’t detect until we got it home and uploaded. So rather than subject you to it, we’re going to try to take a better one in a few weeks. So stay tuned for that AND the before and after photos of the upstairs!
PS: If there’s any source you missed you can probably find it (or something similar) on our Shop Our Beach House page. You can also browse all of our beach house posts and projects here.
*This post contains affiliate links*
The post Before & Afters Of Our Beach House: Downstairs appeared first on Young House Love.
Before & Afters Of Our Beach House: Downstairs published first on www.younghouselove.com
No comments:
Post a Comment